
Boating Basics Online is reader-supported. When you buy via our links, we may earn a commission at no cost to you. Learn more

How to Build a Cardboard Boat in 7 Easy And Simple Steps
Written by J. Harvey / Fact checked by S. Numbers
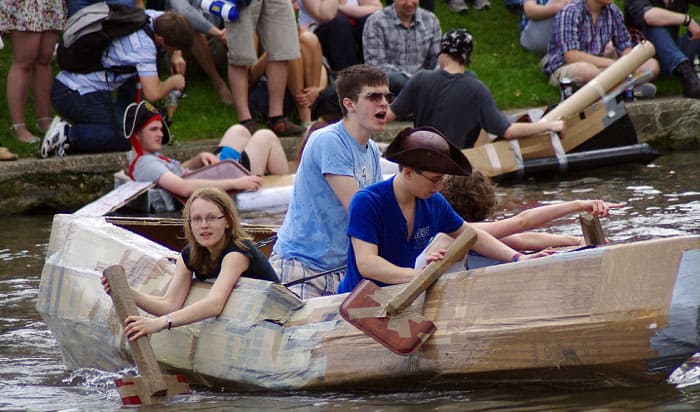
Building your own boat can be a daunting task if done without instructions. Yet, with the right tools and process, DIY cardboard boat building can offer a great experience. It is also a popular group event where people may race the cardboard boats they build themselves.
If you are wondering how to build a cardboard boat, read this short article to get you started. We will cover some cardboard boat ideas for a simple cardboard boat, including building a cardboard boat step by step.
Keep reading to learn more.
Table of Contents
What You’ll Need
Step 1: prepare and inspect your materials., step 2: build a small scale model to test your design, step 3: measure and cut your cardboard into larger pieces, step 4: apply the smaller cuts and folds, step 5: build the boat structure, step 6: seal the boat, step 7: make the finishing touches, 1. use factory cut ends when putting pieces together, 2. prioritize folds over cuts, 3. practice cuts and folds, 4. make use of accurate measurements, 5. use a table.
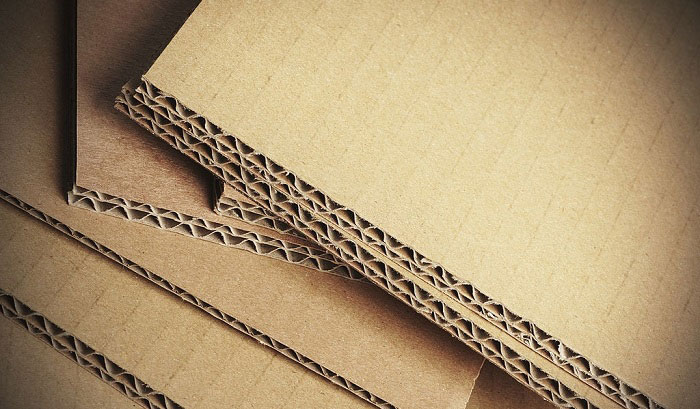
For this guide, we will only use materials that adhere to standard cardboard boat regatta rules to use cardboard only.
- Cardboard pieces
- Razor or knife
- Measuring tape
- Glue applicator
- Manila folder
Preparation steps:
- Choose a boat design
There are many sources for choosing simple yet functional boat designs.
It is better to choose a flat hull design instead of a v-hull. Flat-bottom boats have always been more stable compared to v-shaped hulls, and this is especially true for calm waters.
- Determine the boat’s measurements
If you’re using a boat design, you probably won’t need to determine the boat’s dimensions yourself.
The first step is to count the number of passengers and account for their total weight. Consider a few things for the boat’s length; boats shorter than 10 feet are more difficult to steer, but the longer the boat, the harder it is to steer.
For the boat’s height, a number between 10 and 18 inches is a good range that allows enough arm room and clearance for paddling. Standard widths are 20 to 32 inches wide. After determining the dimensions of your boat, it’s time to check its buoyancy to make sure that it doesn’t sink.
- Calculate buoyancy
First, calculate the boat’s volume. Length x Width x Height in feet should give you the boat’s volume in cubic feet. Let’s use a boat sample that is 10 feet long, 24 inches wide, and 18 inches deep. Convert inches to feet.
10 x 2 x 1.5 = 30
With the figure 30 cubic feet, we will determine the positive buoyancy we want. This refers to the waterline and how much of the boat we want sticking out of the water. Having half of the boat out of water is 50 percent so multiply 30 cubic feet by 50%. The more weight on the boat, the more the boat submerges.
30 x 0.5 = 15
Now we take 15 and multiply it by 62.4, this is the weight of 1 cubic foot of water.
15 x 62.4 = 936
936 is the weight needed for half the boat to submerge in the water. Deduct the boat’s total weight, and you get the passenger weight capacity of your boat. If your boat weighs 50 lbs, then the boat’s weight capacity will be 886 lbs.
Steps to Build a Boat
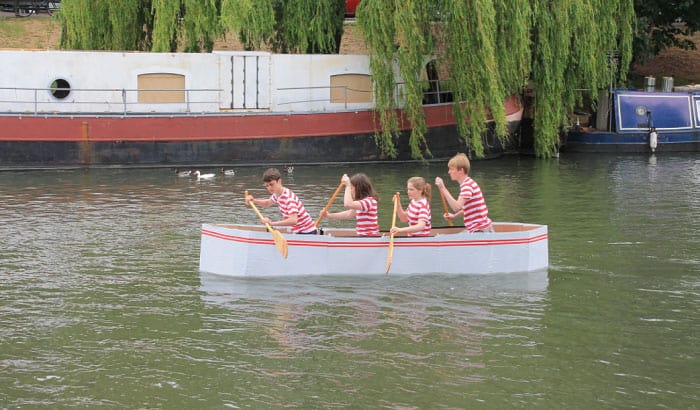
This step-by-step instruction will be a generalized guide for building a DIY cardboard boat. Follow it in conjunction with a detailed boat design of your choosing.
Gather the materials you’ll need and make sure you have enough. It is important to refer to your design to ascertain that you have the proper number of cardboard sheets on hand for cardboard. Some boat designs use double layers of cardboard, so don’t forget to account for that.
It is very important to inspect your materials properly, especially cardboard. Ensure that your cardboard pieces are in good condition and have not been folded or stepped on. If you are using boxes for appliances or electronics, try to use pieces with as few folds as possible.
Before building your cardboard boat, it’s a good idea to make a small cardboard boat to test the design first.
Scale down the measurements of your boat and build a small boat using the same design with a manila folder. Set it on the water with a few rocks to simulate having passengers aboard.
After checking to see that it floats properly, begin building the full-sized boat.
Mark your cardboard pieces as necessary. Mark what to cut and what to fold to avoid confusion, and be sure to mark everything down right away. You can also use reference paper or a diagram sheet to trace over and cut the cardboard instead of marking it.
After making the necessary cuts, attach the bigger pieces together using tape, then reinforce them with other materials such as glue or what materials are allowed.
More complex cardboard boat designs would make use of smaller cuts and folds, usually for inserts that help reinforce the structure of the cardboard boat. Try to keep the number of small cardboard pieces to a minimum; make use of smaller folds and flaps instead. By keeping small pieces attached to a large cardboard piece, the entire structure of the cardboard boat will have better integrity overall.
Assemble the hull based on your chosen design. Use tape and glue to assemble the pieces but use clamps to hold them together during assembly.
You can use screws to hold pieces together; just make sure to remove them later and patch up the holes.
Some designs make use of a boat skeleton to support the entire boat. Still, in simple designs, pieces of cardboard placed horizontally across the boat serve as support for the boat structure and create compartments. These compartments divide the spaces and also help keep the boat afloat.
Some designs have more compartments to isolate leaks better. Don’t expect your boat to be leakproof, plan for the leaks instead. Finish with the bow and transom.
Now it’s time to seal gaps in the boat. This is where you’ll be using a lot of duct tape to seal any gaps or spaces. You can use sealant if allowed, but duct tape is usually the best option available.
Make sure to seal the edges of the cardboard since water will get into them regardless of whether or not these edges are submerged in water. Pay close attention to the bow, even if your boat design has one that is raised.
If your boat has a top layer, seal it and then attach it to the boat. If you don’t have a top layer, try to reinforce the seal of the top side and the bottom.
You can finish up by painting the boat but be careful with the paint and only use one part paint. Otherwise, your boat may not dry. The safer choice would be to use varnish though that limits the decorative aspect of your boat.
Finish by decorating your cardboard boat, but remember to consider the additional weight. If you need to make the paddles yourself, don’t forget to seal the edges for these.
Tips for Building Cardboard Boats
If you are using good-quality cardboard sheets for your boat, the cuts on those pieces of cardboard will probably be precise cuts. It helps keep track of which edges are factory cut ends when attaching cardboard pieces. The precise cuts will mean no gaps or spaces between the cardboard, contributing to the strength of the joined cardboard piece.
Having fewer pieces of cardboard will make the cardboard boat stronger and more durable. Minimize the number of cardboard pieces by using folds instead of cutting away pieces of cardboard whenever possible.
Before folding the cardboard, score one side using the blunt end of a knife or razor. Fold along the scoring with the scorched face inside.
Make use of scraps or smaller pieces of cardboard for practice to understand better how to cut and fold properly. Cuts need to be clean, while folds need to have the right pressure applied for both scoring and folding.
Try to be as accurate as you can with the cardboard measurements, and keep the cuts and folds as precise and clean as possible. Too many measurement errors will make it more challenging to assemble the boat and may even impact performance. While you don’t need to be an expert, make measurements with care.
The chances are high that this cardboard boat building activity will be done outdoors, but it’s a good idea to use a table, even a makeshift one. Everything from making accurate measurements to proper cuts will benefit from having a proper workspace.
You can make use of a sawhorse, a 2 x 4, and plywood to make a simple work table. There are other makeshift options as well. Whatever you choose, having a table will improve your work efficiency and help you better make a cardboard boat.
Now you have a better idea to build a cardboard boat step by step. While this is not a complete standalone guide, it should help you get a feel for what you need for a better cardboard boat construction.
If you know anyone else wondering how to build a cardboard boat, please share this with them as well. Don’t forget to leave your comments and suggestions below, as we’d love to hear from you.
Read more : Tips to build a plywood boat or your own pontoon boat .

“My intention from the first day establishing Boating Basics Online is to provide as much help as possible for boaters who want to experience a first safe and convenient trip. So feel free to join us and share your beautiful journeys to the sea!”
- PRO Courses Guides New Tech Help Pro Expert Videos About wikiHow Pro Upgrade Sign In
- EDIT Edit this Article
- EXPLORE Tech Help Pro About Us Random Article Quizzes Request a New Article Community Dashboard This Or That Game Popular Categories Arts and Entertainment Artwork Books Movies Computers and Electronics Computers Phone Skills Technology Hacks Health Men's Health Mental Health Women's Health Relationships Dating Love Relationship Issues Hobbies and Crafts Crafts Drawing Games Education & Communication Communication Skills Personal Development Studying Personal Care and Style Fashion Hair Care Personal Hygiene Youth Personal Care School Stuff Dating All Categories Arts and Entertainment Finance and Business Home and Garden Relationship Quizzes Cars & Other Vehicles Food and Entertaining Personal Care and Style Sports and Fitness Computers and Electronics Health Pets and Animals Travel Education & Communication Hobbies and Crafts Philosophy and Religion Work World Family Life Holidays and Traditions Relationships Youth
- Browse Articles
- Learn Something New
- Quizzes Hot
- This Or That Game New
- Train Your Brain
- Explore More
- Support wikiHow
- About wikiHow
- Log in / Sign up
- Hobbies and Crafts
- Paper Craft
How to Make a Cardboard Ship
Last Updated: December 14, 2023 Tested
This article was co-authored by wikiHow Staff . Our trained team of editors and researchers validate articles for accuracy and comprehensiveness. wikiHow's Content Management Team carefully monitors the work from our editorial staff to ensure that each article is backed by trusted research and meets our high quality standards. The wikiHow Video Team also followed the article's instructions and verified that they work. This article has been viewed 265,594 times. Learn more...
A cardboard ship is a neat decoration for your home, classroom, or office. Add some imagination, and with a cardboard ship you can leave the landlubber life behind. Aspiring sailors can make a Spanish sail ship with cardboard relatively easily and inexpensively. If you have all the supplies on hand, you could be setting sail in roughly an hour.
Cutting the Cardboard Hull
- Smaller ships can be made by halving the suggested measurements, and larger ships can be made similarly by doubling.
- The bottom of your boat should not be rounded but flat. Round hulled boats will be difficult to stand upright. Only the front and back of the boat’s hull should curve.
- When finished with this cut, you should have two strips that curve in the same direction at both ends.
- You don’t have to cut much off the tip. About 1 inch (2.5 cm) should be sufficient.
Gluing the Hull and Masts
- Due to the curve of the hull, you’ll need to bend the bottom strip so it follows the arc of sides.
- Always take care when using a hot glue gun. The tip of the gun and the glue itself will be quite hot and can cause burns.
- If your scissors don’t seem to be cutting through the skewers very well, try using a pair of shears or snips/sidecutters.
- For an even mast placement, measure and mark the mid-point of the ship for the mainmast. Add one additional mark 2 inches (5.1 cm) from that mark towards both ends of the ship for the other fore and aft masts.
- Inserting the skewers into the bottom of the boat should keep the masts standing up. If the masts feel loose, you can improve stability with a little hot glue or tape.
- The front of a boat is called the “prow” and the rear is called the “stern.”
- If the skewers at the prow and stern of your boat feel loose, stabilize them with a little glue or tape.
Finishing the Ship
- PVA glue is the same as the general purpose white glue used in children’s crafts.
- If you don’t mind your ship looking a little rough around the edges, feel free to skip this step.
- When you don’t have tissue paper, use single-ply paper towel as a substitute.
- Black is the classic color of pirate ships. Merchant ships could be painted a rich brown. You could even paint your ship gold, like Peter Pan's fairy ship.
- Paint can be messy. Lay down a surface cover, like newspaper or a drop cloth, to prevent the spread of paint to your work surface.
- Wear old clothing when painting or put on a smock so you don't accidentally stain your clothes while making your ship.
- The sails are another great place to add a personal design. When the triangles are cut, use some markers to add designs like anchors, clouds, or a squid.
- Cut out a square of cardboard and paint your own design on it. A simple painted skull-and-crossbones hot glued to the front of your ship will give your enemies the chills.
- Simple rigging only needs to be glued to the sides of the ship. However, rigging can be as simple or complex as you desire.
- ↑ https://www.redtedart.com/diy-cardboard-pirate-boat/
- ↑ http://www.ikatbag.com/2010/01/narnia-and-north.html
Community Q&A
- Handle craft tools, like scissors and hot glue guns, with care. Thanks Helpful 12 Not Helpful 3
Things You'll Need
- Pencil (or pen)
- Hot glue gun (and glue)
- Wooden skewers
- Shallow bowl or dish
- Tissue paper (or single-ply paper towel)
You Might Also Like

About This Article

To make a cardboard ship, start by cutting 3 same-sized rectangular strips of cardboard. Next, draw the curve of the boat’s hull on 1 of the strips, arcing from 1 corner to the opposite side. Then, cut curves in both sides of the other 2 strips, which will be the sides of the boat. Afterwards, bend the bottom strip so it follows the arc of the side pieces, then glue the pieces together to form the frame. Once the boat is glued together, make 3 masts out of wooden skewers. To learn how to paint and decorate your ship, keep reading! Did this summary help you? Yes No
- Send fan mail to authors
Reader Success Stories
May 17, 2017
Did this article help you?
Featured Articles

Trending Articles

Watch Articles

- Terms of Use
- Privacy Policy
- Do Not Sell or Share My Info
- Not Selling Info
wikiHow Tech Help Pro:
Level up your tech skills and stay ahead of the curve
5 ways to build an unsinkable cardboard boat
The Kirksville Parks and Recreation Department will be putting on its third annual cardboard boat race April 27. At the event, sailors will show off their homemade crafts by taking to the sea — or at least, the waters of the city’s indoor pool — to see whose designs can stay afloat.
The boat race will be held at noon at the Kirksville Aquatic Center. Participants will compete to see who can propel their boat through a lap in the pool the most quickly, and without sinking.
According to Assistant Parks and Recreation Director Robin Harden, the point of the event isn’t so much to compete as to have fun.
“Our goal is that everyone comes out and has a great time,” Harden said.
But just because the event doesn’t have a competitive spirit doesn’t mean you can’t get competitive. With a little research, you can build a cardboard craft that’s suited to keep you floating while your competition sinks. In that spirit, there are a few steps you can follow to build an impressive craft.
Choose a design
Before you begin constructing your cardboard boat, you’ll need to decide what you want it to look like. Keep in mind that number of people you’ll want your boat to support (the cardboard boat race allows teams of two to four people). Make sure your boat isn’t too large to get it through the door of wherever you’re building it, or the Aquatic Center.
Popular designs for cardboard boats include boats based on canoes, kayaks and sailboats; design templates for more elaborate boats imitating the structures of cruise ships and viking longboats can be found online. Another popular design is simply using a large, square cardboard box, by choosing something a little more elaborate, like a boat with a V-shaped hull, can help your vessel move more smoothly through the water.
When using cardboard as a construction material, a flat bottom is the best design to prevent tipping over. A wider boat is also more stable than a long, narrow one.
Collect the right materials
The only materials allowed in the construction of your boat are cardboard, duct tape, adhesive and water-based paint. Corrugated cardboard may be used, but it cannot have any wax, resin or vinyl coating. Decorations can be made of any material, but should not help the boat stay afloat or keep its structure together.
Of course, to construct your boat, you’ll need large cardboard boxes or sheets of cardboard. Old appliance boxes are a great basis for your construction — ask local stores or recycling centers if you can use the boxes they have available.
Other things you’ll need are tape to hold your vessel together(duct tape is sturdy, but hard to paint, while masking tape is easier to paint but less watertight) and waterproof glue (carpenter’s wood glue is frequently recommended). You’ll need to choose a type of paint that is water-based but also waterproof. House paint is a good choice; you can also use a sealant if you want to make sure your paint doesn’t smudge. Remember to paint the inside of your boat as well as the outside to help protect the craft from splashing water.
Calculate the size of the boat
Sure, any boat can sink — just ask the passengers on the Titanic. But there is a good way to give yourself a better-than-average chance of staying afloat.
In a guide to building a sturdy cardboard boat, the website Instructables offers a formula. Sixty pounds displaces about one cubic foot of water. Start by adding up the weight of your crew, then divide by sixty. That provides the cubic feet of water you can expect your boat to displace. You’ll want to choose dimensions for your boat that roughly multiply together to get that number. For example, if you can expect 15 feet of cubic water displacement, you should be able to stay afloat in a boat that’s five feet long, three feet wide and one foot tall.
You can make your boat bigger than that, and it’s important to make sure you can reach the water with your oars. But if it’s much smaller than your calculations show it should be, you can expect your team to end up in the water.
Pay attention to detail
If you want to make sure your design is going to stay afloat, it’s a good idea to try it out on a smaller scale before you construct the real thing. Construct a small version of your craft out of cardboard (for example, if you’re planning a boat that’s 10 feet long, build a 10-inch model), fill it with coins or rocks proportionate to the weight of your crew, and see if it floats.
If it doesn’t, you should be able to identify the weaknesses in your design and head back to the drawing board.
It’s also important to keep the practicalities of your design in mind while you’re constructing it. Many competitors in cardboard boat regattas have been taken down by paddles or oars that were made of cardboard and not waterproofed. In Kirksville’s race, you can use standard paddles or oars, but if you’re making yours from cardboard, be sure to paint them as well.
Add design elements
Once you’ve completed your cardboard boat, it’s time get creative. Decoration is a major part of any cardboard boat race, with participants showing off innovation ideas for what they can transform their cardboard boats into.
Harden said previous years’ races have included whimsical designs patterned after animals or pirate ships. Other designs that have turned up in cardboard boat regattas include school buses, planes, bananas and even the Oscar Meyer Wienermobile.
Awards will be given out at the event for most original design, most innovate construction and best decoration. And if you can’t win a race or a design contest, there’s another award that might be perfect for you — the “Titanic Award,” for the most entertaining sinking.
Discovery Park of America: Museum and Heritage Park
- keyboard_arrow_right
The Do’s and Dont’s of Building Your Cardboard Boat for the Races
March 5, 2020.
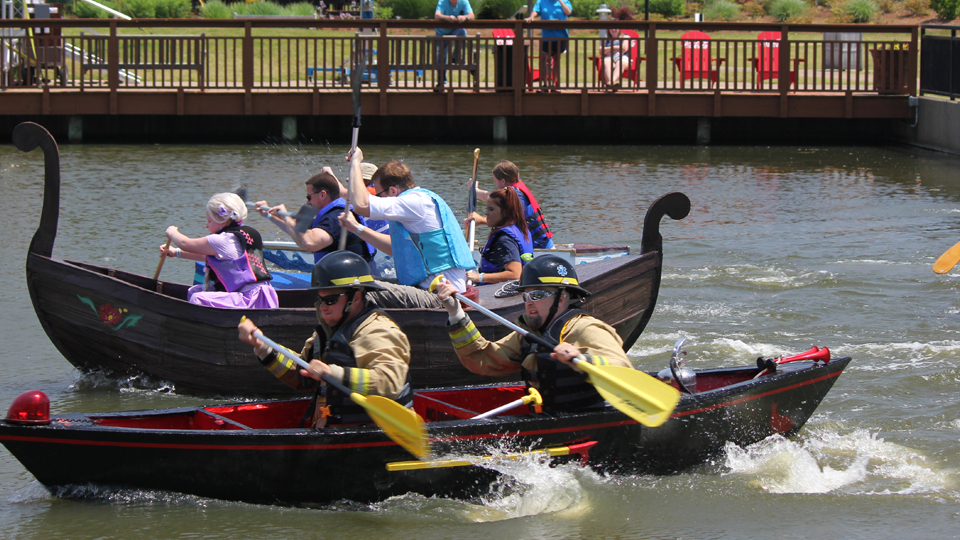
March 5, 2021 – So…you are wanting to build your own cardboard boat for the 2021 Regatta on Sat., May 15, 2021? But maybe you have no clue where to even begin with the fun project. Never fear, because Commodore John Watkins is here to give you some tips and tricks on how to build the best cardboard boat that will be the best on the water on race day (no guarantees, though)!
ITEMS NEEDED AND RECOMMENDED FOR A SUCCESSFUL BUILD
- Undamaged cardboard. If you break it, crush it, or cut through it, the cardboard may fail while in use. No brainer: Don’t step on it!
- Water-based wood glue
- A paint roller. This will help to spread the glue over large surfaces and remove excess glue. Too much glue is not good for you!
- Clamps and weights. These will help press the glue joints and layers together. Be sure to use a large flat surface in between the clamp or weight and cardboard. This will protect the cardboard corrugations from damage.
- Silicon sealant. This will help keep your cardboard dry when it’s in the water! Remember to seal the ends of the cardboard with caulk or silicone, or you’ll have great fun watching the water draw up into the corrugations just like in a drinking straw.
- Paper tape/Reinforced paper tape. Paper tape helps join the pieces of cardboard and also works well over caulked edges and seams. This won’t shrink like duct tape when you paint it!
- Water-soluble outdoor latex-based primer. Try saying that five times fast! This is for your initial coats of paint. Avoid oil-based paints, stains, caulk, and glue because the oil soaks into the cardboard, which weakens and damages it. The cardboard may never dry!
TIPS WHEN BUILDING
- Try building a model first. Scale down your design and cut its “flat-pattern” shape out of a manila folder. Use stones or small weights to test the buoyancy. Tape together and seal it from the water using scotch tape. This could give you an idea if the boat will float the way you want.
- Layer cardboard. This will give you additional strength. Layer the cardboard with the corrugations going in different directions. This will make for a stronger laminate. You can have strength and still keep your boat light if you place the second layer so that the corrugations run at a 90-degree angle to the first layer.
- Fold your cardboard. To fold cardboard across the corrugations, consider scoring the line of the fold with the butt end of your utility knife or other rounded edge of a tool.
- Building location is important. Try to build the raft in a warm, dry, low humidity location. This will speed up the glue drying process. Be sure your boat will be able to get out the door of wherever you build it!
- Channel your inner Van Gogh. Remember to decorate your boat (highly rewarded by the judges on race day) and bring your own wooden paddles or oars.
BONUS TRICKS
- A flat bottom is recommended. A V-shaped bottom is likely to tip over unless the V is very gentle.
- The lowest center of gravity is the most stable. Kneeling or standing will cause you to tip over.
- Longer boats go faster, but they are harder to turn.
- Boats shorter than 10 feet are difficult to steer.
- For height, allow about 18 inches for you to sit and paddle effectively without the edge of your boat blocking your arms.
- Figure about 30 inches maximum for 1 person, 48 inches for two people.
- Clear tape melts when it is painted.
- Forget about “glue guns” because that type of glue melts on hot days.
- Fold a lot and cut sparingly.
Your browser is out-of-date.
To get a better experience with our home designs, please download other browsers for free. Just click on the icon!

homify - modify your home
Browse through millions of photos with the homify app!

Ridetheducksofseattle is reader-supported. When you buy through our links, we may earn an affiliate commission. Learn more

How to Build a Cardboard Boat? – An Easy DIY Technique
Written by Anthony Roberts / Fact checked by Jonathan Larson

You don’t have to throw cardboard boxes as you can make boats out of them! With these boats, you can ace the regatta. Apart from making ones that can accommodate your weight, you can make small ones that kids can play with. So, how to build a cardboard boat?
Some may be complex to work on but there are simple ones that you can assemble easily with templates. Apart from creating a boat’s form, you can also integrate designs that make it look more fun and well-made.
This article will give you tips on making sturdy, cardboard boats that won’t sink and children can play with. Read on!
Table of Contents
1. Pick a design
2. collection of materials, 3. boat size calculation, 4. detail-oriented, 5. design elements, 1. float with a cardboard boat connected by duct tape, 2. collect the materials that you need:, 3. the basics and the base, 4. making the walls, 5. strengthening the boat structure, 6. adding designs, sail away with a cardboard boat, the basics of making a cardboard boat.
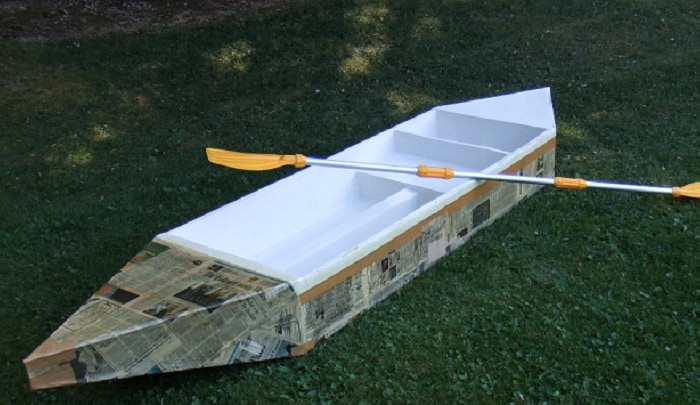
First, you have to know the basics of how to make a cardboard boat. This ensures that you won’t disregard the needed sturdiness when letting it float on the water.
To make you forget about your doubts, a race using cardboard boats was held in Cyrus Peirce Middle School. There were hundreds of participants who all enjoyed the event. The youngsters learned how to make a boat from scratch.
Just like what they did, you have to focus on these steps.
Before proceeding with the construction, you must think about the boat’s appearance. It’s practical to go for simple cardboard boat designs but it’s fine to pick a complex one as long as you’re willing to devote time and effort. You also have to consider the boat’s weight capacity. Decide whether only one or two people can be accommodated.
You also have to think about carrying and transferring it to designated areas. The cardboard boat must not be too large for the door. The designs of cardboard boats are usually modeled after sailboats, kayaks, and canoes. I’m referring to an easy simple cardboard boat.
On the other hand, you can go for more detailed and elaborate designs. Examples of these are the structures of Viking longboats and cruise ships. You can also use a boat with a V-shaped hull, which lets you glide on the waters smoothly. A wide boat guarantees more stability than a long, narrow one. You don’t want to tip over, so make a boat with a flat bottom.
Collect enough cardboard sheets or boxes for a DIY cardboard boat project. You can get them from recycling centers or local stores. Boxes of old appliances also come in handy. You’ll need something to connect the parts. Tape is highly recommended but as you know, there are different types.
Duct tape holds well but it’s difficult to paint. In the case of masking tape, it’s easier to paint but it’s less watertight. Besides choosing tape, you’ll likely need waterproof glue to put parts together. House paint is ideal with a sealant. Avoid smudging it and make sure that you have enough paint for the interior and exterior sides of your boat.
This part is vital to make your boat stay afloat. Based on the recommended formula, 60 lbs of weight can take the place of a single cubic foot of water. Then, add the passenger’s weight to be divided by 60. The answer is the cubic foot of water that your boat can displace. You can achieve this number by carefully planning the boat’s dimensions.
As an example, a 5-ft long, one-ft tall, and 3-ft wide boat can remain afloat on water displacement of 15 cubic feet. Moreover, you can make your boat bigger given that the oars reach the water. When you make a smaller boat, the boat and passengers will eventually be in the water.
Testing can help you ensure that your project works. So, you can make a mini version of your cardboard boat. If you’d like to make a 10-ft longboat, you had to work on a 10-inch small cardboard boat first. You can put coins or rocks to act as the passenger.
In this step, you can find out if there are issues with your designs, which can be in sketch or PDF. You may make oars from cardboard but waterproof them so they will continue to serve you while paddling.
Once you’re sure about the stability and sturdiness of the boat structure, you can be creative. You can go for whimsical designs like bananas, planes, school buses, and even Oscar Mayer Wienermobile. It will be exciting to follow a cardboard pirate ship kit from hacomo.
Guide to Making a Cardboard Boat
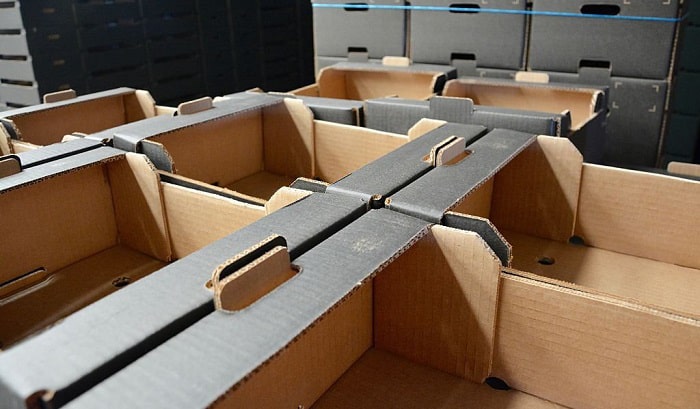
You can make cardboard boats that you can ride on or ones that kids can play with. Here are the guides that can give you different ideas.
If you have plans to join a regatta or to make a sturdy boat for a school project, you can attach the parts with only duct tape. You’ll be surprised by how the parts come together by just following the instructions below.
Cardboard, waterproof duct tape, scissors or box cutter, some pieces of paper for sketching or drawing your plans, paint (optional), and some decorations.
Some may prefer a simple structure so the boat comes out in a box shape. But you can also upgrade it into a speed boat structure. An oval shape can be done too. Once you finalize the boat’s structure, you can draw them on the cardboard before cutting the base.
When making the walls, you have to determine the height that you want. It’s best to keep the walls in strips so you can save time and effort from taping them together.
You’re not putting your boat at risk of leaking in this way. Arrange the walls on the base that you prepared beforehand. Mark the areas where there are curves and score the lines so they’ll follow the lead.
Keep adding the walls and tape them inside and out. Make sure that you tape all the sides of the walls. Check if some parts of the base are sticking out and cut them.
Give the bottom part attention and be generous in taping it as it’s the part that mainly touches the water. The next part where you can add tape is the sides before going to the other sections.
Score some cardboard strips that are 4 to 5 inches wide. Fold them in half so they make 90 degrees. Tape these strips to the bottom part of the boat for reinforcement.
You need cardboard that has similar size to your boat to strengthen the upper part. Cut it to create tabs that you can connect and tape on the sides and the top part.
You can add designs like putting a head on your boat. Then, you’re ready to go!
Using a kit for assembly
Elmer’s Build It Tools Kit will make this project easy for you. Other things that you need are cardboard boxes and a 3D corner bracket that is also from Elmer’s.
This guide is also applicable to little cardboard boats for playtime. Instead of using tape, you can use brackets and screws included in the kit.
Based on my experience, it’s easier to use than the tape which requires a lot of effort. However, these steps are for creating boats that won’t get in contact with water.
- Flatten the cardboard boxes that you have. Cut the top corners of one of the boxes so there are pointed tips. You have to make one rectangle and one isosceles triangle.
- You’ll devote your time to making a cardboard boat template for this project. The base is made by placing the pointed cardboard pieces in the middle. Two flattened cardboards should be curved on every side of the base. They’ll be connected with 4 screws.
- The remaining flattened card should be added to the back part. You have to attach it to the sideboards with the help of 2 screws and flat brackets. This back part should also be securely attached to the base.
- For extra support, add a 3D corner bracket to the front part of the base. Furthermore, a 90-degree bracket should be added to the top of the front sides. You can add a triangle cut as a sail and it’s ready to use.
How to build a cardboard boat? There are two guides in this article. One is for boats that you can sail with and the other is only for making a toy boat. When you intend to sail with a cardboard boat, you have to take note of the basics so it won’t give in to the water. You can always be creative and add your preferred design.

Ten years of enjoying countless trips on boats never made me love them any less! So I am here to put all those experiences into good use for other boaters who want to have a safe and fun trip with their friends and families.
How to Make a Cardboard Boat
Things you'll need.
Closed-cell foam wreath form
4-inch closed-cell foam circle
Phillips screwdriver
1 can of expanding cell foam insulation
8 wooden pegs
Plastic bushing
Utility knife
4 large pieces of cardboard, at least 36 by 96 inches
Tall cardboard box, at least 20 by 36 inches
Sheetrock or packing tape (optional)
Screen roller
Straightedge
Contact cement
Construction adhesive
8-inch cardboard tube concrete form
High-temperature hot-melt glue and glue gun
1-inch PVC electrical bushing
1 piece of 3/4-inch PVC, 18 inches long
3/4-inch PVC end cap
3/4-inch PVC coupler
3/4-inch PVC elbow
3 pipe brackets, 1-inch
Paintable caulk
Water-based primer
Latex paint (various colors)
Colored duct tape
2 closed-cell wreath forms (optional, for lifesavers)
Blue sheet (optional)
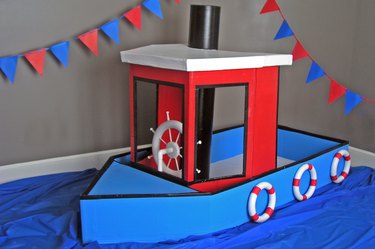
Playhouses offer children a wonderful outlet for creativity and imagination. This cardboard tugboat welcomes kids aboard on an adventure to explore the seas and sail to faraway lands. Built with salvaged cardboard, it is a relatively inexpensive project and quick to put together but can be made durable as well.
Advertisement
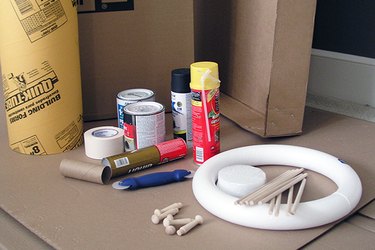
Collect the supplies. Visit a local home improvement store early in the morning, and you will find employees unpacking and setting up displays. They are usually happy to help you find the cardboard you need. Always ask -- do not assume that anything will be discarded.
Video of the Day
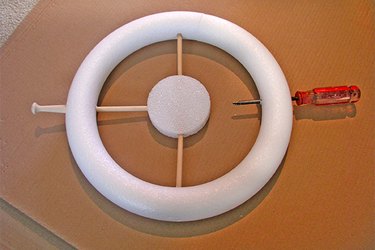
Make the steering wheel. Set the foam circle in the center of the foam wreath form. Measure the distance between the foam wreath and the foam circle, and then add 1 inch. Cut 8 dowels to this measurement. Punch through the side of the foam wreath with a screwdriver. Fill the inside hole with a small amount of spray foam insulation. Push a dowel through the hole, and push the other end of the dowel into the center foam circle. Repeat with the other dowels, making sure to space them evenly around the ring.
Note: Spray foam cures in about 10 seconds, so you'll need to work quickly when using it.
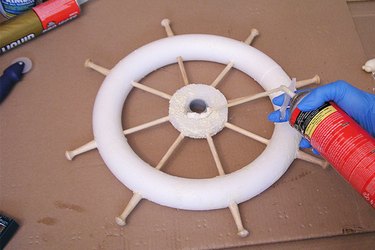
Finish the steering wheel. Set the wooden pegs into the foam wreath at the end of the dowels using a very small amount of the spray foam insulation as glue. Punch the plastic bushing through the center of the foam circle and secure it in place with the spray foam insulation. Set aside to dry. You will need to cut away excess expanded foam with a utility knife when completely dry. Sand if necessary. Prime and paint the wheel.
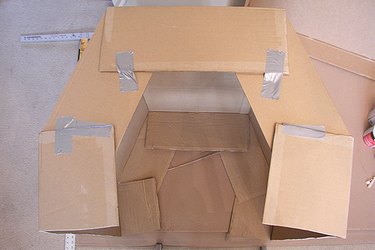
Make the wheelhouse. Split the tall cardboard box down the center of the widest side. Open the box into a semi-octagon shape. Arrange the box so that the widest point is about 32 inches long, and tape in place. Trace lines at the connection points where the five flaps will join together. Paint these overlapping areas with contact cement and allow to dry. Join the five flaps together. Repeat this procedure with the opposite end of the box.
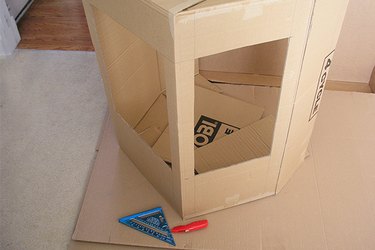
Cut the wheelhouse windows. Cut large windows in the front and side sections of the wheelhouse, starting 12 inches from the bottom and leaving at least 2 inches on each side. Cut reinforcing strips from scrap cardboard, and glue them on the inside of the window corners.
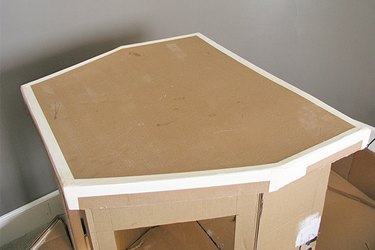
Make the roof and base for the wheelhouse. Set the wheelhouse section on a sheet of cardboard and trace the outline. Cut out the traced shape to use as the inside base. Use this as a template to draw another piece and add 3 inches to the perimeter. Cut out these lines and score 2 inches inside the cut edge. Fold along the score lines, cutting through the cardboard at the corners and folding to form an edge. Glue the roof and base in place on the wheelhouse with contact cement.
Note: Sometimes heavy cardboard splits and does not fold cleanly. You can cover these areas with paper drywall tape or packing tape.
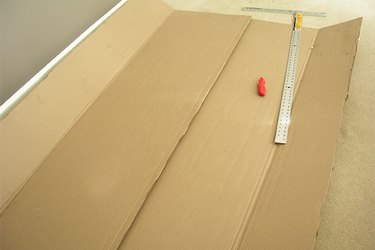
Create the boat floor. On two 96-inch pieces of cardboard, mark the long side 12 inches from the edge, score and fold in. Overlap the two cardboard pieces in the middle so that you have a width of 35 inches. Glue in place with contact cement or construction adhesive. Cut a filler cardboard piece to a width of 35 inches and place it over the overlapped pieces to even out the floor of the boat. Glue it in place.
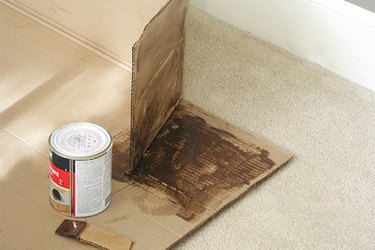
Form the boat end. Score a vertical line down each side fold of the boat that is 12 inches from the bottom. Cut through the cardboard at the 12-inch vertical score marks on each side. Fold the sides in and the bottom up to form the boat end. Glue in place with contact cement.
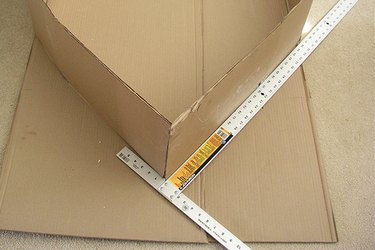
Form the bow. At the front of the boat, score a vertical line down each side fold of the boat that is 26 inches from the top. Cut through the side fold up to this score line. Fold these side flaps together to form a point in the center. Using a straightedge, draw lines along both sides of the pointed bow to trace the silhouette on the bottom floor of the boat.
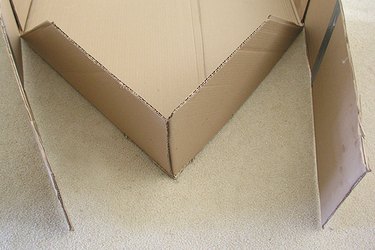
Fold and tape the bow. Pull the side flaps out of the way and score along the traced lines on the bottom floor of the boat. Measure 12 inches over, and cut through the cardboard. Fold these bottom sections up and tape together.
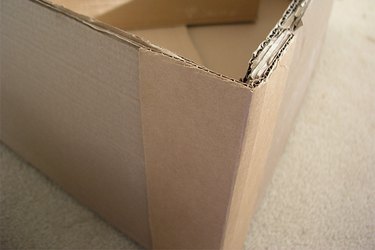
Reinforce the bow and boat end. Glue the side flaps to the pointed bow base with contact cement. Cut a small piece of cardboard to 12 inches by 4 inches. Score vertically in the center and glue around the bow point for reinforcement. Reinforce the rear corners in the same manner.
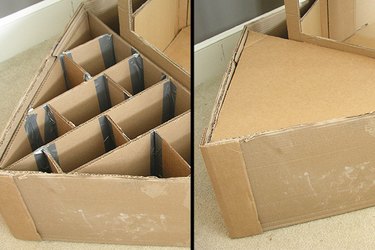
Make a brace for the bow. Cut two cardboard pieces to 12 inches by 35 inches. Glue together and set inside the bow of the boat to form a triangular-shaped brace. Cut strips of cardboard 11 inches wide and lengths necessary to form vertical and horizontal braces. Space the braces 3 to 4 inches apart in both directions. Tape in place. Cut a triangle-shaped piece of cardboard to fit on top of the brace (make sure it can fit inside the vertical edges of the bow). Using construction adhesive, set in place on top of the brace and glue.
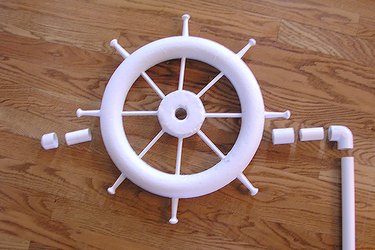
Assemble the wheel. Cut the 3/4-inch PVC pipe into one 14-inch piece and two 2-inch pieces. Set the 90-degree PVC elbow at the top of the 14-inch section. Insert a 2-inch piece of pipe into the side of the elbow, followed by the coupler, the second 2-inch piece of pipe, the wheel and finally the end cap.
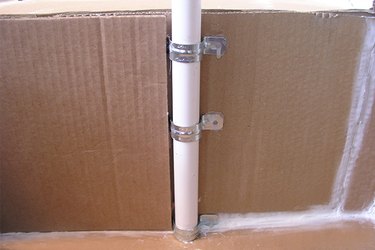
Install the wheelhouse. Set the wheelhouse assembly inside the boat and glue it against the bow brace and boat sides. Use filler cardboard pieces if necessary. Hot glue pipe brackets to the face inside the wheelhouse. Cut additional cardboard pieces to fit on each side of the pipe brackets, and glue them over the brackets to add support. Once glue is dry, slide the wheel into place inside the brackets.
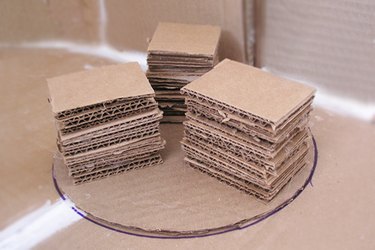
Create a mounting base for the smokestack. Using the cardboard tube as a template, draw and cut a circle from a scrap of cardboard. Cut scraps of cardboard into 2-by-3-inch squares. Glue these into three stacks of about 10 pieces each, and then glue them 1/4 inch from the circle edges. Locate the desired position of the smokestack, notching out the roof if necessary, and glue the mounting base to the floor of the boat in this position. Set the cardboard tube in place over the mounting base to check alignment, then remove.
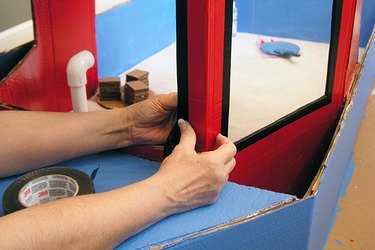
Paint the boat. Level out any areas necessary by adding filler pieces of cardboard. Use painters' caulk to seal the seams if desired, and paint the boat. Cardboard paints best with a water-based primer followed by latex paint. Cover all the raw cardboard edges with duct tape in any color you like.
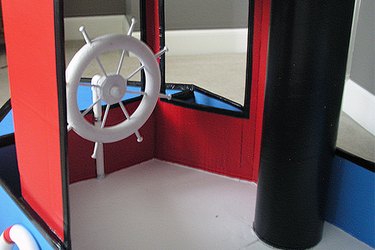
Install the smokestack. Paint the smokestack and allow it to dry before installing it on the mounting base.
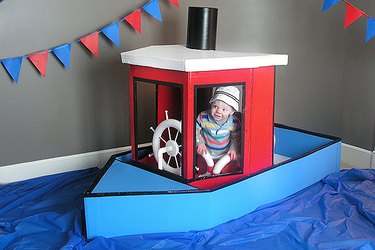
Finished boat. Add any finishing touches, such as lifesavers, to the side of the boat and a blue sheet underneath it to simulate water.
A cardboard wardrobe box works well for the wheelhouse. Always wear gloves when working with spray foam.
Use contact cement only in well-ventilated areas. Don't use regular spray paint or oil-based paint on foam, as it will dissolve it.
Report an Issue
Screenshot loading...
AHOY! Cardboard Boat for Racing

Introduction: AHOY! Cardboard Boat for Racing

Have you ever thought of doing something many think couldn’t or shouldn’t be done? Of course you have, that is why you are here on Instructables.com!
I was proposed with the following challenge:
Build a vessel OUT OF CARDBOARD capable of supporting at least one person to follow a 200 yard race course for two rounds. No this is not a model! This is an actual passenger carrying vessel!
The rules include:
- Corrugated cardboard ONLY! The use of wood, metal, plastic, foam, or fiberglass is strictly prohibited. No wax coated or pre-treated cardboard is allowed.
- Only bare, raw, brown, fibrous cardboard. Various tapes, adhesives and other accessories are allowed, but will be covered in greater detail later.
- You cannot just wrap the entire craft in layers of duct tape!
- All members of the boat are required to wear personal flotation devices. You know, for if or when your ship sinks.
This is how I and my crew did it. It is by no means the only way, but more documentation of our creation and some suggestions. We decided on a pirate theme. We chose to decorate the ship to loosely resemble a pirate ship.
(The challenge was an actual sanctioned event, but doing it solely for the pleasure of the personal challenge is a fantastic reason also!)
Step 1: Plunder Yer Materials

- Large sheets of cardboard – Old appliance boxes work great! Ask local stores for their old boxes. (Since ours was for an actual sanctioned event, we had 8 foot by 4 foot sheets available.)
- Duct tape – (good for tight seals on edges, but hard to paint)
- Masking tape – (good for going over edges and easy to paint, but not real water tight)
- Sturdy waterproof glue – I found carpenter’s wood glue works best. It comes in large bottles, dries quickly, holds tight, and is waterproof!
Decoration:
- Latex house paint can decorate but also is a great sealant (oil based is not allowed in most sanctioned events because it can leave oil in the water) Look for cheap or returns!
- Cardboard tubes like wrapping paper tubes
- A sharp blade to cut cardboard
- A straight edge
- Sandbags – Optional, but are good to hold the hull bottom together while gluing.
- String - Optional
- Oars or paddles to propel the vessel
- Our imagination!
I do NOT recommend using anything like Thompson Water seal. While it sounds ideal, it is not. It works on decks and driveways by soaking into the surface. It will soak into cardboard and make it very wet and weak. Keep the sealing to the latex paint.
Step 2: Avast Ye! Make a Plan!
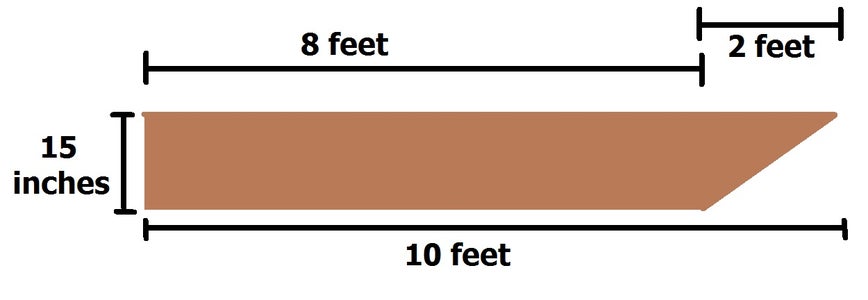
There are many things to consider for the boat:
- Will there be a theme? Titanic, pirate ship, battleship, canoe/kayak, dragon, banana? (Yes, banana!)
- Larger boats are faster for straight-aways, but are a beast to have to turn around corners. Smaller are more agile, but will hold fewer rowers.
- How many passengers do we plan to carry? 1, 2, 5, 10?
- One of the things to consider about our craft was the total weight of our craft and crew. This makes sense, right? Heavier could sink.
“But, JokerDAS, how do I know how big to make it so it won’t sink?”
Stand back! I am going to lay down some science!
- 60 pounds (or 28 kg) of mass displaces about 1 cubic foot of water.
- Add up the weight of all the crew.
- Divide by 60.
- This provides the number of cubic feet that a boat will displace or sink into the water. That may not make much sense yet, but wait, there’s more to it than that.
Take this example:
We have a four man crew. Our total crew weight was 900 lbs. Divide that by 60 and we get 15 cubic feet of water displacement.
That means we could have a boat that is 5 foot long, 3 feet wide and 1 feet tall making a volume of 15 cubic feet (5 X 3 X 1=15) and still theoretically stay afloat. I say theoretically because the water level is to the top edge. That does not even take into account the boat will also have mass.
BUT make the sides of the boat too tall to accommodate the displacement, and we may not be able to reach the water with our oars!
We finally decided on the measurements. The rectangular hull of our boat was 8 foot long, 3 feet wide and 15 inches tall. It had another 2 feet of bow after that.
Plan ahead before you make your first cut!
Step 3: Me Harties, Hull Construction

We had a plan, we had our materials, we had our dream!
Now it is time to make our craft! (We did not have decent pictures of this process, but I created a scale model out of cardboard.)
- First we laid out a large sheet of cardboard.
- Then we measured out and drew the bottom of the boat (8 foot by 3 foot), also called the hull. Leave a couple extra feet at both ends to use later for the structure.
- Since the hull plan was larger than the individual sheets of cardboard, we attached another sheet with duct tape. We made sure the entire seam was covered.
- With the sharp blade, we scored the cardboard along the lines drawn. This was done by cutting only halfway through the thickness of the sheet of cardboard, leaving the other side whole. This will be one less seam to seal later.
- Flip over the sheet.
- Bend the sides up.
- Tape the raw cut to cover the edge. This made a large U-shape.
- We used some string to hold the sides upright so they do not lean back downward.
Step 4: Ship Shape Structural Support

Now there is something that reassembles a boat. But the sides were still quite floppy. More structure had to be added to hold the sides in place. We essentially created cardboard 2 X 6’s.
- We cut 18 strips of cardboard about 40 inches long and 6 inches wide.
- We glued 6 together and clamped them until they were dry.
- We repeated this two more times until we had 3 “boards”.
- The boards were notched about 2 inches from each end about 3 inches deep.
- The sides of the hull slid into the notches.
- One board was glued at about 15 inches from one end (the stern), the next about 4 feet from there and the last about 2 feet from the other end (the bow).
Step 5: Stern Construction, Ye Scallywag!

We had a nice U-shaped hall, but with the bow (the front) and the stern (the back) open, it didn’t look seaworthy. So we had to close off the ends.
- To make the stern, we scored the underside and outside walls perpendicular to the 2 X 6 support brace.
- We cut along the joint where the upright of the side meets the bottom to the score line.
- Folding the bottom flap upward, we then wrapped the two side squares over. They should touch the 2 X 6 brace
- We applied glue to the flaps.
- With the masking tape we sealed all the open edges and scored edges. This boxed off the stern.
Step 6: Blimey! Bow Construction

The bow was a little more complicated because we chose a slanting front for water dynamics and appearance.
- Just like the stern, we scored the underside and the outsides at the mark perpendicular to the brace.
- Again, we cut along the edge joint just like the stern.
- This time we measured a triangular point from the bottom section of measured off hull.
- We cut out the sides of the triangle shape.
- We cut about 8 inches off the end of each side flap.
- We then folded the sides flaps into the point.
- We brought up the point so that it reached the top level of the sides.
- Now we drew a line where the triangle meets the sides at this angle.
- We scored this line from the outside. This formed two triangular shapes on the side flaps.
- Now we folded the lower triangular flap underneath the large hull-bottom triangle. We glued and taped it to the bottom.
- Excess was cut from the opposite side.
- We repeated this for the other side flap.
- Clamps were used to hold it all together while it dried.
- Another triangle was measured and cut to cover the top opening of the bow.
- All seams were taped and sealed.
Step 7: Heave Ho! More Structural Support

Alright, our boat not only looks like a boat, but will hold up, but with only one layer of cardboard between the crew and the water, it would not last long. Time to add more layers.
- Again, we started by laying out a large sheet of cardboard.
- With mass quantities of glue, we glued another sheet right on top of it.
- We set the hull on the center of the layered cardboard.
- We traced around the hull.
- Next we made three more 2 X 6 boards just like before, only longer than the length of the 4 X 8 foot sheets.
- One was along the middle of the hull outline, the other two just inside the hull outline. All three were heavily glued down to the stacked sheets.
- Use the sandbags to press the stack of hull bottoms together.
- Set the hull was glued on top.
- Flip the entire structure upside down and score along the hull edges to allow the sides and ends to bend up. Trim off extra parts to align with the bow point.
- Return it right side up and heavily glue the side flaps of the large sheets to the sides of the hull. (Small sections of side flaps may need to be cut away to fit with the 2 X 6 cross beams.)
- Clamp all the hull sides together.
- Repeat with the bow and stern flaps.
- Set aside to dry completely.
- Finally go over every edge, seam and joint with glue and tape.
Step 8: Swab Yer Deck, Bucko!

Since we opted on a pirate theme. We need our cog to resemble a pirate ship. This mean wooden looking sides, cannon ports, a main mast complete with crow’s nest, a chase gun, and of course the black flag with cross bones and happy face.
- First we painted the entire structure (inside and out because water WILL splash inside) with beige latex house paint.
- Then we painted the wood slats and nail heads all over the sides of the hull.
- The cannon ports were made from more wrapping paper tubes cut to 5 inch length. The end was quartered and spread out. They were painted black.
- We then cut 6 inch squares of cardboard, traced the tube in the center and cut out the trace. They were painted red and yellow.
- The tubes were fed through the back of the squares.
- The squares were glued to the broadside of the hull.
- Cardboard anchors were cut out, painted black and glued to each front corner.
- The mast was created using a few extra rolls of wrapping paper tubing taped together with masking tape. It was taped to the center 2 X 6 brace.
- The Crows nest was made from just shaping some of the wrapping paper into a cone, painting and taping to the top of the mast.
- String was used to tie the top of the mast to the bow and stern.
- A chase gun was created by cutting a box and adding a cardboard mailer tube as the barrel. This was then glued to the top surface of the bow.
Step 9: Weigh Anchor and Hoist the Mizzen!

Our galley, the “Almost Perfikt” was complete. It was the day of the race.
I recommend having lots of extra cardboard boxes and tape on hand the day of the race.
After the first race, we took on lots of water. We had to make repairs using spare boxes and duct tape.
Soon, we were called for our second race.
We met Davy Jones' Locker! (We sank!)
Our clipper was scuttled! (The ship was a total loss.)
Our booty contained much pieces of eight! (We won a trophy and learned a lot!)
We are all now salty seadogs! (We are experienced and will rise again!)
There you have it: An Instructable on building a cardboard boat capable of carrying passengers for the purpose of racing.
This is by no means the ONLY way to build a box boat, but more a list of suggestions and observations made while we made our.
Try it yourself, landlubbers! Your imagination is your only anchor!
And as always, thanks for checking out my Instructable!

Runner Up in the Puzzles Challenge

Second Prize in the Cardboard Contest 2016
Recommendations

Fix It Contest

Make it Resilient

Remake It - Autodesk Design & Make - Student Contest

- About The Kid Should See This
- The TKSST Gift Guide
- Become a Member

Cardboard Boats, a DIY engineering activity
Cardboard is a versatile building material for all kinds of projects , but what kind of design allows a cardboard boat to float while holding a bag of sugar? Mechanical engineer Dr. Shini Somara introduces how different kinds of boats can float and carry additional weight in this cardboard boat video from the James Dyson Foundation .
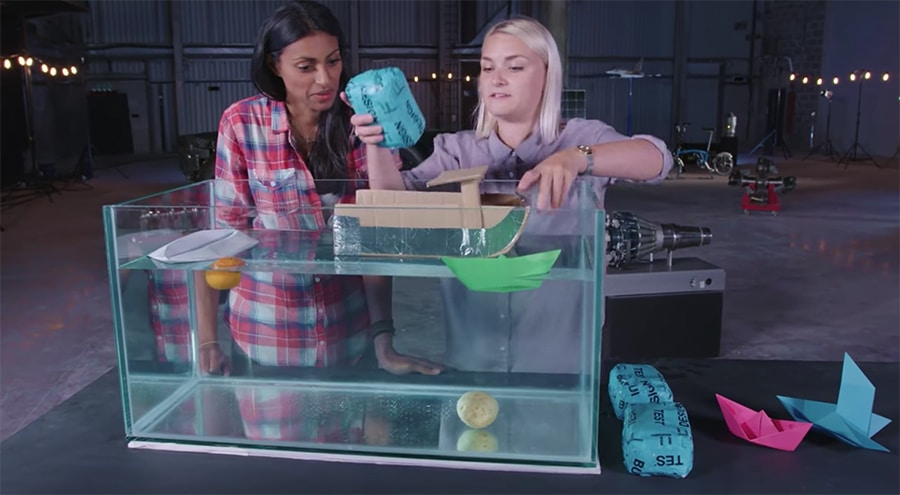
“More than 2,200 years ago, a scientist named Archimedes sat down in his bath and figured out that when an object is placed in water, water moves out of the way—it gets displaced. If the object is floating, the amount of water that gets displaced weighs the same as the object. There is a force, called a buoyant force, which pushes on an object when it displaces water. The strength of this upward acting force exerted by water is equal to the weight of the water that is displaced. So, if an object displaces just a little bit of water, the weight of that small amount of water is small, and so the buoyant force is small, too. If, on the other hand, the object displaces a lot of water, then there will be a large buoyant force pushing upward.”

Related book recommendations: The Way Things Work Now , via Bookshop.org or Amazon .
Watch these related engineering videos next: • Spaghetti bridges, a DIY engineering activity • Balloon Car Race, a DIY engineering activity • What’s an Engineer? + The Engineering Process • Succeed by Failing: Failure points and how to fix them
Plus: More activities and experiment videos for all ages.
This Webby award-winning video collection exists to help teachers, librarians, and families spark kid wonder and curiosity. TKSST features smarter, more meaningful content than what's usually served up by YouTube's algorithms, and amplifies the creators who make that content.
Curated, kid-friendly, independently-published. Support this mission by becoming a sustaining member today .
🌈 Watch these videos next...
Xu zhen’s in just a blink of an eye, what’s on the inside of a fishing reel, what’s inside a tape measure, what’s an engineer + the engineering process – crash course kids, what is ocean stratification, turn human waste into drinking water – janicki omniprocessor, the precision and serendipity of ebru (paper marbling), the power of creative constraints – ted ed, the ingenious design of the aluminum beverage can.

IMAGES
VIDEO
COMMENTS
Multiply the total volume of your boat design by 62.4 (1000 if you're using metric measurements) to see if it'll support the total weight of your crew. Build your boat with corrugated cardboard to give it a sturdier frame. Finish off your boat with latex paint and varnish so it's ready to hit the water. Part 1.
Steps to Build a Boat. Step 1: Prepare and inspect your materials. Step 2: Build a small scale model to test your design. Step 3: Measure and cut your cardboard into larger pieces. Step 4: Apply the smaller cuts and folds. Step 5: Build the boat structure. Step 6: Seal the boat.
Do you want to learn how to build a durable cardboard boat that can float on water? Watch this YouTube video and follow the simple steps to create your own fun and eco-friendly craft. You will ...
Simple Steps To Build An Awesome Cardboard Boat!Join us in this fun and easy DIY project as we show you how to create a cardboard boat using just A4 papers, ...
Step 3: Create the Walls. Cut cardboard into the height of the walls you want. It is easier to keep the wall in a strip so you don't have to tape them together and risk more leaks. Line up the walls to the base. If you are going around a curve then mark it. Score the line and fold it so it goes around the curve.
Glue the curved strips to the uncut one. The curved strips will form the sides of your boat, and the bottom uncut strip the bottom. Use hot glue to join the sides of the ship to the bottom. Hold the strips together for about 30 seconds while the glue hardens.
Remember to make measurements of the boat before starting. Do not eyeball it, as it usually does not work out. Having fun with this project is key to success! Average time for building a cardboard and duct tape boat is about 10 hours, but our boat took about 16 hours, 8 rolls of duct tape (regular duct tape and gorilla tape (stronger)).
Cut out the top corners of 1 box to create a pointed tip. Also cut out 1 isosceles triangle, and 1 rectangle, as pictured. Place the pointed cardboard boat piece in the middle. This will be your boat BOTTOM. Take 2 flattened cardboard pieces and curve around each side of the BOTTOM, then attach pieces with 4 Screws on each side.
Step 2: Splitting the Box. Supplies: Cardboard box. Box cutter. Get a cardboard box, and make it flat by cutting the side of the box, with a box cutter. You will be able to make 6 or 7 flat cardboard with a single box. Repeat that process for the other 4 boxes. We'll use those pieces for making a bigger board.
Build a cardboard boat and see how long you can stay afloat in the water. You'll learn things like buoyancy and construction techniques. And you'll have SO...
In a guide to building a sturdy cardboard boat, the website Instructables offers a formula. Sixty pounds displaces about one cubic foot of water. Start by adding up the weight of your crew, then ...
Pictures of Cardboard Boat Designs. 1. DIY Cardboard Boat. This free cardboard fishing boat pattern would get you hooked. Once you are done with the construction of the model, you would have a gala time painting it red. Cardboard Boat. 2. Cool Cardboard Boat Design. This boat is made out of a cardboard box.
The cardboard may never dry! TIPS WHEN BUILDING. Try building a model first. Scale down your design and cut its "flat-pattern" shape out of a manila folder. Use stones or small weights to test the buoyancy. Tape together and seal it from the water using scotch tape. This could give you an idea if the boat will float the way you want. Layer ...
Rudders help keep you straight but make turning difficult and adds complexity to your design. allows room to sit/kneel & still paddle over the edge. Best Width: 18"-30"(max) for 1 person. 48" wide for 2 people side by side. Kneeling is a "power" position but sitting is more comfortable. 1-2 layers, fasten & cover the seams.
Hot glue a sail and your nautical flag banner to the mast. Cut a simple sail from scrap fabric, cardstock, newspaper, or whatever you have! Hot glue it to the mast, then add your nautical banner. Once the hot glue has completely dried, trim the excess twine from the banner string - your sailboat is complete!
How To Make A Boat Models With Cardboard #4 - Do It YourselfThis is a boat that made from cardboard. You can do it at home. How to make a boat models with c...
Apply a double layer of hot glue when you stick the cardboard pieces. One way to ensure all the tiny gaps are closed is to apply glue on the top and the bottom of each edge, particularly for the bottom pieces that rest on the water. For instance, when you stick the bottom, sides, and back pieces of the boat, first apply glue along the inner ...
Fold them in half so they make 90 degrees. Tape these strips to the bottom part of the boat for reinforcement. You need cardboard that has similar size to your boat to strengthen the upper part. Cut it to create tabs that you can connect and tape on the sides and the top part. 6.
Image Credit: Debbie Williams. Form the boat end. Score a vertical line down each side fold of the boat that is 12 inches from the bottom. Cut through the cardboard at the 12-inch vertical score marks on each side. Fold the sides in and the bottom up to form the boat end. Glue in place with contact cement.
Some have asked for a behind the scenes episode of how I built my cardboard boat for $12 and lucky for you, I recorded it all!What's our next river treasure ...
Set the hull was glued on top. Flip the entire structure upside down and score along the hull edges to allow the sides and ends to bend up. Trim off extra parts to align with the bow point. Return it right side up and heavily glue the side flaps of the large sheets to the sides of the hull.
Design and build your own cardboard boat for a summer activity or for testing in the bathtub. Don't forget to find the failure points. Some history and additional DIY support from Scientific American's Science Buddies: "More than 2,200 years ago, a scientist named Archimedes sat down in his bath and figured out that when an object is ...
Making our boat for the Cardboard Boat Regatta! Materials: Large Cardboard and Duct Tape