

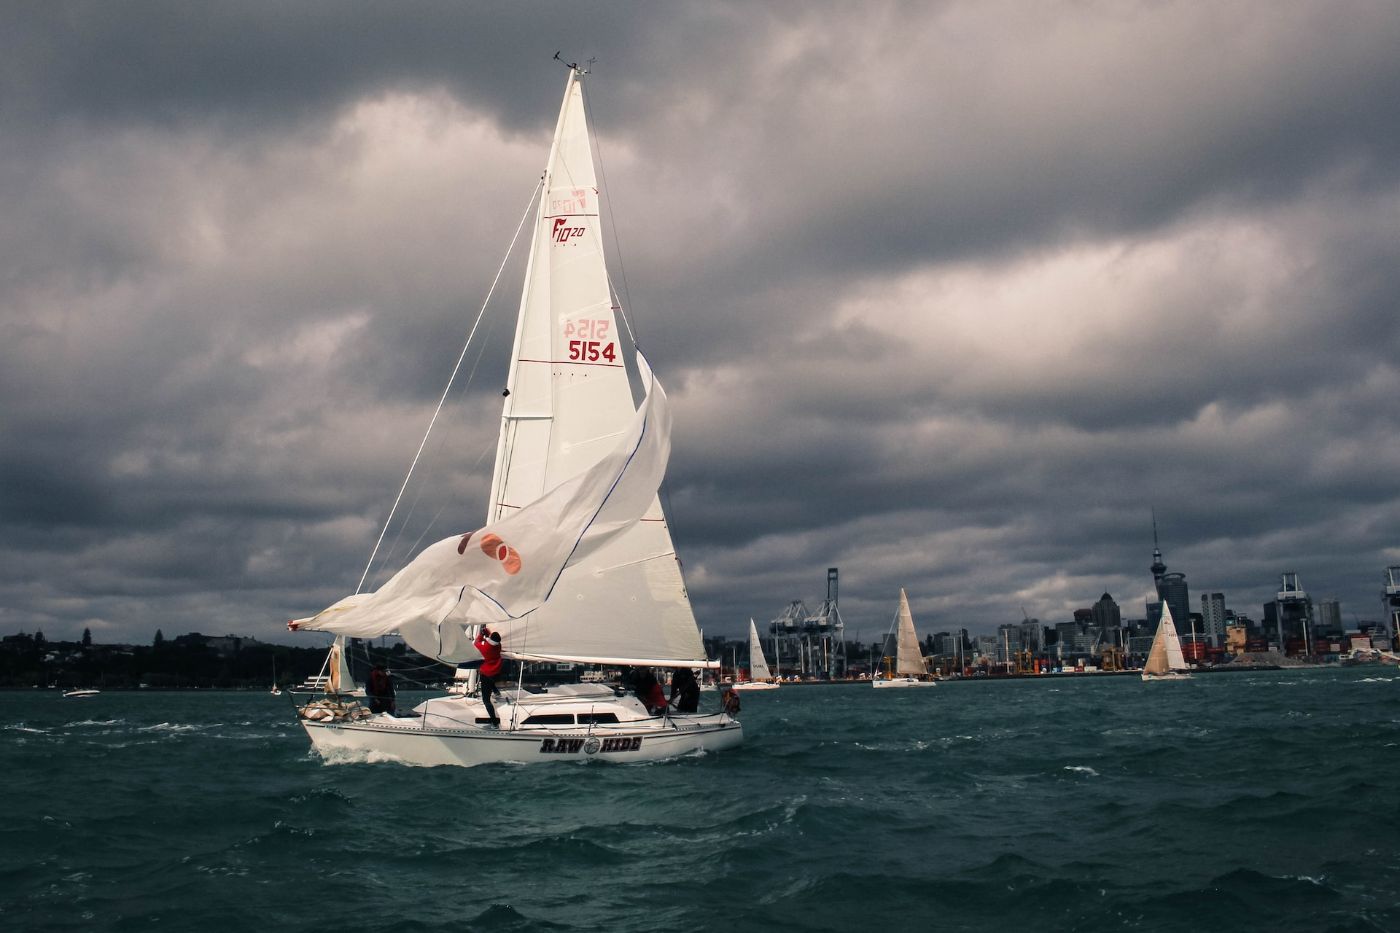
Boat Scratch Repair Cost (Materials, Costs & Tricks)

When you own a boat, you know at some point the boat will get a scratch no matter how hard you try to prevent it. Scratches on a boat can depreciate its value. If you own a boat and want to be cautious about scratches, you might want to know the exact cost to repair a boat scratch.
The average cost to repair a boat scratch is 500-1500 USD. The price varies based on the material, magnitude of the scratch, location of the scratch, material availability, and the boat’s age.
Is there a way to repair the scratch at a lower price? Should you have materials immediately available to fix scratches on the go? Let’s discuss this in this article.
Average Boat Scratch Repair Costs
The average cost for materials to repair a boat scratch can range from 500 to 2000 USD. The labor charge begins from 150 USD and increases based on the intensity of the scratch.
Perhaps, some minor scratches can always incur lesser prices and can be done without requiring external experts. For instance, if you’ve noticed a tiny scratch around the boat dock, you can fix it with respective liquid solutions. However, if the glass on the boat has a major scratch, you need to replace it and fix its surrounding location. This can incur additional expenses.
One of the common instances, when your boat gets scratched, is while docking it. You may seek a discount on the overall charge if you reach a dealer. In any case, tiny repairs and scratches can be fixed with polishes. Nevertheless, don’t take chances with large scratches or deep scratches on the hull or important locations.
Such scratches can affect your boat’s quality, integrity, and value.
How To Fix A Scratch On A Boat
While a scratch on a boat can be thought of as a scratch on a bike, the intensity can vary significantly. Fixing it begins with proper assessment, sanding, filling the region, and curing the damaged part.
Let’s look at it step-by-step right below.
Step 1: Identify the damage
A scratch doesn’t always mean that the paint has peeled off the boat. It can also imply damage to the hull of the boat.
- Dock your boat at the nearest location.
- Inspect the scratched part.
- Identify if the surrounding area is unaffected.
- Estimate the magnitude of scratch.
If it’s huge, reach out to an advisor. If it’s tiny, do-it-yourself. Sometimes, fixing tiny scratches is easier than you imagine it to be.
Boat owners often underestimate the cause of the scratch. For instance, there can be an underlying crack resulting in a scratch. When you leave it unattended, it can extend further and ruin your upcoming journey.
Step 2: Sand the area
As soon as you spot the scratched region, remember to sand it down to avoid exposure to sharp corners. You can use a sanding sponge to fix this sharp region.
Another advantage of sanding the area is to clean it thoroughly to gain a better look at the scratch. Sometimes, it can be bigger than what you’ve estimated.
You need to switch between different sandpapers depending on the depth of the scratch. For example, a deep scratch requires 800-1000 grit sandpaper.
According to Bottom Paint Store , wet sanding combined with 2000 grit sandpaper seemed to work well for many sailboats.
Remember to store sandpapers of varied grits in your boat cabinet so you can save time in hunting for a hardware store at a new location.
Step 3: Get the filler.
If it’s a surface scratch, you can use a basic filling solution and mix it with a color that matches your boat’s color. However, you need to engage a professional if it’s a deep scratch
Some deep scratches are caused due to internal holes or major cracks. In that case, you need to use a marine filler to fill the scratched region and increase its elevation to match the surrounding.
Switching between sanding and coating a few times will help if it’s a hairline crack.
You can use a resin filler to fix the scratch. Ensure proper care while mixing the filler as it needs to be in ratio and consistency as recommended by the manufacturer.
The rule of thumb is to mix it in a way that is spreadable. This will make it easier for covering the scratched area. It should not be too watery or too thick.
Step 4: Cure the scratched area
As soon as you’ve filled the scratched area, ensure that it’s consistent with the associated surface. Otherwise, you should shape it properly.
Your boat needs some time to cure before you can use it again. For instance, a minor scratch might need a few hours to a day to dry and become usable. Deep scratches need several days based on environmental factors and the type of mix.
Once the boat has crossed the average curing time, you should cross-check for imperfections before using it for your next sailing experience.
Note: You can also polish the area if you’d like to.
I’d prefer a polished look always. So, I’d always be up to spending those extra hours of elbow grease to give it a better shine. However, it’s entirely up to your discretion.
For a qucik and cheap option for fixing boat scratchs, I highly recommend this product! I love it!
How To Fix A Deep Scratch On A Hull
The best way to fix a scratch on a hull is to use either Gelcoat or Alexseal paint, and a sprayer. Begin with applying Gelcoat and curing the area until the scratch is no longer visible.
Fixing a deep scratch on a hull can take time and effort. Here’s a step-by-step guide to fixing the damaged hull:
- Sand the location with 120 grit sandpaper.
- Apply the paint as a primer (the first level of fixing the scratch).
- Sand the location again with 400 grit sandpaper. You can skip this step or extend it further according to the size of the scratch on the hull. For example, if it’s extremely deep, you need 800-grit sandpaper to take advantage of its shallow surface.
- Apply the first coat to the sanded region to provide an even look.
- Since the scratch would’ve affected the elevation, you need to apply another layer of paint to match up with the surrounding elevation.
- Allow sufficient time gaps for drying between all layers of paint.
Here’s a YouTube video where the presenter uses Alexseal paint to fix deep scratches:
You need to repeat the process if you’re unhappy with the outcome. Alternatively, it’s also recommended to take the help of an expert while fixing deep scratches.
In sanding the region, you may hamper the smoothness of the surface. This can increase the overall effort involved.
For major scratches, you may need several materials like a sanding block, heat gun, spray gun, sandpaper, variable speed buffer, and rotary tool. You should also decide on the filler or gel coat you’re planning to apply to the scratched region.
Important Safet Note:
Don’t forget to purchase safety gear. You may need two pairs of gloves (chemical-resistant) and safety glasses. On the safer side, you can purchase a respirator to avoid the side effects of the paint’s smell on your respiratory system.
Common Mistakes In Fixing Boat Scratches
Fixing boat scratches is vulnerable to several mistakes such as owner underestimation, wrong choice of materials, wrong process, and limited knowledge about curing. These mistakes affect the usability of the boat.
It’s common to overlook the affected area and fix it with a thickener. Unfortunately, this approach can become useless when there are cracks or serious deep scratches that need urgent attention.
When you’re stuck at a place with no access to experts, you may need to determine the urgency in fixing the scratch and then plan it accordingly. If it’s a minor scratch, it can wait.
As a boat owner, remember to stay cautious before, during, and after the process of fixing scratches on your boat (irrespective of the location and magnitude of the scratch).
Can You Get Scratches Out Of A Boat
All scratches in a boat, minor to profound, can certainly be fixed with a relevant filler compound. Based on the intensity and location of the scratch, a professional can be engaged.
It’s common for boat owners to feel low when the sailboat has major scratches caused by a petty mistake. It’s a wise thought to keep a filling compound with your boat kit. This will help in treating the boat immediately.
Do All Boats Have The Same Methods To Fix Scratches
Most boats have similarities in their methods of fixing scratches, but the materials can vary according to the surface. For instance, a fiberglass boat needs a different material to fix the scratch compared to a kayak.
If you’re using a conventional sailboat, the material varies. There is no one-size-fits-all approach to fixing scratches. Likewise, the filler compound isn’t the same either. For instance, Gelcoat is widely used for fiberglass boats. However, for conventional sailboats, experts use a 3M sanding block, marine filler, and an aerosol thickener.
Final Thoughts
Sailboats are prone to cracks and scratches. However, most scratches don’t need immediate attention unless they’ve extended to other regions or affected the performance of the boat.
In any case, fixing the scratch can vary in cost, effort, and time. But, you can rest assured that it can be fixed!
Boatlifehq owner and author/editor of this article.
Recent Posts
Sailboat Racing - Rules & Regulations Explained
Sailboat racing, a blend of skill, strategy, and adherence to intricate rules and regulations, offers a thrilling and intellectually stimulating experience on the water. Navigating through the...
What is the best sailboat to live on? Complete Guide
Embarking on the journey of living aboard a sailboat requires careful consideration of your budget, desired amenities, and storage options. This guide offers a concise, step-by-step approach to...
The Model Shipwright
How to build first-class ship models from kits or from scratch using actual ship plans, free downloadable high-resolution ship plans, starting point for scratch-built ship model building.
All the the plans offered on The Model Shipwright and The Model Shipwright blog are available on this site in high-resolution files. The images on the blog posting are linked directly to the page here with the downloadable files, or you can search from this page by ship type, ship name, or the historical period in which it was built. We put a lot of work in tracking down these plans, and in some cases digitized them ourselves and put in time cleaning up and repairing the images to make them more useful. Feel free to use them for your modeling projects, but please don’t just take them to repost on your site. We have digitally watermarked them to identify them as coming from this site.
Motor Vessels Ships for which the primary motive of propulsion is an engine
Sailing Vessels
Vessels for which the primary motive of propulsion is sails
Oar-powered Vessels
Vessels for which the primary motive of propulsion is rowing

Coast Guard Vessels
We offer plans of U.S. Coast Guard vessels ranging from early sailing cutters of the revenue service to modern motor vessels such as the buoy tender White Sumac.
Ships whose primary purpose is warfare are cross referenced on this page, whether motor, sail, or oar-powered vessels
Cargo Ships
Ships whose primary purpose is cargo transport are cross referenced on this page, whether motor, sail, or oar-powered vessels

Utility Vessels
Ships whose primary purpose is to serve the maritime industry, such as pilot vessels, tugboats, or lighters are cross referenced on this page, whether motor, sail, or oar-powered vessels

14 comments
How detailed are your plans? Can you email me one page showing it?
You can download the plans directly from the website. Go to the page of plans you want, and left-click on the plan image to open the image file. Then right-click on the image and choose “save image as” to download it to your computer. The plans can be opened with any image-editing or preview software. Save it to a removable drive and you can take the drive to a local copy shop to be printed on their large-format printer.
Do you accept donated paper plans? I may thin out my collection.
Send us a message on our contact page, we’re always looking for submissions!
WAGB -10 or WAGB-11 Looking for plans. Can anyone help? Thx
I have a set of some 200+ plans for WAGB-10, what are you looking for?
I am looking for drawings of below main deck layouts of 1700-1800 “Man of War” ships. Do you have any?
Check out our page on the French Man of War Montebello It has several views of the below decks.
does anyone know where I could get plans for a VLCC oil tanker /?
I have some GA plans for some tankers, what are you looking for?
I am looking for the typical or average hull ratios: beam/lenght, beam/keel, beam/depth, beam/draught, tonnage, displacement, and burthen of the various types of Ships during the age of sail. Any recomendations?
One of the best experts on the subject was Howard Chapelle. He probably answers the question in one of his many books on sailing ships. https://en.m.wikipedia.org/wiki/Howard_I._Chapelle
[…] Ship Plans […]
Anyone know of a source for plans for the Steamer Eastland, that capsized in the Chicago River in 1915?
Leave a Reply Cancel reply
How to Build a Wood Sailboat

Introduction: How to Build a Wood Sailboat

I've been wanting to combine my two favorite hobbies - woodworking and sailing for a long time, so I thought I'd build a boat. It's got classic lines and looks so dazzling in the sunshine that people constantly stop me at the boat ramp to ask me about it. There's something unbelievably rewarding about building something like this from scratch. This is definitely a boat that is much better built than bought . Here's how I did it.
The boat takes about 100 hours to build. I did it over 3 months, working a little bit just about every day and full days when my schedule permitted.
It will take about $1,000 in total to build if you buy everything at full retail cost (not including tools you might need to buy), but you can spread that across the length of the project. For example, you only need to buy one $30 sheet of plywood at a time, take it home, draw out the parts (loft) that fit on just that sheet and cut them out. That will take a couple of hours right there. Some boating supply stores (chandleries) might let you setup an account which might give you a discount if you tell them you're building a boat.
All of the skills needed to build a sailboat can be learned slowly, one step at a time. For example, if you've never fiber-glassed plywood before, just practice on a small piece first to get your confidence up. This was my first boat build, so I did a lot of learn as you go . Not only am I going to show you the right way to successfully build your own sailboat, but I'm going to share with you the mistakes I made along the way to hopefully save you from repeating them.
The end result will be a very attractive little 8 foot long pram, that is easily made out of 4x8 sheets of plywood that is light enough to put in the back of a small pickup truck or roll down to the local lake on the optional dolly. Anything longer would require you to either make a scarf joint (which is a bit tricky) or buy longer sheets of plywood (which is considerably more expensive).
What you will need:
Boat building plans
8 panels of 1/4" oak plywood 4'x8'
Pencil, Sharpie, ruler, tape measure, yard stick, etc.
Long flexible straight edge
Box of 1" brad nails
2 gallons of epoxy resin
1 gallon of epoxy hardener - SLOW
1 quart silica thickener
5 quarts wood flour thickener
1" masking tape
Japanese pull-saw
Table saw (helps, but optional)
Round-over router bit
Flush trim router bit
Palm/random orbital sander
220 sanding discs
Combination square
Drill bit set
Drill bit extension
Basic hand tools
Small diameter wire or zip ties
Wire cutter
12 C-clamps - 3"
Mixing cups, mixing sticks, rubber/nitrile gloves
16' x 60" of 6oz fiberglass cloth
2" plastic spreader
Gallon of waterproof glue
Glue roller
Silicone bronze screws
Stainless steel fasteners
Small blocks
Gudgeon & pintle - dinghy size
Patience - large
Elbow grease - large
For more detailed explanations on each step and more specific info/reviews on the materials and parts used, check out my boat build blog: www.Midnight-Maker.com
Step 1: Cutting Out the Parts...

First, you'll need boat building plans. I purchased some very nice ones from a popular boat building website because I had a specific style in mind to build, a "pram". It's a Norwegian design with lots of buoyancy in the bow and building a pointy boat is a little more difficult. There are a bunch of free boat building plans (search "dinghy") online. Also, I wanted my boat parts to fit in a standard (read cheap) 4'x8' sheet of plywood. It also had to be light enough for me to load/unload/move myself. This boat weighs in at about 70 pounds. When on the custom dolly I built, it's very easy to move from the parking lot to the lake.
Next, you'll need to draw out the parts of the boat full-sized onto the plywood (lofting). I actually did this step on hardboard/masonite because I wanted to make templates of all the parts in case I ever wanted to build another one.
This step requires you to be very meticulous. Carefully transfer the measurements (offsets). They may or may not look correct because it's very non-intuitive to look at curved boat parts that are laying flat. Some parts actually bend the opposite way you think they should. To make the curves, I nailed a bunch of 1" brads into the panel and used a long, flexible straight edge (yard stick, etc.) bent to follow the curve, then I traced the curve with pencil/Sharpie. Once I removed the brads, I had perfectly smooth curves. Keep in mind that with the side panels that are symmetrical to both sides of the boat, only draw out one version and cut two stacked sheets at a time. This ensures the boat will not be lop-sided. Make sure to immobilize the two sheets together with screws outside of the boat parts or use double-sided tape/clamps, etc. to keep the parts registered properly.
Using a Japanese pull-saw allows you to control the cuts very carefully and it can follow the graceful curves. They cut on the pull stroke which means they're very easy to control. Make sure you leave a bit of your cut line, meaning cut just outside the line. This allows you a bit of a safety margin and you can always sand to the line to sweeten it up. This is where the elbow grease really kicks in. It takes hours to cut out the hull panels by hand, but it's worth it. I tried cutting the first part out with the jigsaw and it wandered all over the place and quickly cut inside the line before I knew it. Also, a jig saw blade can lean to one side which could mean two panels might not be the exact same shape. Using hand tools is a classic way to do woodworking and is a very gratifying process. With hand tools, things happen slow enough for you to be in total control, whereas power tools can quickly do unexpected damage. With the understanding that you're building a classic boat, using hand tools wherever possible is part of the philosophy.
The plans I bought were in metric and called for 6mm (1/4") and 9mm (3/8") plywood, but I wanted to make everything out of 1/4" plywood so the thicker parts in the plans were glued together with two layers of 1/4" (so at 1/2" they were a bit thicker than designed). I actually liked this because it made the boat feel sturdier and of course it was cheaper that way. The trade-off was that the boat would be a bit heavier.
For any of the parts that need to be doubled-up/laminated (e.g. the transoms), now is a good time to do that. Make sure you use "waterproof" glue instead of "weatherproof" glue like I did...
Spread a thin layer of glue over one of the "bad" sides (plywood usually has a good side and a bad side, glue bad sides together so good sides show on both outside faces), making sure it's completely covered (I used a special glue roller), then carefully place the other half on top. Align all of the edges together, then clamp them in place. Now put heavy things carefully on top to press the parts together. The glue should be dry in about 6 hours.
NOTE: It's considerably easier and safer to do any woodworking processes to the parts before you assemble the boat. This way, you can safely clamp pieces to the work bench and cut out handle holes, etc. Since my boat is a "lapstrake" design, I had to route a rabbet (groove located on the edge) carefully on the bottom edge of each side panel. This creates a shoulder for the parts to sit on, positively locating them while you're stitching the panels together. Likewise, the grab handles in the transoms are much easier to cut out before putting the boat together.
Also keep in mind that any mistake will be considerably more painful the further you are along in the build. For example, if I biff cutting out the grab handle holes while they're just loose pieces rather than when they're a permanent part of the boat, it's much easier to recover - just make another transom. If you had to patch a hole in the boat, it would be difficult and possibly never look perfect. No pressure...
Step 2: Assembling the Hull...

Once you have the bottom and sides cut out, you can start to "stitch and glue" the hull together. This is a technique used usually for smaller boats to be able to pull the hull form together without the need to build a frame or mold (which can take almost as long and as much wood as the boat itself).
I built a gauge stick to make sure my holes were perfectly spaced at 4" at 1/2" in from the plywood edge. It was 1" wide so either edge was the required 1/2" from the centerline. I worked my way down one side of each of each mated seam and drilled all those holes at once while the panels could lay flat on the bench. Make sure to use a backer block to prevent tear out on the back side, even with such a small drill bit.
With one mating panel drilled with a 1/16" drill bit, hold the mating panel in it's relative position. I used some spare twine to wrangle my panels into the proper orientation as I was marking them. Make a pencil mark where the mating hole should be, remove the pre-drilled panel and drill the second set of holes 1/2" in from the edge. This makes sure there's enough strength to hold the boat together.
The first pass on the stitches is just to get the hull together structurally. You can always go back and make the stitches fancier/tighter and tweak the position of the panels.
The stitches go from the inside out. Cut 6" lengths of wire and bend them into long, narrow U's that are the width of the distance between the holes. Stick the ends through the holes and carefully twist the tails together on the outside of the hull, making sure not to damage the plywood. If you're using zip ties, then the holes you drill will need to be bigger and you'll have to start on the outside, go in, turn around, then back out, then "zip".
Make sure your panels' rabbet shoulders are resting securely on the mating panel and carefully tighten all the stitches. For my boat, once I had two panels stitched to the bottom panel on each side, it was time to attach the transoms (ends). Once all of the exterior parts are stitched together, you should have something that looks like a boat. It will be a little rickety at this stage, but that's okay.
NOTE: In the photos I took of my build, you'll notice that the transom doublers (reinforcers) aren't in place. That was because I was following the instruction manual, but I think that was a mistake, so I highly recommend laminating (gluing) the doublers to the transoms before you stitch the boat together.
Step 3: Reinforcing the Hull Joints...

Now that the hull is stitched together, flip it over upside down. You'll be surprised at how stiff it is, considering how difficult it was to wrangle all those panels into position. Be careful, there's lots of poky wire ends sticking out all over the place.
I used a technique called "tabbing", meaning I made small, structural tabs from thickened epoxy that fit between the stitches, then I removed the stitches and made one long, larger fillet to connect the hull panels together.
Make sure your panels are perfectly aligned and tightened. I used a nipper to lop off most of the tails so they wouldn't get in the way, but that left very sharp spikes.
Make sure your boat is square. Take diagonal measurements from corner to corner, make sure the boat parts are parallel to each other, etc. because if there's a twist in your boat, the next step will make it permanent, which will affect the boat's performance.
Now mix up a batch of epoxy and silica thickener according to the manufacturer's directions (meaning each type of epoxy has a different resin to hardener ratio) until it's between the consistency of thick ketchup, but runnier than peanut butter (make sure to mix the 2 parts of epoxy together first very well before adding a thickener). Too thick and it won't fill the void, too thin and it'll run down inside the boat. Both are bad. I used a small syringe to inject the mix into the V intersection between the panels and checked underneath/inside to see if there were any runs.
Once the epoxy has partially set, use a glove wet with denatured alcohol to smooth out the "tabs" so they fit inside the V groove and don't extend above the intersection between the panels. This will give you good practice for the seams that will show on the finished boat. Be careful of the wire spikes.
Repeat this process for every seam on the hull. Let it cure overnight.
Once the tabs have cured, carefully remove the stitches. If the wire seems to be epoxied permanently to the hull, heat the wire with a lighter. That will soften the epoxy enough to pull the wire out. Be careful not to scorch the boat (you don't want a Viking funeral). Now repeat the thickened epoxy process for each overlap, except this time each seam will need to be one long, smooth joint. Let it cure overnight. This goes a long way in making the boat hull structural.
Step 4: Fiberglassing the Hull...

Now that you've got a permanent hull shape, it's time to make it waterproof and rugged. Fiberglass and resin over plywood is a tried and true Do It Yourself boat building technique which makes it strong and light.
Mask off the bottom panel and roll out your fiberglass cloth. Smooth the cloth out very carefully so as not to snag or tweak the fibers' orientation. Mix up an unthickened batch of epoxy (it will be the consistency of syrup). Starting at the stern, pour a small puddle of epoxy and spread it out nice and thin. You should be able to squeeze most of the epoxy out of the cloth, leaving only saturated cloth with no dry spots (which will appear white) but the weave should still be showing (meaning no extra epoxy is pooling). You should easily be able to see the wood grain through the cloth now.
Let the epoxy partially cure and using a razor, slice the dry fiberglass cloth away on the taped seam. Then remove the masking tape. Let the epoxy cure overnight.
Flip the hull over and mix up a batch of epoxy that is the consistency of peanut butter. I masked off the joint, but this step is optional, but keep in mind that it will be visible if you plan on finishing the interior bright (varnished wood). It's not as critical if you're painting the interior. With a plastic spreader, carefully make a large radius transition (fillet) between the bottom panel and the first side panel (garboard). Remove the masking tape when the epoxy mixture is partially cured and carefully scrape/wipe any unwanted mixture. It's much easier to remove now than having to sand it all off later. At this point, it's also a good time to fillet the transoms to the sides using 3/4" radius tabs between stitches and 1" finished fillets after you've removed the stitches. Let the fillets cure overnight.
Now, repeat the entire fiberglassing process on the inside. Except instead of just doing the bottom panel, make sure both the bottom and the garboard are fiberglassed. This is basically the waterline of the boat. The fillet should allow the fiberglass cloth to smoothly make the bend between boards. Remove the excess cloth when partially cured and let sit overnight. Some people fiberglass up onto the transom at this stage which will make the boat stronger, but that means you have to have already filleted the transoms to the bottom.
Step 5: Installing Interior Parts...

The bulkheads get stitched in place just like the panels. They will make the already stiff (and much heavier boat) completely structurally sound and push/pull the sides into their final shape. Then make 3/4" "tab" fillets between the stitches to lock them in place, remove the stitches and make long, smooth 1" fillets. The smaller fillets will get covered by the larger fillets. I used two different modified plastic spreaders to do this step. Each spreader was cut with a box knife and filed/sanded into its final shape.
While you're doing the previous steps, if you're in a time crunch, go ahead and build the daggerboard trunk. It's made of numerous parts that are pre-coated with a couple layers of unthickened epoxy, then glued together with silica-thickened epoxy. This makes it strong and waterproof as it will be below the waterline so must be completely waterproof.
The daggerboard trunk is the most important part of the boat, especially if you're making a sailboat version (this boat can easily just be used as a rowboat). Not only does it support the center seat (thwart), but it has to transfer all of the force from the sail to the water and if you run the boat aground, it takes all the shock loading from the daggerboard.
The daggerboard gets filleted into place like everything else. Make sure it's perfectly on the centerline of the boat as that will affect its sailing characteristics.
Next, let's make the daggerboard slot in the center thwart. I set up a straight edge with a spiral upcutting router bit. Make sure to enlarge the slots at the end of the center thwart so that it can fit around the fillets of the center bulkhead. Now is the time to ease the edges of the center thwart because you'll be sitting on it a lot, so it needs to be comfortable. Because it's so thin, I only routed the top edge of the center thwart that shows and just hand sanded the edge underneath (it's very problematic to use a round-over bit on the second side of a thin board). Paint all of the thwarts with three coats of unthickened epoxy, especially the undersides. Once the woodworking is done, the thwart can be epoxied into place with peanut butter (or you can jump to cutting the daggerboard slot in the bottom of the hull). Make sure the thwart fits snugly in place. Drop dollops of peanut butter on the top edges of the center bulkhead and daggerboard case and spread it out evenly (make sure none gets inside the slot to interfere with the daggerboard). Firmly seat the thwart (pun intended) into the goop and weight it down. Let it cure overnight.
While you've making sawdust, cut out the mast hole (partner) in the forward thwart by drilling holes in the four corners (for the square mast we're going to make), then cut out the sides, file it smooth, then round over the top edge with the router.
Any time after the bulkhead thwart fillets have cured, you can seal the airtank chambers. Paint the bottom, sides, inside of the bulkhead and transom up to the level where the thwart will be.
Step 6: Rail & Sailboat Parts...

There are several processes in this boat building instructable that can be done concurrently. While you're waiting for the epoxy on one part to cure, you can be doing woodworking or epoxying another part. This step illustrates that point. While you're waiting for the epoxy on the rub rail (outwale) to cure, you can be fabricating the sailboat accessories (e.g. daggerboard, rudder, tiller, spars, etc.).
In order for the outwale to be thick/strong enough to be effective, you'll need to laminate it in two strips on each side. You can't bend a single piece that thick around the curvature of the hull without either breaking the wood or softening it by steaming it which is a complicated process.
Take a strip that's half the final thickness and a little longer than the boat edge (I made mine a bit beefier), mix up some peanut butter with the colloidal silica and carefully spread it on the inside of the strip. Starting at the stern, clamp it in place, perfectly align it with the top edge of the plywood. Now you have a long, springy lever to bend the wood strip along the compound curve. It dips both vertically (shear), and bows out at the widest part of the boat (beam), then back in toward the bow. At least every foot, clamp it as you go, moving forward. More is better. Toward the bow, the strip will get stiffer as it gets shorter. Once clamped in place, scrape/wipe off all the squeeze-out. It's much easier to remove now than after it hardens. Let it sit overnight. You'll have to repeat this three more times, meaning this step takes four days (if you're using "slow" epoxy hardener).
During those four days that you're dealing with the outwale, you can make major progress on the sailboat parts. They're completely separate from the hull. If you're just making a rowboat, then you can skip making these parts.
The daggerboard and rudder are cut out and laminated. Then a bevel is ground onto the leading and trailing edges to make it slice through the water more efficiently. Then they're covered in layers of epoxy. The mast step is assembled. This has to be very strong because all of the force of the sail is transmitted to the boat through the mast step and the mast is a very long lever arm. The rudder cheek plates and tiller also have to be assembled similarly to the daggerboard case.
NOTE: Whenever there's a hole to be drilled into any part of the boat, you must take additional steps to make sure the water doesn't penetrate and damage the wood. The correct procedure is to drill an over-sized hole, completely fill that hole with epoxy (I usually put a piece of masking tape on the back side to act as a dam), then once the epoxy cures, re-drill in the center of the epoxy plug the correct hole size. That makes each hole in the boat possibly a 2 day process, so plan accordingly. You can also use 5 minute epoxy to knock out a bunch of holes quickly, but be careful, they're not kidding. This stuff gets rock hard very quickly and will permanently glue anything touching. This is exactly how you drill the hole for the pivot point for the rudder/cheek plate assembly. If the pin is 1/4", then drill 1/2" hole and fill that with epoxy. Now the 1/4" hole will fit nicely in the center and be completely waterproof.
Since all the parts need several coats of unthickened epoxy and they just about all have holes in them, I hung them up with some twine and painted them on all sides, one layer at a time, for several days. Make sure the rudder doesn't get too thick to fit inside the cheek plates.
Step 7: Making the Spars...

More sailboat parts you can make while waiting for other parts to cure are the spars, the structural parts that support the sail. The mast is another glue up. I used 3 - 1x3's of hemlock. A relatively soft wood, but with a nice tight grain with no knots. A mast would break at a knot, regardless of how strong the wood is. Using the waterproof glue, align the pieces as perfectly as you can then clamp up the assembly and let dry overnight. Then run it through a table saw to get the final dimensions. Use a router and a round-over bit to ease the edges. Cut to length and sand the sharp corners. It should fit easily, but snugly into the forward thwart.
The boom (bottom of sail) is a little more complicated. Cut out the gooseneck (boom pivot point) by using a hole saw first, making sure to clamp it securely to the workbench, then cut out the profile. This gets attached to another piece of 1x3 hemlock, after it's been cut to length and the edges have been rounded over.
The yard (top of sail) is easy. Just cut to length and round over the edges. Drill and fill any holes in the spars at this time. You'll need at least one hole on each end to lash the sail grommets to.
This time, everything gets covered with several coats of varnish, epoxy is not necessary. The varnish protects the wood from water and UV damage.
The reason we had to make at least the mast at this point is because we'll need it in the next step to establish the location of the mast step.
Step 8: Finishing Up the Interior & Exterior...

Once the outwales are successfully attached, trim them flush with the face of the transom(s). While you're at it, use a flush cut saw (with no sawtooth offset to mar the wood) to trim the sides flush with the transom. This will show you how well your injected silica mix worked earlier. Now you're ready to install the mast step.
The mast step must be precisely located on the floor (sole) of the boat to give the mast the proper angle (rake). This is very important because it directly affects the boat's ability to sail upwind. Using your mast, insert it into the forward thwart (partner) and into the mast step. With the mast at a 3° angle (mostly vertical but with a small, yet noticeable and graceful tilt toward the stern of the boat), trace the location of the mast step. Use a combination square to make sure it's perfectly aligned side to side (athwartship). You can now set the mast aside. Drill and fill holes in the bottom of the boat so that you can securely screw the mast step from the outside of the hull. The mast base must also be epoxied to the sole with peanut butter. After it's screwed into place but before the epoxy cures, make sure to test fit the mast again and verify the rake angle is correct. It would be a little messy at this point if you had to tweak it, but at least you wouldn't have to cut it off.
Now comes the most unpleasant part of the whole build. On your hands and knees, make a 1" radius fillet on the underside of every part in the boat. I didn't worry about making these pretty, just structural and water tight (these create the flotation tanks that keep the boat from sinking if you capsize). Let that cure overnight.
Next is the scariest part of the build, making the slot in the hull for the daggerboard. Using a drill bit extension, from the inside of the boat, reach down through the daggerboard case and drill a hole at each end of the slot through the bottom of the boat (make sure to use a backer board). Drill a couple holes in between, then take a jigsaw and connect the dots. This weakens the hull enough so that the router won't tear out any extra wood. Note, this step can easily be done prior to affixing the center thwart. Using a flush trim/laminate router bit, let the bearing run around the inside of the daggerboard case. This will make the hole in the hull perfectly match the slot. This is important because you don't want a shoulder on the inside for the daggerboard to hit and you don't want to damage the waterproof lining of the case. Last, ease the sharp edge of the daggerboard slot with the router and a small radius round-over bit.
The skeg must be cut to fit the curve of the hull (rocker), then using silicone bronze screws, attach it to the hull using the same drill and fill/peanut butter techniques. Make sure to snap a chalk line on the centerline of the boat for reference. Then make a 1" fillet where it meets the hull which will support the skeg and make it strong. The skeg keeps the boat tracking straight in the water. I optionally used some fiberglass cloth to cover the skeg and overlap onto the bottom to make the entire assembly stronger and more waterproof. The skeg will take the brunt of the abuse when launching, beaching, loading and unloading, etc. I also installed a stainless steel rubstrake on the aft end of the skeg with this in mind. In wooden boat building, silicone bronze screws are often used because they won't corrode when encapsulated like stainless steel screws can.
Install the skids parallel to the skeg. These are solid pieces of hardwood because they will also take a lot of abuse when the boat is sitting on shore, protecting the thin hull from rocks, etc. They get installed the same way as the skeg, although it's a little tough to bend the wood along the rocker. Scrape off the excess peanut butter once they're screwed in place.
I also installed the optional outboard motor pad at this point because I plan to use an electric trolling motor on the back to quietly putter around the lake in the evenings to relax with the family after work.
That should be the last parts that go into making the boat!
Step 9: Finishing the Hull...

Now comes the last dash to the finish line. One of the more tedious steps is that you now have to sand the entire boat. I actually built the entire boat inside, but for the sanding stage, I took her outside. Several hours of sanding all of the fillets nice and smooth. Everything will show in the finished product whether you paint the boat or leave it "bright" (unpainted). If you've been careful about cleaning up the peanut butter as you go, you should be able to sand the boat with mostly 220 grit. Be careful not to sand through the thin veneer of the plywood. After the sanding is done (make sure to use a dust mask), vacuum the entire boat and then wipe it down with a tack cloth to remove any dust. I also reversed the hose on the shop vac and used it to blow the sawdust off since I was outside.
Next, you must coat the entire interior and exterior with 3-4 coats of unthickened epoxy. This makes the entire boat waterproof. It will also give you an idea of how beautiful the wood will look when varnished. This is why a lot of boat builders decide to leave their boats bright so the beauty of the wood shows through.
Mix up 1 cup batches of unthickened epoxy and pour out large puddles onto the surface. Taking a foam roller, distribute the epoxy in a smooth coat. Now take a wide foam brush and gently smooth (tip) the rolled out surface. This should remove any lap marks or bubbles. Move along to the next area, making sure to not touch the wet parts. Also, make sure no dust or bugs get on your finish or it'll mean even more sanding later.
Start with the exterior first. It'll be much easier to get good by practicing on the convex surfaces. The interior is more tricky because you want to prevent sags and pooling by only applying very thin coats.
Make sure to check with the manufacturer's directions during this step in case you have to deal with "blushing", a thin layer that can sometimes form on the surface of epoxy when it cures. This could cause your layers to not stick to each other. If your epoxy does blush, it's easy to just wipe the entire boat down with a rag soaked in acetone after each coat has cured. Some people sand between coats of epoxy. This is how you would make an extremely smooth/shiny finish, so if you want your boat to be museum quality, invest the effort. I'm planning on banging my boat around so opted out of an extreme, fancy, mirror finish.
I was originally going to paint the exterior of the hull, which would require priming and painting, but I'm leaving it bright for the time being. The good news is that you can always paint later if you change your mind, but if you paint it and change your mind, it's tough to go back. There aren't a lot of pics of this step, which took a couple of days because there wasn't much visible progress after that first coat went on. At this point, any surface that's not painted should be varnished using the same "roll and tip" method as the epoxy, with the optional sanding between coats. Note that epoxy has no UV resistance, so to keep your boat from getting sunburned, you must either paint or varnish every surface. Giving a boat a "museum quality" paint and/or varnish finish can literally take as long as building the boat.
Step 10: Making the Sail...

Another step you can do while other parts are curing is make the sail. This particular design uses a "lug" sail, a classic looking sail for small boats with wood masts. It increases the sail area (therefore the force generated by the wind) without it having to be as tall as a modern sailboat mast made of aluminum. There is a kit from an online sailmaking company that you can get for a reasonable price. The Dacron cloth panels are all cut out by a CNC machine, so they fit perfectly together. I used a regular, domestic sewing machine, not an industrial one. The only time I had trouble was when sewing through all 7 layers at the reinforcement patches. When I got to those parts, I had to manually push down on the foot of the sewing machine with a flat-bladed screwdriver (minus) to help push the needle through the Dacron. We jokingly call Philips head screwdrivers "plus".
The panels/parts all come labeled. The directions were a bit confusing because they suggest you make sub-assemblies after the fact to make wrangling the large sail easier but they mention it after you've already sewn the large panels together. It's important to understand what parts go together while the panels are still small and more manageable. For example, the batten pockets are tricky enough to build on a single panel, much less the finished sail. Building the sail was about as difficult for me as building the boat, but it was worth it.
The lug sail gets reinforcement patches on all four corners where you attach it to the spars (bend), and there's also a reefing point for when the wind starts to pick up (freshen). Modern sails have three corners (Marconi rig).
I opted for the less expensive white Dacron sail kit, but there's also a classic red (tanbark) colored kit that's $100 more expensive. Before I sewed a single stitch, I carefully traced every part of the sail kit onto painter's tarp poly film so I can always use the templates to build another sail, all I need to do is buy the tanbark cloth.
Step 11: Rigging Your Sailboat...

This seems to be the trickiest part for most people, probably because there are numerous ways it can be successfully rigged, depending on your experience, preferences or criteria. It's confusing because you have to know what the finished setup will look like in your mind while you're staring at a pile of ropes. I chose a setup that allows the most room in the cockpit for a full-sized adult, so the mainsheet is led forward of the skipper's position. This keeps the skipper's attention forward so they're looking where they're going. I have another boat where the mainsheet is behind the skipper and it takes some practice getting used to.
The lines I made up (rope becomes a line when you give it a job description) were the halyard (hauls the sail up), the mainsheet (adjusts the angle of the sail to the wind = trim) and a traveler bridle (where the mainsheet attaches to the boat). I got fancy and spliced all my ends, but you can just as well use a bowline knot.
I installed a cheek block at the top of the mast instead of the large diameter hole in the directions. I wanted the halyard to run as smoothly as possible when setting the sail. Then I installed a pair of cleats at the base of the mast, one for the halyard and one for the downhaul (cunningham). With both of these lines pulling in opposite directions, it locks the sail in place, flat, so it effectivley acts like a wing. The main halyard attaches to the gaff with a snap onto a padeye. This allows easy on/easy off when rigging at the boat ramp. I also used a small loop (parrel) around the mast and through the eye to keep the gaff located close to the mast. I looped the downhaul over the boom and down to the cleat to try to keep the gooseneck from twisting. Note, except for the blocks, just about all of the hardware used on rigging a boat this size can come in stainless steel or brass/bronze, depending on the look you're going for. If you plan on installing oarlocks to row the boat, this decision becomes even more important to the final look of the boat.
For the mainsheet, I made a short bridle between the handles on the transom with a small eye tied in the center. This allows a place for the snap on the end of the mainsheet to attach to. I could've just as easily allowed the snap to slide, which would give the bridle the function of a traveler, but would affect its pointing ability (sail upwind). The mainsheet is then run to a block on the end of the boom, then to another block in the middle of the boom. This leaves the main cockpit area unobstructed with running rigging. Make sure your mainsheet is long enough for your boom to swing forward of 90° to the boat, with enough to still come back to the cockpit for the skipper to control. A stop knot at the end of the mainsheet will keep the mainsheet from getting away from you and give you something to grip.
The rudder pivot hardware (gudgeons and pintles) must be installed perfectly vertical and on the exact centerline of the boat so that she will sail well. Drill and fill the necessary holes for this hardware. Be careful with the spacing. It's designed to be easily installed and uninstalled while underway.
With this particular rigging layout, when under sail, the skipper must constantly keep the mainsheet in hand, which is a good idea anyway for safety reasons (if you get hit by a gust of wind = puff, you won't get blown over = capsize). The tension on the mainsheet is easily manageable for any size skipper. On larger boats, the mainsheet is held by a fiddle block with a cam cleat, which is not necessary for a boat this size. With that being said, a possible future upgrade would be to install a block and a camcleat somewhere on the centerline of the boat so that more advanced sailors wouldn't need to constantly have to oppose the tension on the mainsheet. Of course the trade-off would be the hardware would probably be somewhere you might want to sit.
Another upgrade I figured out after actually taking her sailing would be to rig up a bungee/shock cord system that will hold the daggerboard both in an up and down position. With the current setup, the centerboard is held down by gravity and must be pulled out of the slot when beaching.
Step 12: Go SAILING!

Because I wanted to be able to go sailing by myself if needed, I made a dolly out of 2x4's and large pneumatic tires (which makes the dolly float). The dolly fits securely between the center and aft thwarts when driving out to the lake. The sides on the dolly lock against the skids on the bottom of the boat so it can't twist. Roll the sail up with the spars and wrap it with the main halyard. At the designed length, the mast doesn't fit inside the boat, but it seems a bit long, so some people have cut the mast down enough so that it fits inside the boat.
Out at the lake, unload the boat, slide the dolly underneath and you're ready to roll down to the ramp. At the launch, roll the boat out into the water until it floats off the dolly, toss the dolly off to the side out of everybody else's way. Drop the daggerboard into the slot and install the rudder assembly. Facing into the wind (important), stick the mast into the receiver hole (partner), tie off the downhaul (cunningham) and hoist the sail until the downhaul is tight, then cleat off the main halyard. Reave the mainsheet (run the line through the blocks) and you're ready to go sailing.
I've found that this boat sails very well. The lug sail makes it very easy to sail upwind (weather helm), it's a little more tender for a large adult, more so than a boat with a hard chine, like an El Toro/Optimist but it's a lot more graceful looking. The payload is very reasonable for a boat this size. My wife and son can easily (and safely) go sailing with me and I don't even need anyone's help to get it rigged and launched. All in all, this is one of the best projects I've every built. I hope you too can discover the joy of building your own boat and then take her sailing. Remember, in sailing, the wind is free, but nothing else is...
This is my very first Instructable after many years of referencing this excellent site to build numerous cool projects (you should see my next post). Anyway, I hope you enjoy it and please feel free to ask any questions you may have and I'll do my best to answer them. I'm planning on building a larger boat in the near future so stay tuned...

Participated in the On a Budget Contest

Participated in the Wood Contest
Recommendations

Make it Resilient

Made with AI - Autodesk Design & Make - Student Contest

Remake It - Autodesk Design & Make - Student Contest

How Much Does It Cost to Build a Sailboat?
If you're on a tight budget, there are ways to build a sailboat affordably and still end up with a seaworthy boat. You can choose to start completely from scratch or consider using a self-build kit. If you want to hop on a sailboat project, let me help you break down the costs of building one.
The average price range for building a sailboat from scratch is between $10,000 and $20,000. A self-build kit for a 17' sailboat can be purchased for $2,500, while a sail-away Puur 17 kit can cost between $14,000 and $18,000. Meanwhile, building a 21ft gaff-rigged cutter can cost between $33,000 and $35,000.
If you're building dinghies, you can expect to spend anywhere from $1,500 to $10,000, depending on the size and materials used. Let's look at the estimated costs of building other types of sailboats and what factors can affect these costs.
- If you are on a tight budget, you can try starting to build a basic dinghy, which only costs around $1,500.
- If you're building a smaller boat, try to use less expensive materials, such as plywood or fiberglass, to keep costs down.
- You can save a significant amount of money on labor costs—around $10,000 if you do all the building yourself.
- A plan includes information on the materials needed for construction, as well as step-by-step instructions for assembling the boat.
- A catamaran with a more complex design or more advanced features costs around $50,000–$500,000 to build.

On this page:
Breakdown of costs in building a sailboat, average cost of building different types of sailboats, how to build a sailboat on a budget.
The average price range for building a sailboat from scratch is between $10,000 and $20,000 , but this can be much higher if you want to build an extremely high-quality craft or if you live in an area that is especially expensive.
Below is a table showing the estimated range of costs when building a sailboat:
Consider the materials you will use and the amount you need
Some common materials used in sailboat construction include fiberglass, wood, aluminum, and steel. The estimated cost of each material is as follows:
If you plan to build an aluminum sailboat, you might want to check out its pros and cons .
Factor in the costs of equipment
Building a sailboat requires a variety of specialized tools and equipment, such as saws, sanders, drills, and clamps. In addition to these basic tools, there are also more specialized pieces of equipment that may be necessary, such as a planer, a router, and a jointer. The table below shows how much each of these equipment costs:
Take into account the costs of labor
If you have the skills and experience to build the boat yourself, you can save a significant amount of money on labor costs. However, building a sailboat is a time-consuming process, and you should factor in the value of your time when calculating the overall cost of the project.
If you hire a professional boat builder, the cost of labor can be quite high, based on the complexity of the boat and the builder's experience and expertise. Although hiring a professional builder can be more expensive, it can ensure that the boat is built to high standards and is seaworthy.
Budget for purchasing a plan
If you are building a sailboat from plans, you will need to purchase the plans themselves. A plan refers to a set of detailed instructions and diagrams for building a specific sailboat design. It includes information on the materials needed for construction, as well as step-by-step instructions for assembling the boat.
Plans for a smaller, simpler sailboat may cost a few hundred dollars, while plans for a larger, more complex sailboat may cost several thousand dollars. The plan also includes the estimated timeline for completing the boat construction process. Building a sailing yacht can take at least 10 - 24 months to complete .
Carefully evaluate different sailboat plans before making a purchase to ensure that they are suitable for your needs and skill level. You may also want to consult with a professional boat builder or designer to help you choose the right plans and provide guidance during the construction process.
Account for miscellaneous expenses
There are a variety of other expenses which can add up quickly and should be factored into the overall cost of the project, such as the following:
- Permits: Depending on the location where the sailboat is being built, there may be permits required for construction.
- Insurance: Sailboats are valuable assets and require insurance coverage to protect against damage, loss, or theft. Insurance premiums can be a significant expense, especially for larger sailboats. Read this article to see the current costs of sailboat insurance.
- Transportation: If the sailboat is being constructed in a location that is far from the water, transportation costs may be incurred to move the boat to the water. This can include fees for a trailer, a truck, or a professional boat transport company.
- Miscellaneous Materials: There may be other materials required for the project that are not included in the initial cost estimate, such as hardware such as screws, bolts, and fittings, which may need to be purchased separately.
Sailboats come in various types, each designed with different features and purposes. The type of sailboat you choose will affect the cost of building it. Here are some common types of sailboats and their average costs:
The cost of building a dinghy
Dinghies are small sailboats that are typically used for racing or leisure sailing. They are usually less than 20 feet long and are designed to be sailed by one or two people.
For a basic dinghy, the cost can be as low as $1,500. This would typically involve using plywood or fiberglass for the hull, and basic rigging and hardware. However, for a more high-end dinghy, the cost can be as much as $10,000 or more. This would typically involve using high-quality materials such as carbon fiber or Kevlar for the hull, and more advanced rigging and hardware.
The cost of building a daysailer
Daysailers are slightly larger than dinghies and are designed for sailors who want to enjoy a day on the water without the expense and maintenance of a larger boat. Daysailers come in a variety of designs, from traditional wooden boats to modern fiberglass models. Some popular brands of daysailers include the J/Boat, the Laser, and the Sunfish.
These types of sailboats can accommodate up to six people and are usually between 20 and 30 feet long. A basic daysailer can be built for as little as $10,000, while a more luxurious model can cost upwards of $30,000. The most common materials used for building daysailers are wood, fiberglass, and aluminum.
The cost of building a cruiser
Cruisers are larger sailboats that are designed for long-distance sailing. The best-size cruiser usually ranges from 30 - 40 feet long.
Building a cruiser can cost between $30,000 and $100,000. Some cruisers may have additional amenities such as a kitchen, bathroom, and sleeping quarters, which can increase the overall cost.
The cost of building a racing sailboat
Racing sailboats are designed for speed and agility. They are usually between 20 and 30 feet long and are built with lightweight materials.
Building a racing sailboat can cost between $20,000 and $50,000, depending on the size and materials used. Since these sailboats are designed to be as lightweight as possible, it means that high-performance materials such as carbon fiber may be used, which can increase the overall cost.
The cost of building a catamaran
Catamarans are sailboats with two hulls. They are designed for stability and speed and are usually between 30 and 50 feet long, but the perfect size for sailing is around 37037 feet . Building a catamaran can cost between $50,000 and $500,000.
The larger the catamaran, the more expensive it will be to build. The materials used in the construction of the catamaran can also impact the cost, so if a catamaran is made of fiberglass, it will be less expensive than one made of carbon fiber. A catamaran with a more complex design or more advanced features will generally cost more to build.
The cost of building a trimaran
Trimarans are sailboats with three hulls, which are usually between 30 and 50 feet long. The cost of building a trimaran ranges between $50,000 and $500,000.
Since trimarans are generally larger and more complex than monohull boats, they require more materials and labor to build. Additionally, trimarans often require specialized equipment and expertise to construct, which can drive up the cost of the project.
Trimarans are also often built using high-quality materials like carbon fiber, Kevlar, and other advanced composites, which can be quite expensive. These materials are chosen for their strength, durability, and lightweight, which are all important factors for a high-performance sailing vessel.

Below are some tips to help you build a seaworthy sailboat without breaking the bank:
Consider a self-build kit : If you're handy with tools and have some building experience, you might want to consider a self-build sailboat kit. These kits come with everything you need to build a sailboat, including plans, materials, and hardware. Self-build kits can be a cost-effective way to build a sailboat, with prices ranging from $2,500 for a 17' sailboat kit to $14,000 to $18,000 for a Puur 17 kit, whichever you'd like to choose.
Choose your materials wisely : You don't want to skimp on quality, but you also don't want to overspend on expensive materials. With this, perhaps consider using plywood instead of solid wood for the hull, as it's more affordable and easier to work with. You can also look for deals on used materials, such as sails, rigging, and hardware, to save money.
Keep it simple : The more complex the design, the more expensive it will be to build. A simple design with a basic rig can be just as seaworthy as a more complex design, and it will be easier and cheaper to build.
Do it yourself : If you have the skills and experience, try doing as much of the work yourself as possible. This can include everything from building the hull to installing the rigging and hardware. Doing the work yourself can save you a lot of money on labor costs, and it can be a rewarding experience to build your own sailboat from scratch.
Leave a comment
You may also like, how long does it take to build a yacht (7 types).
Building a yacht requires time, effort, and dedication. Factors such as customization, size of the yacht, design complexity, material availability, and shipyard …
pros-and-cons-of-aluminum-sailboat

What's the Best Size of Sailboat for Coastal Cruising?

13 Best Beginner Sailboats with Cabin (For Any Budget)

The Best Sailboats for Rough Sea Conditions (13 Examples)
Own your first boat within a year on any budget.
A sailboat doesn't have to be expensive if you know what you're doing. If you want to learn how to make your sailing dream reality within a year, leave your email and I'll send you free updates . I don't like spam - I will only send helpful content.
Ready to Own Your First Boat?
Just tell us the best email address to send your tips to:
Become the Confident Skipper of Your Own Sailboat
Sailboat model building.
- Post author: Anns
- Post published: October 11, 2022
- Post category: Uncategorized
- Post comments: 0 Comments
Introduction
You can build a model sailboat out of wood, and it’s really easy. This blog will show you how to build a basic wooden sailboat model that’s good for beginners and more experienced modelers alike.
How to build a Sailboat: Part 1
Building a sailboat has been my dream since I was a kid. I have always wanted to build one from scratch, but never had the time or money to do so. Now that I am retired and have more time on my hands, I have decided to start building this beautiful wooden sailboat model from plans that I bought online. Here’s how you can build your own wooden sailboat:
How to build a Sailboat: Part 2
Before you can begin building a sailboat, you need to build a keel. The keel is the main part of your boat and without it, your boat would have no stability. This is what keeps the boat from tipping over when sailing in rough seas.
Next, you need to make a hull for your sailboat model by using pine wood or balsa wood strips that are glued together with sticky glue (which is sold at most craft stores). After making sure that all of the pieces fit together properly, start applying paint or stain onto each plank so they look real!
Afterwards, make sure there are no gaps between each plank so that water cannot get inside while sailing out on open waters! You’ll also want as many planks as possible because this will improve your ship’s speed! In fact…
How to Build a Sailboat: Part 3
Now that you have a hull, it’s time to turn your attention to the deck. The deck is what rests on top of the hull and provides a platform for sailing. The size, shape and placement of this part are all up to you based on what kind of ship you want to build.
Once you’ve made your decision about how big or small your deck should be, take measurements from below so that it fits snugly in place over the hull. You may need some help from someone with better eyesight than yours if parts don’t line up quite right (as they often won’t!). Then cut out some wood planks with a saw and glue them together using wood glue or waterproof epoxy (like Gorilla Glue). Afterward make sure everything fits snugly by sanding down any rough edges before painting or staining them!
At this point everything looks great with just one problem—it needs something more than just wood planks sticking out everywhere! So let’s start adding railings next….
How to Build a Sailboat: Part 4
Being able to build a sailing ship from scratch is a skill that many people never get around to learning. It’s not just hard, it’s also expensive. Not everyone can afford to go out and buy a kit where all the pieces are put together for them, nor do they want to spend hours in the garage cutting wood with their tool of choice. Here at Sailboat Model Building we’re here to help!
In this article we’ll be showing you how you can build your own sailboat from scratch using nothing more than some basic tools, maybe a table saw if you’re lucky enough, and some time on your hands (but not too much!). We’ll also teach about why building your own models is an important step towards being able to build real life sailing ships in the future!
You can make your own sailboats from wood.
You can build your own sailboat from wood. To do so, you’ll need:
- Wood for the boat’s hull and deck (about ¾ inch thick).
- Plywood for the boat’s keel and mast (about ½ inch thick).
- Fiberglass cloth to make a fiberglass hull that is stiffer than wood. It should be cut into 2-inch wide strips with an overlapping seam in the middle of each strip. The seams should run lengthwise along the sides of the boat instead of parallel with them so that they won’t show when you’re done painting it. The cloth needs to be about 6 inches longer than each side of your boat; use Velcro or duct tape at either end so that you can overlap them without getting any glue on yourself while working on this project!
- Epoxy resin glue which comes in two parts – one part hardens quickly while another part hardens slowly over several hours or days depending on how thickly they’re applied together! This makes sure everything stays put even when exposed to strong winds out there sailing around on open water!
Building a real sailboat from wood is a rewarding project that can be done with minimal tools and space. It’s also something you can do with your children as long as they’re old enough to understand safety precautions for working with sharp objects like saws or knives. I hope this blog has given you some insight into how it’s done!
You Might Also Like
Understanding life jackets and pfds, 5 tips on how to choose the right catamaran cruise, leave a reply cancel reply.
Save my name, email, and website in this browser for the next time I comment.
Your browser has Javascript disabled. Please go to your browser preferences and enable Javascript in order to use Scratch.

Step-By-Step Guide: How to Build a Wooden Sailboat – Complete DIY Tutorial
Alex Morgan

Building a wooden sailboat is a rewarding and fulfilling endeavor that allows you to create your own vessel for sailing adventures. Whether you’re a seasoned sailor or a woodworking enthusiast, constructing a wooden sailboat requires careful planning, attention to detail, and a love for craftsmanship. This comprehensive guide will take you through the step-by-step process of building a wooden sailboat, from choosing the right design and gathering the necessary materials to assembling the framework, building the deck and cabin, and installing the sails and rigging. We will also discuss the finishing touches and regular maintenance required to keep your wooden sailboat in optimal condition for years of enjoyment on the water. Let’s dive into the world of wooden sailboat construction and embark on this exciting journey together.
Key takeaways:
Key takeaway:
- Choosing the right design and plans is crucial: Research different sailboat designs and select suitable plans based on your skill level to ensure a successful project.
- Gather the necessary materials and tools: Pay attention to wood selection and preparation, as well as acquiring the tools and equipment needed for building your wooden sailboat.
- Attention to detail in the construction process is important: Prepare and assemble the framework carefully, focusing on lofting, laying out the keel, constructing the ribs, and the hull structure to ensure a sturdy and reliable sailboat.
Choosing the Right Design and Plans
When it comes to building a wooden sailboat, one of the crucial steps is choosing the right design and plans. In this section, we’ll take a deep dive into the world of sailboat designs and explore the vast array of options available. From researching different sailboat designs to selecting plans that match your skill level, we’ll guide you through the exciting process of bringing your wooden sailboat dream to life. So, hop aboard and let’s set sail on this exhilarating journey of craftsmanship and adventure.
Researching Different Sailboat Designs
When conducting research on sailboat designs, it is important to take into account a variety of factors in order to select the most suitable design. One of the primary considerations is whether you prefer a monohull or a multihull sailboat. Monohulls are more commonly found and offer superior performance when sailing upwind, whereas multihulls provide both stability and speed.
Another aspect to consider is your level of sailing experience. If you are a beginner, it is advisable to seek out designs that are easier to handle and forgiving. On the other hand, experienced sailors may gravitate towards performance-oriented designs that are ideal for racing or long-distance cruising.
It is crucial to think about how you intend to use the sailboat. Are you looking for a day sailer , a cruiser , or a racing boat ? Each design comes with its own set of distinctive features and characteristics.
Determining the appropriate size of the sailboat is another crucial step, which should be based on the number of people and activities you plan to have on board. You must also decide whether you prefer an open cockpit or an enclosed cabin .
To find the perfect sailboat design that aligns with your sailing goals and preferences, it is imperative to thoroughly research various options and take into consideration all of these factors. By doing so, you will be able to make an informed decision and select the ideal sailboat design.
Selecting Suitable Plans for Your Skill Level
When it comes to building a wooden sailboat, it is crucial to select suitable plans that match your skill level. This is important as it ensures that you have the necessary knowledge and expertise to effectively complete the construction. In order to help you with this, here is a table that outlines the different skill levels and the corresponding plans:
Choosing the right plans for your skill level is essential as it enables you to navigate the construction process smoothly, avoid any complications, and ultimately achieve the desired result. It is crucial to honestly evaluate your woodworking skills and then select plans that align with your abilities. Keep in mind that building a wooden sailboat demands patience , attention to detail , and a willingness to learn and improve your woodworking skills.
As a pro tip, if you are a beginner, it is advisable to start with simpler plans and gradually work your way up to more complex projects. This allows you to gain experience and confidence in your woodworking abilities over time. So always remember to select suitable plans for your skill level and enjoy the process of building your wooden sailboat.
Gathering the Necessary Materials and Tools
When it comes to building a wooden sailboat, gathering the necessary materials and tools is key . In this section, we’ll dive into the exciting world of selecting and preparing the right wood for your sailboat, as well as the essential tools and equipment you’ll need to bring your project to life. So, start sharpening your creativity and let’s sail away into the realm of wooden boat construction!
Wood Selection and Preparation
Incorporating the provided keywords naturally in the provided text:
1. Conduct research on the different types of wood used in boatbuilding, such as mahogany , teak , or oak . This will help you make an informed decision regarding the most suitable wood for your sailboat.
2. Determine the specific requirements of your sailboat design in order to guide your wood selection process. Each design may have different needs and preferences when it comes to the type of wood to be used.
3. Take into consideration the durability and resistance to rot of the wood options available. This is crucial to ensure the longevity and overall quality of your sailboat. Choosing a wood that can withstand exposure to water and other elements is essential.
4. Look for straight , dry , and defect-free wood. This will contribute to the structural integrity of your sailboat. Any defects or irregularities in the wood may compromise its strength and performance.
5. Calculate the amount of wood needed based on the specific design and measurements of your sailboat. This will help you estimate the quantity of wood required for the construction process.
6. Mill or cut the wood into the required dimensions and shapes as outlined in the sailboat design. This step is crucial for achieving the desired structure and appearance of your sailboat.
7. Prior to assembly, it is important to sand the wood surfaces thoroughly. This will remove any rough edges or splinters, ensuring a smooth and safe finish.
8. Apply a protective coating or sealant to the wood in order to prevent water damage. This will help preserve the wood and extend its lifespan .
By following these steps, you can ensure that the wood selected and prepared for your sailboat construction is suitable and of high quality.
Tools and Equipment Needed for the Project
When embarking on the construction of a wooden sailboat, it is crucial to have the appropriate tools and equipment to ensure successful completion.
To accurately measure and obtain precise alignment and dimensions, essential measuring tools such as a tape measure , combination square , and level are indispensable.
For shaping wooden components, cutting tools like a circular saw or table saw , jigsaw , and hand saw are necessary.
Joinery tools, including a chisel set , mallet or hammer , and drill with different-sized bits, are vital for smoothly joining parts together.
To achieve a polished finish, sanding and finishing tools such as sandpaper with varying grits, sanding blocks , and a random orbital sander are crucial.
Additionally, brushes and rollers are required for the application of finishes.
When it comes to safety, it is imperative to prioritize the use of safety goggles , ear protection , a dust mask , and work gloves to ensure personal protection during the construction process.
When selecting tools and equipment, it is essential to invest in high-quality items that are specifically designed for the tasks involved in wooden sailboat building.
By doing so, not only will efficiency be maximized, but the overall quality of the finished boat will also be greatly enhanced.
Preparing and Assembling the Framework
As we delve into the world of building a wooden sailboat, we now find ourselves in the exciting phase of preparing and assembling the framework. In this section, we’ll discover the essential steps that go into setting up the lofting and laying out the keel , as well as the intricacies of constructing the ribs and hull structure. Get ready to immerse yourself in the hands-on process of bringing this magnificent vessel to life!
Setting Up the Lofting and Laying Out the Keel
To properly set up the lofting and lay out the keel for a wooden sailboat, it is important to follow these steps in a systematic manner:
- Firstly, prepare the lofting area by clearing a large, flat space where the plans and measurements will be placed.
- Next, securely attach the keel stock to the lofting platform, making sure it is both level and aligned with the boat’s centerline.
- Using battens, rulers, and pencils, transfer the measurements and lines from the boat plans onto the lofting platform.
- Ensure the accuracy of the waterlines, buttock lines, and other reference lines on the lofting platform by drawing them according to the measurements provided in the boat plans.
- Utilizing the dimensions indicated in the plans, measure and mark the positions of the keel, stem, and transom on the lofting platform.
- Thoroughly examine and adjust all lines and measurements to guarantee their accuracy.
- Identify the locations where any additional frames, bulkheads, or structural elements will connect to the keel, by marking them accordingly.
- Prior to proceeding, double-check all marks and measurements to ensure their accuracy.
The process of setting up the lofting and laying out the keel is an integral step in the construction of a wooden sailboat. It serves as the foundation and reference points for the boat’s overall structure. It is crucial to pay close attention to detail and maintain accuracy throughout the build. By following these steps, you will be on your way to constructing your very own wooden sailboat.
Constructing the Ribs and Hull Structure
When constructing the ribs and hull structure of a wooden sailboat, follow these steps:
– Measure and cut the ribs: Use the plans as a guide to mark and cut the dimensions on the wood. Cut the ribs accurately.
– Attach the ribs to the keel: Position and attach the cut ribs evenly along the keel using marine epoxy and screws.
– Install chines and stringers: Attach the chines to the bottom edge of the boat and install the stringers along the sides for strength.
– Attach the planking: Cut and fit planks to cover the rib and stringer structure, securing them tightly.
– Reinforce the joints: Apply epoxy and fiberglass tape over the joints to strengthen the structure.
– Shape the hull: Use tools to shape and smooth the hull, paying attention to fairing for optimal hydrodynamics.
– Apply a protective finish: Coat the hull and ribs with marine-grade varnish or epoxy for durability.
– Perform a thorough inspection: Check for defects, cracks, or imperfections and make necessary repairs before moving forward.
The process of constructing wooden sailboats has evolved over time, combining traditional techniques with modern materials and tools. Craftsmanship, attention to detail, and an understanding of wood’s properties are still essential in constructing the ribs and hull structure. This blend of artistry and engineering ensures sailboats can withstand the demands of the sea while providing a smooth and enjoyable sailing experience.
Building the Deck and Cabin
Let’s dive into the exciting world of building a wooden sailboat! In this section, we’ll focus on the crucial element of constructing the deck and cabin. Get ready to explore the process of creating the deck framework and adding those essential interior features . From laying the foundation to crafting a cozy cabin space , we’ll uncover the key steps and considerations for bringing your wooden sailboat to life. So, grab your tools and let’s set sail on this exhilarating construction journey !
Creating the Deck Framework
When creating the deck framework for a wooden sailboat, follow these steps:
- Measure and mark the desired deck size and shape on the boat’s frame.
- Cut and shape the wooden planks or panels to match the marked measurements.
- Align the planks or panels horizontally across the frame, ensuring they are straight and evenly spaced.
- Secure the planks or panels to the frame using screws or nails, ensuring tight fastening.
- Add additional support beams or joists underneath the deck for added strength and stability.
- Sand the deck surface to create a smooth and even finish.
- Apply a weather-resistant sealant or paint to protect the deck from moisture and UV damage.
- Install necessary features or fixtures on the deck, such as hatches, cleats or railings.
Pro-tip: Enhance the deck’s strength and durability by adding epoxy or marine adhesive between the joints before securing the planks or panels.
Installing the Cabin and Interior Features
When building a wooden sailboat, it is important to pay attention to every step, including the installation of the cabin and interior features. To install these features, follow the following steps:
1. First, measure and cut the materials for the cabin walls, floor, and ceiling.
2. Next, securely fit the cabin walls in place.
3. Then, attach the floorboards to the cabin base using screws or nails.
4. Align and install the cabin ceiling.
5. If desired, add insulation for extra comfort.
6. Attach interior features such as cabinets, storage compartments, and seating areas.
7. Install windows and hatches to allow for natural light and ventilation.
8. Properly wire the cabin for electricity, ensuring that lights and outlets are installed and functioning.
9. Finish the interior by sanding and applying a protective coat of varnish or paint.
10. Ensure that all installations meet safety standards.
Precision and attention to detail are key when installing the cabin and interior features of a wooden sailboat. By carefully measuring, cutting, and fitting each component, you can ensure a secure fit. It is important to optimize the layout and functionality of the interior features to create a comfortable living space with ample storage. The addition of windows and hatches will enhance comfort and enjoyment by providing natural light and ventilation . If electricity is needed, proper wiring is essential to ensure necessary lighting and power outlets. Finishing the interior with a protective coat of varnish or paint will not only enhance aesthetics but also provide durability.
Remember, the goal is to create a cozy retreat for sailors, so it is important to put in the necessary effort to install the cabin and interior features correctly.
Installing the Sails and Rigging
Set sail with confidence as we dive into the exciting world of installing the sails and rigging for your wooden sailboat. Discover the key considerations in choosing the perfect sails and master the art of setting up and adjusting the rigging. With expert tips and tricks , this section will equip you with the knowledge to navigate the waters with ease and experience the thrill of sailing your wooden masterpiece .
Choosing the Right Sails
When choosing sails for your wooden sailboat, consider the following factors:
– Type of sailing: Determine if you plan to cruise , race , or do both. Different sails are designed for specific purposes.
– Boat size: The size of your sailboat determines the size and number of sails you need. Larger boats require bigger sails , while smaller boats may need fewer and smaller sails .
– Wind conditions: Consider the typical wind conditions in your sailing areas. Different sails perform better in light winds , heavy winds , or various wind conditions.
– Sail material: The material of the sails affects durability and performance. Material choices include Dacron , laminate , and nylon . Each material has different trade-offs between longevity, performance, and cost.
– Reefing options: If you sail in varied or unpredictable wind conditions, choose sails with reefing options. Reefing allows you to adjust the sail area for stronger winds, improving control and safety.
– Manufacturer reputation: Research sail manufacturers for their reputation and reliability. Read reviews, seek recommendations, and consider warranty and customer support.
By considering these factors, you can make an informed decision when choosing sails for your wooden sailboat. Remember, the right sails greatly impact your sailing experience, so take your time and choose wisely.
Setting Up and Adjusting the Rigging
When setting up and adjusting the rigging of a wooden sailboat, it is important to follow these steps to ensure proper and safe rigging.
To start, attach the mast to the deck using a mast step or mast partner for stability and support. This will provide the foundation for the rigging.
Next, secure the standing rigging , which includes the shrouds and stays , to the mast. This will help distribute the forces from the sails and ensure the stability of the mast.
Connect the forestay to the bow of the sailboat. This will keep the mast in line and control the position of the headsail.
To counteract forces from the headsail and maintain rigging tension, attach the backstay to the stern of the boat.
Use turnbuckles or rigging screws to adjust the tension in the standing rigging. This will ensure proper alignment and support of the mast.
Install the running rigging , including halyards and sheets , to control the position and tension of the sails.
Before and during sailing, it is important to regularly check the tension in the rigging to ensure performance and safety.
Make any necessary adjustments to the rigging during sailing in order to optimize the shape of the sails and enhance the performance of the boat.
By following these steps, you will be able to properly set up and adjust the rigging of your wooden sailboat, allowing for safe and enjoyable sailing experiences.
Finishing Touches and Maintenance
When it comes to completing your wooden sailboat and keeping it in top shape, this section has got you covered. We’ll dive into the art of applying exquisite finishes to the hull and deck, giving your sailboat a stunning appearance. And don’t worry, we won’t neglect the nitty-gritty details of regular maintenance and care, ensuring your wooden vessel remains seaworthy for years to come. So, let’s get ready to add those finishing touches and keep your sailboat sailing smoothly !
Applying Finishes to the Hull and Deck
When building a wooden sailboat, applying finishes to the hull and deck is crucial for durability and aesthetic appeal. Here are the steps to follow:
1. Prepare the surfaces: Sand down rough spots, fill in cracks and imperfections, and ensure a smooth and clean surface.
2. Choose the right finish: Consider the type of wood and desired look. Varnish provides a glossy and traditional appearance, while paint offers different colors and styles.
3. Apply the primer: Enhance adherence and create an even surface for the final coat by applying a primer.
4. Apply the finish: Use a brush or roller to apply the chosen finish coat to the hull and deck. Follow the manufacturer’s instructions for drying times and application techniques.
5. Allow for drying and curing: Follow the manufacturer’s instructions for drying and curing to ensure the finish is fully set and provides maximum protection.
6. Inspect and touch up: After drying, inspect the hull and deck for missed spots or imperfections. Touch up any areas that require additional finish for a seamless and polished look.
By following these steps and applying finishes properly, you can protect and enhance the hull and deck of your wooden sailboat, ensuring it looks beautiful and lasts for many years.
Regular Maintenance and Care for Your Wooden Sailboat
Regular maintenance and care for your wooden sailboat is crucial for its longevity and performance. Here are the steps to follow:
1. Inspect the hull and deck for damage like cracks or rot. Promptly repair any issues to prevent further damage.
2. Clean the boat regularly with mild detergent and freshwater to remove dirt, salt, and grime that can accumulate over time.
3. Apply a protective coating to the hull and deck using marine-grade varnish or paint to prevent water penetration and protect against UV damage.
4. Check the rigging and sails for wear or damage. Replace worn-out lines or rigging components for safe sailing.
5. Inspect wooden components such as the mast, boom, and rudder for rot or decay. Replace or repair as necessary to maintain structural integrity.
6. Keep the interior of the sailboat clean and dry to prevent mold and mildew growth. Use a dehumidifier if needed.
7. Regularly check and maintain the boat’s systems , including electrical, plumbing, and navigation equipment. Address any issues promptly.
8. Store the wooden sailboat in a suitable location, such as a covered boat dock or boatyard, when not in use. Protect it from extreme weather conditions.
Pro-tip: Establish a regular maintenance schedule and keep a detailed record of all maintenance and repairs. This will help you stay organized and ensure your wooden sailboat remains in optimal condition.
Some Facts About How To Build A Wooden Sailboat:
- ✅ Building a wooden sailboat can take approximately 100 hours over a span of 3 months. (Source: Instructables)
- ✅ A wooden sailboat can cost around $1,000 to build. (Source: Instructables)
- ✅ The boat is typically built from 4×8 sheets of plywood and measures 8 feet in length. (Source: Instructables)
- ✅ Various tools such as a pull-saw, table saw, router, sander, and drill are needed for building a wooden sailboat. (Source: Instructables)
- ✅ Fiberglass cloth, epoxy resin, screws, and other materials are used to reinforce and waterproof the wooden sailboat. (Source: Instructables)
Frequently Asked Questions
1. how long does it take to build a wooden sailboat.
Building a wooden sailboat typically takes about 100 hours spread over approximately 3 months.
2. What materials are needed to build a wooden sailboat?
To build a wooden sailboat, you will need 4×8 sheets of plywood, epoxy resin, oak plywood, various tools (such as a pull-saw, table saw, router, etc.), fiberglass cloth, screws, fasteners, and other supplies like glue, clamps, and mixing cups.
3. How much does it cost to build a wooden sailboat?
The estimated cost of building a wooden sailboat is around $1,000, including the materials and tools needed for the project.
4. Can I learn to build a wooden sailboat if I have no prior experience?
Yes, building skills can be learned gradually, and mistakes can be avoided along the way. With patience and guidance from boat building plans, even beginners can successfully build a wooden sailboat.
5. How long is the wooden sailboat described in the reference?
The wooden sailboat described in the reference is an 8-foot long pram, featuring classic lines and made from 4×8 sheets of plywood.
6. Can I launch the wooden sailboat in any body of water?
Yes, the wooden sailboat is designed to be light enough to fit in a small pickup truck or be rolled to a local lake on a dolly, making it suitable for various bodies of water.
About the author

Leave a Reply Cancel reply
Your email address will not be published. Required fields are marked *
Save my name, email, and website in this browser for the next time I comment.
Latest posts

The history of sailing – from ancient times to modern adventures
History of Sailing Sailing is a time-honored tradition that has evolved over millennia, from its humble beginnings as a means of transportation to a beloved modern-day recreational activity. The history of sailing is a fascinating journey that spans cultures and centuries, rich in innovation and adventure. In this article, we’ll explore the remarkable evolution of…

Sailing Solo: Adventures and Challenges of Single-Handed Sailing
Solo Sailing Sailing has always been a pursuit of freedom, adventure, and self-discovery. While sailing with a crew is a fantastic experience, there’s a unique allure to sailing solo – just you, the wind, and the open sea. Single-handed sailing, as it’s often called, is a journey of self-reliance, resilience, and the ultimate test of…

Sustainable Sailing: Eco-Friendly Practices on the boat
Eco Friendly Sailing Sailing is an exhilarating and timeless way to explore the beauty of the open water, but it’s important to remember that our oceans and environment need our protection. Sustainable sailing, which involves eco-friendly practices and mindful decision-making, allows sailors to enjoy their adventures while minimizing their impact on the environment. In this…
RC Sailboats
An overview of radio controlled sail boats and a brief explanation of scale model sailboats, semi scale rc sport, and rc racing sailing yachts. kits, rtr and scratch built..
RC sailboats can be divided up in three main categories:
- RC Sport Sail
- RC Sailing Yachts (for racing)
- RC Scale Sail
RC sport sail
Most kits and RTR (ready-to-run) model RC sail boats are best categorized as RC sport scale. This category is a happy medium between full-blown scale models and RC racing yachts.
Some have become so widely distributed that new racing classes has been formed around them. Good examples are Graupner's Micro Magic and Kyosho's Fairwind.
They are usually semi-scale of modern cruising yachts or made to resemble America’s cup sailboats.
The lower cost models come with ABS hulls, whereas the higher end models come with more durable fiberglass hulls. Drop keels, aluminum masts and Dacron sails are most common.
RC racing yachts
If you want to get into RC yacht racing there are a number of classes to choose from. Each country has a governing body ( American Model Yachting Association (AMYA) in the USA, Model Yachting Association in the UK) under the International Model Yacht Racing Union.
As with full size regattas, RC model yacht racing face some of the same issues. Entry rules for competitions typically follow depending on if the class is Open or Closed Design.
Open or Construction Class
What these classes have in common is that the boats are not identical - instead the rules are made up like a mathematical formula. The good thing that brings is that the challenge is three-fold – design, construction and sailing the course.
The disadvantage is in that the rules for some classes can be complicated. Some classes have gained in popularity precisely because the rules fro previously established classes were so hard to understand.
Examples of some popular open design model yacht classes:
- 6 Metre - M6R
- 10 rater – R10r
- 36" (36-inch)
Closed Design or One-design Class
All entries have to be the same design. Some are kits from a single manufacturer others are open to home built model boats.
- Soling 1 Meter
- Micro Magic - Graupner
- Fairwind - Kyosho
RC scale sail
We're talking about scale model sail boats that actually use its sails as the main means of propulsion. RC scale sail is called minisail in continental Europe. The vast majority of sailing scale model boats is scratch built. There are a few kits - Billings Collin Archer RS-1 comes to mind.
The prevailing problem with scaling a sailboat is that stability doesn’t scale linearly with size. The result is that model boats will always be significantly less stable than the boat or ship it was modeled after. Left as is, it may have detrimental effects on the model’s sea keeping abilities. There are ways to minimize the effect.
A smallish boat built to a large scale is more stable than a large ship to a small scale. For instance, say you can only transport a model 1m long. Building a model of an 8m cruising yacht at 1:8 scale will be more stable than a model of the USS Constitution at 1:48 scale. This is true even if they end up weighing the same and being the same length. I bet the yacht will be a much better sailer too.
Bigger is always better too, when it comes to scale RC sailboats. Try and build the biggest model you can get away with. A larger model will be more forgiving on construction techniques, materials and the weight of components. The finished model will also be faster, a better sailer and handle stronger winds than if it was built smaller.
Making considerable effort to build light is always a god habit. The higher up a part or component is located, the more important this becomes. For instance, rigging components need to be light weight.
Other factors are beam and draft (width and depth for landlubbers). A wider and deeper hull will naturally be more stable than thin and shallow.
There are two tricks to increase the stability of model boats artificially:
Add a drop keel
By adding a drop keel you can bring the center of gravity down while adding profile area. The greater under-water profile helps against drifting sideways. All sailboats drift downwind some, because the surface water moves with the wind. The lower boundary-layers of a body of water are influenced less by the wind than layers closer to the surface. Therefore, the deeper any extension of the hull is, the less drift.
Typically a boat with a drop-keel also needs a larger rudder. A good guideline is to make the rudder area 10-12% of the total submerged hull profile.
Extent the hull below the waterline
Some builders rather build the boat hull slightly out of scale than add a drop keel. The most bang-for-the-buck is to deepen the hull. Same rule apply about the rudder (rudder area = 10-12% of total submerged profile). You could technically make the hull wider, but the effect is not as great.
Any change in the submerged hull profile need to maintain the same geometric center to balance the center of effort on the sails. Naturally, if you know what you are doing, the sail and rig can be modified also.
A Final Word on Scale RC Sailboats
Generally stay away from lateen rigs, multi-hull, centerboard designs and square riggers, at least until you have become an experienced RC sailboats captain and/or builder.
Return from RC Sailboats to Radio Controlled Boats
Return to Homepage
Would you prefer to share this page with others by linking to it?
- Click on the HTML link code below.
- Copy and paste it, adding a note of your own, into your blog, a Web page, forums, a blog comment, your Facebook account, or anywhere that someone would find this page valuable.
- Plans Store
- Model Boat Books
- Model Boats Intro
- Building Materials
- Make a Hull
- Plastic Kits
Radio Control
- US Battleships
- Torpedo Boats
- Model Boats Q&A
- Model Ship Gallery
- What's New?
- Privacy Policy

By Petter Blix
Copyright 2009-2018 Building-Model-Boats.com
Trademarks belong to their respective owners
All Rights Reserved
- Join Newsletter & Get 10% Off Your First Order
Join / Login
Model ship fittings, parts & accessories.
The largest range of wooden model ship & model boat fittings, accessories & parts available. Modelers Central is the no.1 destination for scratch model ship builders.. There are over 90 model ship fittings categories from anchors to wire, the scratch model boat builder will find what they need here. All items are listed as single items unless shown otherwise in brackets i.e. (P10) means a packet of 10.
Popular Model Ship Parts

Chain – Brass – 5/32″ (4mm)

Life Buoy Plastic – 55/64″ dia (22mm)

Winch Brass Modern Type C – 1-3/8″ (35x46mm)

Cannon Barrel – Brass – 4-1/16″ (105mm)
All model ship part categories, belaying pins, bells & belfry, bitt head tops, blocks - wood, blocks - violin, cannon balls, cannon barrels, cannon kits, cannons - underdeck, cannon saddles & wheels, copper plates, deadeye heart, deadeye loops & straps, deadeye chain strap assembly, drip covers, eye pins, split pins, eye plates, gunport lids & hinges, hammocks cranes & netting, lights search & navigation, mortar barrels, oars & oarlocks, parrels & parrel beads, pulley wheels, rigging cord, rod - brass, rudder hinge, strap - brass, tackle blocks, turnbuckles, tube - copper, ventilators, ships wheels, yard spacer, filter products.
Showing 1–100 of 675 results

Deadeye – Wood – Brown – 13/64″ (5mm)
Deadeye – wood – brown – 9/32″ (7mm).

Block – Wood – Brown – 1 hole – 1/8″ (3mm)

Deadeye – Wood – Yellow – 13/64″ (5mm)
Block – wood – brown – 1 hole – 3/16inch (5mm), deadeye – wood – brown – 1/8″ (3mm).

Block – Wood – Yellow – 1 hole – 3/16inch (5mm)

Belaying Pin – Wood – Yellow – 13/32″ (10mm)

Block – Wood – Brown – 2 hole – 3/16″ (5mm)

Deadeye Loop – 13/64inch (5mm)
Block – wood – yellow – 1 hole – 1/8″ (3mm), deadeye – wood – yellow – 1/8″ (3mm), block – wood – brown – 1 hole -1/4″ (7mm), block – wood – brown – 2 hole – 5/32″ (4mm), block – wood – brown – 1 hole – 5/64″ (2mm).

Block – Wood – Yellow – 2 hole – 3/16inch (5mm)
Belaying pin – wood – yellow – 5/16″ (8mm), deadeye – wood – yellow – 9/32″ (7mm).

Cleat – Metal – Brown – 13/64″ (5mm)

Belaying Pin – Brass – 5/16″ (8mm)

Gunport Frame with Lid – 33/64×33/64inch (13x13mm)
Cleat – metal – brown – 9/32inch (7mm).

Port Hole – Brass – No Glass – 5/64inch (2mm)
Gunport frame with lid – 25/64″ x 25/64″ (10mm x 10mm).

Stanchion – Wood – Brown – 5/16″ (8mm)
Block – wood – brown – 2 hole – 1/4″ (7mm), block – wood – yellow – 1 hole – 5/64″ (2mm), deadeye loop – 1/8″ (3mm).

Gunport Hinge – Dummy – Gilded – 15/32″ (12mm)

Deadeye – Wood – Brown – Triangular – 13/64″ (5mm)
Deadeye – wood – brown – 5/64″ (2mm).

Belaying Pin – Wood – Brown – 13/32″ (10mm)
Belaying pin – wood – brown – 5/16″ (8mm), belaying pin – brass – 15/32″ (12mm).

Port Hole – Brass – With Glass – 9/32″ (7mm)
Belaying pin – wood – yellow – 1/4″ (6mm).

Chainplate – Modern – Brass – 19/32″ (15mm)
Deadeye – wood – yellow – 23/64″ (9mm).

Eye Screw – Brass – 5/64″x5/16″ (2x8mm)

Barrel – Wood – Brown – 8diax10mm
Block – wood – yellow – 2 hole – 15/32inch (4mm).

Block – Wood – Fawn – 1 hole – 1/8″ (3mm)
Cleat – metal – brown – 15/32inch (12mm), belaying pin – wood – brown – 1/4″ (6mm).

Deadeye Strap – 1-1/32″ x 13/64″ (26mm x 5mm)
Port hole – brass – no glass – 13/64″ (5mm).

Eye Plate – Brass – 3/32″ x 9/32″ (2.5mm x 7mm)
Deadeye loop – 9/32″ (7mm), port hole – brass – no glass – 1/8inch (3mm), port hole – brass – no glass – 1/16inch (1.5mm), block – wood – fawn – 1 hole – 1/4″ (7mm), port hole – brass – no glass – 3/64″ (1.2mm), gunport frame with lid – 9/32″ x 9/32″ (7mm x 7mm).

Deadeye Heart – Brown – 15/64″ (6mm)

Stanchion – Brass – Straight – 25/64″ x 2 hole (10mm)
Eye screw – brass – 13/64″ x 23/64″ (5mm x 9mm), belaying pin – wood – yellow – 15/32″ (12mm).

Block – Wood – Fawn – 2 hole – 3/16″ (5mm)

Cannon Wheel – Wood – 5/32″ (4mm)
Deadeye – wood – brown – 23/64″ (9mm), deadeye – wood – brown – triangular – 9/32″ (7mm).

Stanchion – Brass – Straight – 19/32″ x 1 hole (15mm)

Chainplate – Modern – Brass – 63/64″ (25mm) – No Loop
Belaying pin – wood – brown – 45/64″ (18mm), belaying pin – wood – brown – 9/16″ (14mm).

Rigging Cord – Fawn – 0.50mm x 20m – Amati
Cleat – metal – brown – 5/8inch (16mm).

Gunport Frame No Lid – 25/64″ x 25/64″ (10x10mm)

Bitt Head Top – Wood – Round Head – 5mm sqr Base
Gunport frame no lid – 33/64″x33/64″ (13x13mm), deadeye strap – 1-9/64″ x 9/32″ (29mm x 7mm).

Rigging Cord – Fawn – 0.25mm x 20m – Amati
Block – wood – fawn – 2 hole – 5/32″ (4mm), block – wood – brown – 1 hole – 13/32″ (10mm).

Rigging Cord – Black – 0.5mm x 10m – Mantua
Stanchion – brass – straight – 25/64″ x 1 hole (10mm).

Stanchion – Wood – Yellow – 7/16″ (11mm)

Barrel – Wood – Yellow – 12dia x 14mm

Pulley Wheel – Brass – 3/32″ (2.5mm)

Stanchion – Wood – Brown – 35/64″ (14mm)
Belaying pin – wood – brown – 5/8″ (16mm), cannon wheel – wood – 13/64″ (5mm).

Block – Wood – Brown – 3 hole – 3/16″ (5mm)

Sheave – Wood – 3/32″ (2.5mm)

Rigging Cord – Black – 0.75mm x 20m – Amati

Block – Violin – Brown – 1 Hole – 9/32″ (7mm)

Cannon Kit – Metal – Brown – 19/32″ (15mm)
Rigging cord – black – 0.25mm x 10m – mantua, stanchion – wood – brown – 15/32 (12mm).

Eye Pins – Copper – 5/64″ x 15/32″ (2mm x 12mm) – P100
Stanchion – brass – straight – 63/64″ x 2 hole (25mm).

Eye Pins – Brass -9/64″ x 25/32″ (3.5mm x 20mm) – P10

Cannon Barrel – Brown – Plain – 45/64″ (18mm)

Truck – Wood – 5/32″ (4mm) – With Hole
Barrel – wood – brown – 12diax14mm, belaying pin – wood – brown – 15/32″ (12mm), belaying pin – wood – yellow – 9/16″ (14mm).

Rigging Cord – Fawn – 0.75mm x 20m – Amati
Stanchion – wood – brown – 15/64″ (6mm).
Join 18,543 other modelers to hear about specials, new products and modeling tips
- Become a Member
- Modeling Hub
- Model Ship Building
- Maritime History
- Affiliate Program
Information
- Terms & Conditions
- Privacy Policy
Copyright © 2023 Modelers Central. ABN: 31 114 830 732
- Claim 10% Off First Order
- Get 5% off ALL orders with a Membership
- Gift Vouchers
- Help & Advice
Modelers Central. 2023, All rights reserved.
- Claim 10% Off Your First Order
- Get 5% Off All Orders With A Membership
Get 10% off
Your first order.
10% off applies only to full-price items. By providing your email address, you agree to our Terms & Privacy Policy
10% off applies only to full-price items. By providing your email address & mobile number, you agree to our Terms & Privacy Policy and consent to receive marketing messages from Modelers Central at the addresses provided. You can unsubscribe at any time by replying STOP.

- Forum Listing
- Marketplace
- Advanced Search
- All Topics Sailing
- General Sailing Discussions
- SailNet is a forum community dedicated to Sailing enthusiasts. Come join the discussion about sailing, modifications, classifieds, troubleshooting, repairs, reviews, maintenance, and more!
Scratch Building RC Scale Model Boats - The Bristol 41.1 Project

- Add to quote
Cool stuff. Will be checking progress here and taking a look at your channel as well.

Good stuff, nice to see another Ottawa sailor. Will be checking out your vids.
Love it. Good luck. I've often considered having an RC sailor to play with at anchor. Last I looked into them, I wasn't sure what to get that would prove fun and reliable. Read a bunch about them leaking or failing. I suppose I just hop in the dinghy and go get it. They might be kind of big to store aboard too.
From what I've seen of the 15 or so different RC models at our yacht club, they rarely break down totally. It's ls very handy to get a transmitter that includes battery monitoring: you can set an alarm to warn you when the boat's power is getting low, not expensive either. If you don't sail in a small pond-like area, the worry about your boat sailig off to the horizon out of control, or drifting there dead, is real, so we stick to harbour areas where the farthest it can get is the far wall of the harbour. They are great fun, specially when the big-boat season is over, and they are all stored for winter, but there is still open water, which is for a few months here in Ottawa..

Nice little boats. I'll check your channel and give you some likes!

Moored next to a guy in Avalon once who fitted his RC sailboat with running lights, great after dinner entertainment and very cool in the moonlight.

A few years ago I made a scale model of a Colin Archer double-ender, and fitted eight-channel radio control. The boat has individual sail control, (jib, staysail, main, and mizzen) a variable speed electric motor, navigation lights, and a motley crew of four and two cats. This was from a kit, not from scratch, because I didn’t have the skill for that. Buying and figuring out how to fit all the ancillary radio control equipment was time-consuming enough. You can see pictures and read the story here: OLD GAFFER (schooner-britannia.com) Warning: you definitely need a lot of patience to make a radio-controlled model boat.
Hi Arcb, I think your question may have been been answered in other responses here. There is the group at Andrew Haydon Pond, and another Ottawa RC boat club I'm aware of. I have no interest/involvement in any other model groups because they all have either One-Design requirements to join in, or too many rules. I created a model race series at BYC Ottawa, that allows anyone, with any kind of model (ie from Walmart, or the most expensive, huge OD RC models) to race together reasonably fairly. I use the NHC/RYA handicap system and scale it for the models' dimensions etc. We had a great season kick-off in 2019 but the pandemic put a stop to our fun in 2020 & 2021, Hoping to get it rolling again next year. You can join BYC Britannia Yacht Club (byc.ca) for an amazingly low price and still have full access to all the club amenities. I maintain an email list of all the RC model boat owners at BYC, and could include you, if you might be intererested in joining in. regards, Tony

Fun stuff. Back in the day I used to build different r/c sailboats. Pretty much all from scratch, using line drawings, it was a long process, but I enjoyed it, back in y teens and 20's. I built everything from an Alberg 37, One J-class which was huge, an EC12, etc. We used to have a fairly active r/c racing group in SW Michigan, now they have almost all but faded away. If you want to get into a boat, with a good chance of similar ones nearby, the International One Metre class is the worlds largest, and they do not take up a ton of space. One Metre (radiosailing.org)

Arc B the soling onemeter is a very popluar one design RC sailboat. if its a complete kit, worth around 3-400 bucks US Ive build about 8-9 of them. not the easiest build, but can be done on a kitche table. Its very easy to build it crooked there are tons of resource. let me know VIA pm and we can chat off line. depending on where you are in ontario. Here are some clubs. Ontario region: Toronto Name: Metro Marine Modellers – MMM Club affiliation number: ON1 Sailing Locations: Etobicoke & Mississauga Schedule Boats sailed : DF65, DF95, Soling1M, IOM, Victoria Contact: [email protected] Ottawa Name: Ottawa Area Model Yacht Club – FB site Club affiliation number: ON2 Sailing Locations: Andrew Haydon Park Mondays and Fridays Boats sailed: Mini12 & Fantasy 32 Contact: [email protected] Windsor Name: Windsor Model Yacht Club – WMYC Club affiliation number: ON3 Sailing Locations: Volmer Pond & Riverside Sportsman’s Club Schedule Boats sailed: Footy, RG65, Soling1M, US1M, DF95 Contact: [email protected] Belleville Name: Quinte Model Yacht Club – QMYC Club affiliation number: ON4 Sailing Locations: Bay of Quinte Yacht Club Schedule Boats sailed: Mini12 Contact: [email protected] Hamilton Name: Fifty Point Model Sailing Group – FPMSG Club affiliation number: ON5 Sailing Locations: Fifty Point Conservation Area Schedule: Monday and Wednesday afternoons from 1 pm until 4 pm Boats sailed: DF65, DF95, Soling1M, Victoria Contact: Paul Charles [email protected] Kingston Name: Kingston Yacht Club – KYC Club affiliation number: ON6 Sailing Locations: Kingston Yacht Club Schedule: Monday (DF65) and Wednesday (IOM) evenings starting at 6 pm Boats sailed: DF65, IOM Contact: Paul Switzer Ive built a few dozen RC boats over the years before jumping into the full size market last year.... here is the last RC boat Ibuilt plank on frame Star 45, finished mid fleet at Nationals a year or two ago. the power boat is a 1920's Vinyard that I made based on a half hull and actual measurement from the full size.
Attachments

@marcjsmith Awesome, thanks for the info. I may PM you for help once I get going on it. I think it's a complete kit except for the lead for the keel.
Is this a build your own only deal or can some of these boat be purchased. I'd really like to build a kit, but I've signed up for too much this winter already.
CRYA – Canadian Radio Yachting Association, RC Sailing
THE AMYA - American Model Yachting Association

marcjsmith said: Minnwaska, What type of boat are you looking to build. Click to expand...
Thanks. Lead shot should be easy to get, just can't use it for waterfowl hunting. I shoot trap and black powder, so probably have a fair bit, maybe not 6 to 7 pounds though.
Easy to assemble easy to sail. Df65 or the df95. Df95 is a better sailing boat, but it’s also a larger boat 95cm long vs 65cm long. The reason I mentioned a local club, you might be able to find a boat built and ready to go, maybe older or not suited for racing. Both the df65 and 95 go together out of the box easily in an afternoon. And disassemble easily for transport/ storage. https://radiosailing.net/ . Some folks save the box it came it to transport to events. Others use a bow and arrow case or build their own out of doorskins Hull is abs plastic, lead bulb, carbon keel carbon rudder carbon mast Mylar sails. Boat can be powered by aa batts. I am not a seller of the boats, but I do know person who imports and sells the df boats. Arcb. If you end needing a few lbs. let me know...
Are the rigs and keels readily removable and reinstalled? This sounds like fun, I just don't think I can devote much time to it.
keel is held in place by a single hex head machine screw bulb is held in place on the keel by a single hex head machine screw as is the rudder linkage The main and jib sheet are attached to the booms by a snap swivel(fishing). The jib club and back stay are attached via a string and a snap swivel as well. The mast is keel stepped in a trunk that is adjustable fore aft. No side shrouds. Honestly 10 min max to rig and start sailing For the 65 or 95. Boat can be launched/ retrieved by grabbing the mast at the mast crane and lifting the boat. Two channel radio, one channel for rudder and one for sail. The sails has all the typical adjustment, ouhauls, downhaul, Vang, jib topping lift, forestay tension,jib halyard tension.
marcjsmith said: Honestly 10 min max to rig and start sailing Click to expand...
@glatus12345 sounds cool. Keen to learn a new style of sailing. I will PM you with my email address.
The DF65 RTR Version is shipped with everything necessary to get started . Preinstalled Servo's, Preassembled booms, sails, fittings etc. All you need to do is assemble the spars , Mast, hang the sails, install your radio system and go race! Click to expand...
DragonForce 65 / 650mm DF65 Class RC Sailboat
Df65 is a nice boat, would a great boat to tool around with at anchor. Strong ondesign class so if you ever decided to play with other df65 boats you’d be on an even playing field. The df95 is a better sailing boat, but that is a virtue of the longer waterline and heavier weight. The a+ Sails add a bit more sail area for the light days. And if you want to customize the exterior of the boat https://www.dragonskinsusa.com/df65
Glatus, as you move forward on your project, keep us updated, pics of plans, ect... Also, if you need anything printed out in large format. let me know. I have easy access to a 36" black and white plotter
Hi All! Here's Update video # 2 of the 1/18th Scale Bristol 41.1 RC model. The hull and spars are well-developed now, and the mainsail has been sewn up. Foresail should be done today, and then back to the hull for preps for keel & rudder construction and installation. 1/18th Scale RC Model of Bristol 41.1 - Update 2 - YouTube Thanks again to to helpful members of SailNet!
- ?
- 173.8K members
Top Contributors this Month

COMMENTS
Scratch is a free programming language and online community where you can create your own interactive stories, games, and animations.
Check out my Patreon to help support the boat build! - https://www.patreon.com/jackwood25Guten Morgen! After months of building and filming, I'm finally post...
The sailboat hull can be constructed in a step-by-step process. Here is how you can construct a strong and durable sailboat hull: Step 1. Create the hull mold: Start by building a robust and long-lasting frame that accurately represents the shape and size of the hull. Step 2.
BUILDING A SAILBOAT from SCRATCH With NO Experience In Sailing Or Building - meet Mirco who made the impossible possible and shows us with his Aluminium Days...
Fill the dent with Bondo or a fiberglass patch. Try using Bondo or fiberglass patches to remove dents from your boat's hull or deeper scratches. For Bondo, start by filling in gaps or cracks in the hull using the two-part epoxy putty. Spread an even layer overtop of and around any remaining dent, then allow it time to fully dry.
Average Boat Scratch Repair Costs. The average cost for materials to repair a boat scratch can range from 500 to 2000 USD. The labor charge begins from 150 USD and increases based on the intensity of the scratch. Perhaps, some minor scratches can always incur lesser prices and can be done without requiring external experts.
In this Scratch tutorial you will learn how to use pen to draw a sailboat.
There are many sources of model ship plans. In choosing a set of plans for your scratch build, make sure they contain, as a minimum, three required views: a body plan, a sheer plan, and a half breadth plan. Without these, it is not possible to build an accurate model. The use of these plans will be discussed in detail in Chapter 2.
Free Downloadable High-Resolution Ship Plans Starting Point for Scratch-Built Ship Model Building. All the the plans offered on The Model Shipwright and The Model Shipwright blog are available on this site in high-resolution files. The images on the blog posting are linked directly to the page here with the downloadable files, or you can search from this page by ship type, ship name, or the ...
It's got classic lines and looks so dazzling in the sunshine that people constantly stop me at the boat ramp to ask me about it. There's something unbelievably rewarding about building something like this from scratch. This is definitely a boat that is much better built than bought. Here's how I did it. The boat takes about 100 hours to build ...
For example, the 21ft gaff-rigged cutter I'm currently building will end up costing between $33,000 and $35,000, fully outfitted—several thousand dollars more than the new prices of a couple of popular fiberglass boats near the same size. And yes, since it's wood, it will demand more maintenance.
The average price range for building a sailboat from scratch is between $10,000 and $20,000, but this can be much higher if you want to build an extremely high-quality craft or if you live in an area that is especially expensive. Below is a table showing the estimated range of costs when building a sailboat: Expenses.
How to build a Sailboat: Part 1. Building a sailboat has been my dream since I was a kid. I have always wanted to build one from scratch, but never had the time or money to do so. Now that I am retired and have more time on my hands, I have decided to start building this beautiful wooden sailboat model from plans that I bought online.
Scratch is a free programming language and online community where you can create your own interactive stories, games, and animations. ... Boats on the sea v0.8 cataclismys pro. maximngy. Archer's Boats. Nanoscopic. Boats And Birds MAP part 24. Shadowblaze-the-WC. Battle Boats. S0LARFLARE. Ships.. and boats.
Check out my Patreon to help support the boat build! - https://www.patreon.com/jackwood25Bonjour! I finally got around to fixing my video editing software an...
A wooden sailboat can cost around $1,000 to build. (Source: Instructables) The boat is typically built from 4×8 sheets of plywood and measures 8 feet in length. (Source: Instructables) Various tools such as a pull-saw, table saw, router, sander, and drill are needed for building a wooden sailboat. (Source: Instructables)
We offer a huge range of wooden model ship plans & wood model boat plans for the scratch model ship builder. Modelers Central is the no.1 destination for wooden model ship builders. Popular Model Ship Plans. View All Ship Model Plans. Ship Model Plans - Blue Nose I $ 45.10. Add to cart. Ship Model Plans - Viking Ship
The vast majority of sailing scale model boats is scratch built. There are a few kits - Billings Collin Archer RS-1 comes to mind. The prevailing problem with scaling a sailboat is that stability doesn't scale linearly with size. The result is that model boats will always be significantly less stable than the boat or ship it was modeled after.
The largest range of wooden model ship & model boat fittings, accessories & parts available. Modelers Central is the no.1 destination for scratch model ship builders.. There are over 90 model ship fittings categories from anchors to wire, the scratch model boat builder will find what they need here. All items are listed as single items unless ...
When he started the process of crafting a 38-foot wooden sailboat from scratch, Steve Denette knew nothing about boat building. Beginning seven years ago, he...
13 posts · Joined 2021. #1 · Nov 23, 2021. Hi to all on SailNet! I recently asked members of SailNet & Facebook Yacht Club for help locating/obtaining basic design drawings for the Bristol 41.1, and with the very speedy response, am now able to set off on the journey of design & construction, from scratch. I have built several scale RC models ...
The scratch sheet below is visible but not editable. You need to update the actual google doc to update the information below. Sailboat Racing. Experienced racers New sailors Fleets Latest Scores. Membership. Join as a Member Who We Are Carolina Sailing Foundation. Quick Links. Events Calendar
I scratch built all the 12mR sailboats. The tug was built by an unknown (to me) Danish guy. My nephew and I got it running with new radio equipment.