- BOAT OF THE YEAR
- Newsletters
- Sailboat Reviews
- Boating Safety
- Sailing Totem
- Charter Resources
- Destinations
- Galley Recipes
- Living Aboard
- Sails and Rigging
- Maintenance
- Best Marine Electronics & Technology

A Strong Stanchion to Save Your Life
- By John Vigor
- Updated: August 7, 2002
Lifeline stanchions take a terrible beating. Theyre long, thin and almost impossible to install with any pretense of engineering integrity. They might have been designed as levers to pry open a deck. In fact, whenever someone shoves a boat off a dock with a hearty thrust to a stanchion, thats exactly what can happen. In a fiberglass deck, stanchion movement can cause crazing and cracking in the gel coat. In a wood deck, movement will strain the fasteners and loosen the base, disturbing the bedding compound that forms a vital waterproof seal.
In each case, saltwater and rainwater leaks result. Telltale brown stains then will appear inside lockers, above the pilot berth, or on the cabin liner, usually (but not necessarily) directly beneath a stanchion. Leaks can run along stringers and liners, emerging some distance from the source. But leak damage isnt just cosmetic. It can rot interior woodwork or saturate a deck core, leading to delamination, structural degradation and costly repairs.
A leak signals that you need to rebed your stanchion bases. If they were properly fitted in the first place, this is not a big job. You can do one at a time, but its wiser to rebed them all at once. When one springs a leak, chances are the others wont be far behind.
Some stanchions are two-piece affairs with separate bases and upright posts. Some are bolted through the base plate only and others are reinforced with attachments to a bulwark or high toe rail (which makes them substantially stronger). Whatever the make-up, these are the key elements of good stanchion installation:
- Backing pads spread stress loads.
- Flexible bedding compound seals joints against leaks and, in a cored deck, sealed bolt holes keep the core dry.
- Stainless steel bolts/nuts/washers give strength and security.
Keeping these basics in mind, heres a step-by-step guide to rebedding a stanchion base:
Step 1 Remove the wire lifelines. Remove the stanchion from its base (if the two are not integral) by unscrewing the retaining nuts or removing the cotter pins. Lay it aside. Place masking tape flush alongside the edges of the base and tamp down firmly.
Step 2 Remove interior trim or headliner to expose the nuts holding the stanchion base in place. Remove the nuts with a wrench. You may need a helper on deck with a large screwdriver to stop the bolt from turning. Withdraw the bolts and inspect for pitting or crevice corrosion. If need be, replace with new stainless steel bolts of the same size (but at least 1/4-inch in diameter).
Step 3 Lift the stanchion base from the deck, prying gently with a wide screwdriver if necessary. Gently scrape bedding compound off deck and bottom of base. Wash away remaining bedding compound with solvent (paint thinner or mineral spirits if it was an older, linseed oil-based marine putty such as Dolfinite bedding compound; or acetone if it was polysulfide or silicone).
Step 4 Thoroughly sand the deck inside the masking tape with 120-grit paper, taking care not to sand the tape itself, protecting it if necessary with a piece of Formica or similar held in place. Sand the bottom of the base, too.
Step 5 If necessary, prepare a new backing plate. For materials, use at least 3/32-inch-thick stainless steel, 1/8-inch aluminum or 3/16-inch marine plywood. It should be 50 percent longer and wider than the stanchion base, if possible. Place the base on top of the backing plate and mark for holes. Drill holes in the backing plate 1/16-inch larger than the bolt diameter, to allow for bolt drift.
Step 6 For decks cored with balsa or foam, and if the edges of the bolt holes have not been sealed with epoxy to prevent water ingress, there is an additional step to insert here. With a drill, ream out the existing bolt holes through the deck about 3/32-inch larger than the bolt diameter. Tape the bottom of the holes, but prick a small hole through the middle of the tape with dividers or a large needle. Mix a small quantity of epoxy resin with a bonding powder to the consistency of peanut butter and fill the bolt holes, forcing the resin down from the deck until a tiny worm of putty squeezes through the air holes in the tape. Allow the epoxy to cure. Then, using the base plate as a template, carefully re-drill the original-size holes through the middle of the epoxy.
Step 7 Cover the deck area outlined by masking tape with a generous layer of polysulfide sealant such as Boatlife’s Life Calk or 3M 101 marine sealant. Silicone may also be used to bed the base, but polysulfide is the preferred sealant. Polyurethane bedding compound should not be used because it is a powerful adhesive that makes subsequent removal of the base difficult, and will likely cause structural damage to the deck. (Note: Sikaflex claims this effect won’t occur with its less adhesive 231 polyurethane formula and says it’s suitable for bedding deck fittings.)
Step 8 Smear the bottom of the base with a layer of polysulfide sealant. Also smear sealant under the heads of the bolts. Place the base in position and drop the bolts through. Line up the slots in the bolt heads as required, but don’t turn the bolts again or you’ll destroy their waterproof seal. All tightening will be done from inside.
Step 9 Down below, fit the base plate and the washers, and screw on the nuts while a helper holds the bolts in place on deck. Tighten the nuts only until a fat bead of compound oozes out all around the edges of the base. Remove the excess compound with a putty knife or scraper and a rag soaked in mineral spirits, then smooth the sealant against the edges of the base with a finger or a plastic spoon.
Step 10 Allow the sealant to cure according to the manufacturer’s instructions. This could take anywhere from 48 hours to a week. With a helper again on deck to prevent the bolts from turning, tighten the nuts home one by one. Replace the stanchion post in its base and rerig and tension the lifelines.
Stanchions rebedded in this manner will provide many years of good service and add substantially to the security of the deck lifeline system.
Safety-At-Sea Note: The American Boat and Yacht Council suggests that the entire lifeline installation be capable of withstanding a ÒstaticÓ force of about 600 lbs.
In his book Surveying Small Craft, British author Ian Nicolson warns owners to watch out for stanchions secured with screws. All deck fittings should be thru-bolted, he says.
Furthermore, as far as stanchions are concerned, surveyors agree “that there should be underdeck pads to take the nuts and washers, almost regardless of what construction material is used. Mass-produced boats need adequate checking, because there is a tendency to omit these pads or locate them carelessly so that the bolts do not pass through the pads.”
Nicolson advocates using backing pads on top of the deck, between deck and stanchion base, and below the deck.
Dan Spurr, author of Upgrading The Cruising Sailboat, warns that stanchions should be made of stainless steel pipe, not tubing, and should have lock nuts under the deck. “Stanchions should be welded or thru-bolted to their bases, because Allen set screws only dimple the metal, at best, and are not very secure,” he writes.
To keep the exterior of the stanchion base smooth or to prevent damage to a chromed base, you may want to drill only the stanchion. Mark the position of the set screw with the stanchion in place. Remove the stanchion and center punch the spot, then drill and tap it to receive a machine screw. To use the Allen set screw, drill partially through the stanchion to provide a recess into which the set screw can securely sit. Always use LokTite or a similar product on the threads of the bolts, machine screws or set screws to keep them from working loose.
If there are only three holes in a round stanchion base, locate two holes inboard, Spurr advises. The stanchion will better be able to withstand a sudden outward thrust.
———————————————————————— John Vigor is a regular contributor to Cruising World
- More: DIY Sailboat Projects
- More How To
How to Protect Your Spars from Corrosion
Sailing totem refit series: the forward head makeover, fatty goodlander: dealing with chafe while cruising, how to rig everything in your favor, route planning in the face of climate change.
- Digital Edition
- Customer Service
- Privacy Policy
- Email Newsletters
- Cruising World
- Sailing World
- Salt Water Sportsman
- Sport Fishing
- Wakeboarding
~ Back to Stanchions Main Page ~
~ Back to Hardware Main Page ~

Please verify you are a human
Access to this page has been denied because we believe you are using automation tools to browse the website.
This may happen as a result of the following:
- Javascript is disabled or blocked by an extension (ad blockers for example)
- Your browser does not support cookies
Please make sure that Javascript and cookies are enabled on your browser and that you are not blocking them from loading.
Reference ID: 06e2ee23-f145-11ee-bb8a-ac35d3f50202
Powered by PerimeterX , Inc.
- New Sailboats
- Sailboats 21-30ft
- Sailboats 31-35ft
- Sailboats 36-40ft
- Sailboats Over 40ft
- Sailboats Under 21feet
- used_sailboats
- Apps and Computer Programs
- Communications
- Fishfinders
- Handheld Electronics
- Plotters MFDS Rradar
- Wind, Speed & Depth Instruments
- Anchoring Mooring
- Running Rigging
- Sails Canvas
- Standing Rigging
- Diesel Engines
- Off Grid Energy
- Cleaning Waxing
- DIY Projects
- Repair, Tools & Materials
- Spare Parts
- Tools & Gadgets
- Cabin Comfort
- Ventilation
- Footwear Apparel
- Foul Weather Gear
- Mailport & PS Advisor
- Inside Practical Sailor Blog
- Activate My Web Access
- Reset Password
- Customer Service

- Free Newsletter

Ericson 34-2 Finds Sweet Spot
How to Sell Your Boat

Cal 2-46: A Venerable Lapworth Design Brought Up to Date

Rhumb Lines: Show Highlights from Annapolis
Solar Panels: Go Rigid If You have the Space…

Leaping Into Lithium

The Importance of Sea State in Weather Planning
Do-it-yourself Electrical System Survey and Inspection

When Should We Retire Dyneema Stays and Running Rigging?
Rethinking MOB Prevention

Top-notch Wind Indicators

The Everlasting Multihull Trampoline

What Your Boat and the Baltimore Super Container Ship May Have…
Check Your Shorepower System for Hidden Dangers
DIY survey of boat solar and wind turbine systems

What’s Involved in Setting Up a Lithium Battery System?
The Scraper-only Approach to Bottom Paint Removal

Can You Recoat Dyneema?

How to Handle the Head

The Day Sailor’s First-Aid Kit
Choosing and Securing Seat Cushions

Cockpit Drains on Race Boats
Re-sealing the Seams on Waterproof Fabrics
Safer Sailing: Add Leg Loops to Your Harness
Waxing and Polishing Your Boat

Reducing Engine Room Noise

Tricks and Tips to Forming Do-it-yourself Rigging Terminals

Marine Toilet Maintenance Tips

Learning to Live with Plastic Boat Bits
- Safety & Seamanship
- Sails, Rigging & Deck Gear
Lifeline Stanchions: New Aluminum Matella Is Super Strong
Cast bases outperform welded ones, so look to spartan and suncor..
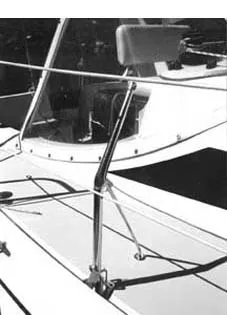
Long ago, aboard sailing ships trapped in the doldrums, the crew rigged long, vertical poles to support awnings. The awnings were needed to keep the decks from opening up and to prevent living things—man and beast—from dying in the heat.
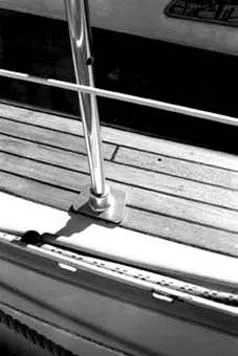
The poles became pipes, they got shorter and soon they were called “bulwark stanchions.”
And that’s how, as bulwarks extending above the weather deck shrank, lifelines came into being. Bulwarks, once needed to keep deck-loaded cargo from going over the side, added to the cost of construction; they also added a lot of windage and could scoop up tons of water.
Stanchions, threaded with strong, low-windage rope or wire lifelines, became slim and trim.
On modern ships and yachts, the lifelines the stanchions support are intended to keep the crew from going overboard. To be really effective, the lifelines should be taller than generally seen. Waist high should be the minimum. How the boat looks shouldn’t be an issue, but it is.
The lifelines and the supporting stanchions and bases must be strong enough to withstand a lurching fall by a large crew member.
Standards for stanchions and lifelines are meager. The Offshore Racing Council says the lifelines should be 18″ high on boats no more than 28′ LOA, 24″ on larger boats with both mounted on through-bolted, bonded or welded stanchions no more than 7′ apart. The Cruising Club of America’s Fastnet-inspired publication, Desirable and Undesirable Characteristics of Offshore Yachts, states only that stanchions be of stainless steel and through-bolted. A recent study sponsored by the United States Naval Academy and the United States Sailing Association suggested that plastic-coated lifeline wire should be replaced with bare wire and that, because pulpits and pushpits are weak attachment points for lifelines, their bases should be equipped with supporting struts.
For this Practical Sailor test, almost two dozen stanchions and close to three dozen bases were collected. The samples do not include all available lengths of stanchions and angled bases.
They all were examined closely for design, material, finish and workmanship. Extra scrutiny was given to fabricated items—those that are welded or made up of several pieces of stainless plate, tubing and rod.
Cast vs. Welded Bases For those who prefer one-piece construction, the penalty for the solid bronze or stainless castings usually is weight.
For instance, a Vetus base in this test, which is made up of a piece of stainless plate bent to shape and to which is welded a piece of stainless tubing, weighs 8.5 ounces. That light weight was the goal clearly is indicated by a hole punched out to eliminate excess material. When combined with a Vetus tapered stanchion, the pair weigh 1 pound, 11 ounces.
By contrast, a cast stainless steel Spartan base weighs twice as much—18 ounces. Combine that Spartan base with the strongest Tops-In-Quality stanchion (the model reinforced with a fiberglass rod) and the weight soars to just over 3 pounds.
Multiply the weight differences in these combinations by the stanchions needed on most boats and the added weight can get significant…especially to a sailboat that is raced. The choice between fabricated and cast bases should be made by a boat owner; unfortunately, the selection usually is made by the boatbuilder, who too often goes not only for the lightest but also the cheapest.
As with any safety equipment, the primary objective is to have a lifeline system that will save a life. (But because of inherent weaknesses, oneshould never clip a safety harness to lifelines.) That means strength.
In the case of lifelines, it’s likely that when someone falls it will be more likely against the lifelines than against a single stanchion. Some say it’s better to have stanchions bend (to provide some cushion). It seems preferable, in our view, that the stanchions withstand the force.
How much force?
Practical Sailor has struggled with various ways to figure out how much force a grown adult might exert while falling hard. Various drop tests have been considered and rejected as not realistic. However, that does not preclude testing to establish which items in a group are the strongest. Tests that indicate in what manner failure presents itself also can help buyers match their preferences to the products they buy.
Bases sell for about $32-$45.
Design and Quality Before testing was undertaken, the stanchions and bases were closely examined.
For the stanchions, the chart (click here to view) shows evaluations of finish, welding, aesthetics, weight, length and price.
Stanchions made of stainless tubing are manufactured from a flat strip. The ribbon is fed into an automatic machine that forms a tube and welds the seam. Because welds are prone to corrosion, the quality of the weld is important. So is the finish…the polishing of the stainless.
The top details may be a matter of appearance. The castellated tip, shaped like the battlements on the corners of a castle, surely ranks as the second best looking (next to the one-piece aluminum Goiot). As with the pipe tip and ring tip on two of the Tops-In-Quality stanchions, the castellated top is a separate piece that must be welded in place. That increases the possibility of corrosion.
One other consideration of stanchion tips involves comfort and safety. The small tips on tapered stanchions may be sleek and handsome, but the blunt tops on the Schaefer and two of the Tops-In-Quality models, all three on untapered tubing, would be a bit nicer to grab and somewhat safer if one fell on them. Tapered for good looks and with fairly large tips, the Goiot and Matella are good compromises.
Whatever the design, the hole for the lifeline must be smooth to avoid chafing either the plastic cover used on most lifelines or a bare wire lifeline. Because the plastic cover encourages corrosion, bare wire is preferable…except in an anodized aluminum stanchion where the stainless wire would quickly wear away the anodizing.
The mid-hole for the lower lifeline also must be smooth.
It should be noted that, although they may be sold as stanchion bases, some of these bases really are meant for powerboat railings. Included are models from Attwood, Buck Algonquin and Suncor. Others can be found in some discount marine stores. With fewer mounting holes, less material or with a low profile, these “railing bases” seem to satisfy powerboat owners, but should not be used on a sailboat.
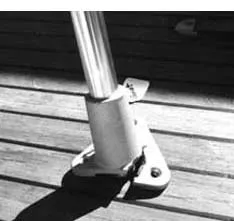
Sailboat bases should have a drain hole, because they collect water and debris. The result: Corrosion, which is unsightly but, more importantly, can lead to failure, especially of fabricated bases.
It’s important, too, how the stanchion is secured in the base. It’s not uncommon for someone hoping to avoid a fall to pull up on a lifeline, only to have the stanchion lift out of the base.
The poorest bases have one tiny set screw. Those with two set screws are twice as good as “very poor.”
A requirement, in our opinion, is a bolt, threaded into at least one side of the stanchion and base, but better if run all the way through and secured with an acorn nut, seated in Loc-tite, on the other side. If such bolts hold the stanchion up off the bottom of the base socket, they rarely rattle. Not one of these bases is so equipped, but some easily can be drilled and fitted with a proper through-bolt.
Several years ago we had Tops-In-Quality make up a number of bases for our Tartan test boat and they were quite happy to drill drain and through-bolt holes. We think this is an improvement well worth the modest price increase.
As one manufacturer put it, “Basically, stanchion bases should be inviolate.” They must not break or bend. They also must be powerfully mounted. If not, a failure probably will do some deck damage, which might be dangerous if at sea and expensive to fix anywhere.
Unless it’s light weight you desire, cast bronze and stainless bases are far better than fabricated bases. Fabricated bases always involve the ever-suspect welding and it takes little pressure to distort the fabricated bases, even those with reinforcing struts. When a base bends, it always pulls the mounting holes closer together and squeezes the deck unmercifully. The result: wobbly bases, deck cracks and leaks.
First Phase Testing For the first phase of the testing, fabricated bases were tested with a strong aluminum stanchion…in this case the 1″ OD Matella.
A piece of Sta-Set line was shackled to the hole in the tip of the stanchion and led to a Harken winch mounted on the other end of the long workbench. Interposed in the line was a Dillon dynamometer. It took a pad eye and a block to produce a proper angle for the line to meet the winch. The pull on the stanchion was at about a 20° downward angle…about right for someone falling against the stanchion or lifeline from the opposite side.

The pull, applied by the Harken #32 two-speed, self-tailing winch and registered on a dynamometer, was increased until damage could be seen.
The failure usually presented itself in the form of a bend in the base plate on the backside. When the bend was well-developed and permanent, the pull and angle were recorded.
Second Phase Testing The second phase of the test involved stanchions. All except the big Matella and the metric Goiot are 1″ OD.
The wall thickness of the stainless steel tube stanchions is about .060″. However, because this was a simple strength test, any differences in the wall thickness are moot.
Further, although it is obvious that shorter stanchions would show up better in the testing, no allowance was made for length after it appeared that it wouldn’t make any difference in the final recommendations.
The Spartan plain bronze base ($40) was used for all but the Matella stanchion (which has its own base).
The pull was applied in the same manner as for the bases. With two exceptions, the stainless tubing stanchions all failed in the same manner. One exception was the braced Signet stanchion; it failed where the brace was welded to the main body of the stanchion. The other exception was the 30″ Ronstan; it has holes for three lifelines and bent at both the bottom hole and at the point where the tube entered the base.
Although it might be thought that a stanchion would bend at the mid-hole or, if tapered, near the top, all but the exceptions noted above failed at the compression point where the stanchion emerges from the base. (Tapering is a relatively inexpensive procedure costing a dollar or two.)
It starts with a slight depression and very quickly becomes a deep kink, at which point the integrity of the stanchion disappears.
The aluminum stanchions are different. Firstly, they have more flexibility, meaning that they recover from fairly severe bending. More importantly, they are very strong and retain most of their strength, even when bent severely.
The Bottom Line Because the base should be of unquestioned strength, cast bases (bronze or stainless, but not aluminum) are so superior to fabricated bases that only cast bases are worthy of recommendation. It’s tempting to qualify that statement by saying that fabricated bases might be used if light weight was very desirable; however, making exceptions in safety equipment can lead to regrets.
Of the cast bases in this sampling, those sold by Spartan—especially the bronze model with the excellent drain hole—provided the greatest confidence. The large stainless model from Suncor also appears more than adequate to very heavy usage.
For stanchions, other than the Tops-In-Quality stainless version stiffened with a thick fiberglass rod, none of the hollow stainless tubes are equal to the two solid aluminum stanchions from Goiot and Matella.
The stainless tube stanchions all failed at from 120 to 200 pounds, which, in that emergency setting when someone is thrown hard against the lifelines, is not nearly as good as the reinforced Top-In-Quality, the Goiot or Matella.
The Goiot stanchion is a metric size, which makes it not usable (without some work) with a non-metric base. And the cast aluminum Goiot base fractured at 195 pounds.
That leaves as Practical Sailor’s top choice the new Matella.
Machined of solid 6061 aluminum, assembled with a 7075 aluminum machine screw, the heavily anodized stanchions come with backing plates and 5/8″ nuts. The base even has two O-rings, which makes caulking unnecessary. The Matella stanchions are available in three lengths—26″, 28″ and 30″ and Practical Sailor recommends the longest. They’re even available in colors—bronze, red, green, blue and any other on special order. They fit deck thicknesses from 3/8″ to 1-3/8″.
Two negatives about the Matella: (1) if one is damaged, perhaps by snagging an overhanging dock, the entire unit must be removed for straightening or replacement, which would be more difficult and more expensive than just replacing a bent stanchion; and (2) it is heavy, as mentioned earlier.
On the plus side is the price. A 30″ stanchion, complete, costs $85. By contrast, a chromed bronze Spartan base ($54.65) and the rodded Tops-In-Quality stanchion ($57.90) together cost $112.55 and you must supply your own backing plate and fasteners.
Contacts- Garhauer, 1082 W. Ninth St., Upland, CA 91786, 909/985-9993, www.garhauermarine.com. Goiot, Welmax Marine USA, 220 Lock Rd., Deerfield Beach, FL 33442-1516, e-mail [email protected]. Matella, Box 2849, Big Bear City, CA 92314, 909/584-0168, www.matella.com. Ronstan, 7600 Bryan Dairy Rd., Largo, FL 33777, 727/545-1911, www.ronstan.com. Schaefer, 158 Duchaine, New Bedford, MA 508/995-9511, www.schaefermarine.com. Signet, 505 Van Ness, Torrance, CA 90501, 310/320-4349, www.signetmarine.com. Spartan, Georgetown, ME 04548, 207/371-2542, www.robinhoodyachts.com. Tops-In-Quality, 314 E. Huron Blvd., Marysville, MI 48040, 810/364-7150, fax 810/364-7925, www.topsinquality.com. Vetus, Vetus Den Ouden, Box 8712, Baltimore, MD 21240, 410/712-0740, www.vetus.com. White Water Inc., White Water Marine Hardware, 13663 46th St. North., Clearwater, FL 33762, 800/572-8871, e-mail [email protected].
RELATED ARTICLES MORE FROM AUTHOR

Medical Emergency on a BVI Charter
What your boat and the baltimore super container ship may have in common, leave a reply cancel reply.
Log in to leave a comment
Latest Videos

Safety At Sea For You & Your Family – The Joe...

What’s The Best Vinyl Window Cleaner for Your Boat?

40-Footer Boat Tours – With Some Big Surprises! | Boat Tour

Electrical Do’s and Don’ts
- Privacy Policy
- Do Not Sell My Personal Information
- Online Account Activation
- Privacy Manager

- Forums New posts Unanswered threads Register Top Posts Email
- What's new New posts New Posts (legacy) Latest activity New media
- Media New media New comments
- Boat Info Downloads Weekly Quiz Topic FAQ 10000boatnames.com
- Classifieds Sell Your Boat Used Gear for Sale
- Parts General Marine Parts Hunter Beneteau Catalina MacGregor Oday
- Help Terms of Use Monday Mail Subscribe Monday Mail Unsubscribe
Leaking Boat Stanchions
- Thread starter sunlover
- Start date Sep 25, 2021
- Beneteau Owner Forums
- Ask A Beneteau Owner
I would guess that it is digging in because it’s been tightened before and the core is failing letting it sink into the deck. Again. a guess
sunlover said: View attachment 198613 . How do I get off the cover? I did some light prying and decided to ask the group. Also, if you look at the photo, the cover has a lip that is digging into the deck. This just looks wrong. Any explanation? Click to expand
I regret to report that after I replaced the furling line clutch on an '06 Bene the owner was unsure about my use of bedding material, so I told him to look inside and I'll run a hose on deck. Water poured in the aft cabin but not from MY work, the gate stanchion had no sealant, no washer, no nut from the factory, and was only held in place because the deck holes were misaligned and it was wedged into place. Whole thing hidden in the overhead such that the owner knew of excess moisture in area but couldn't track it.
sunlover said: I got out my endoscope to look behind a wall (bulkhead?). There's about a 1/2 inch crack to allow insertion. I see the bolt, but how does one access it? It's on the port side behind the galley, but it appears that the easiest access is from the rear cabin. I'm surprised that there is no base plate as just bolted into the fiberglass with a washer doesn't seem very sound. View attachment 198840 Click to expand
Mechone said: I can get at some mine , if they are behind a cabinet ... you may have to remove cabinet to access. Other manufacturers are the same , my buddy has a Catalina 310 stantions bent from winter winds . Basically he has to rip apart all the cabinets to gain access. Using a flex shaft , universal joint with a socket may let you get at it Click to expand
sunlover said: I got out my endoscope to look behind a wall (bulkhead?). There's about a 1/2 inch crack to allow insertion. I see the bolt, but how does one access it? I'm surprised that there is no base plate as just bolted into the fiberglass with a washer doesn't seem very sound. Click to expand
Sounds like cutting a proper access hole and fabbing up a hatch for future access might be in order
I have a suggestion that may work…The Beneteau stanchions are cross bolted at the deck. Remove the allen bolt and pull the tubular stanchion straight up. It will come off the peg. Then with an assistant, get a wrench on the nut below the deck just to hold it. You should be able to unscrew it from above, being careful not to damage the peg that holds the stanchion. Don’t lose the nut and washer, if its there. You will probably have to get creative in order to put it back together.
BigEasy said: Always hate to see that kind of shoddy engineering where one has to tear stuff apart to get to a component or fitting. It's not a matter of IF, but WHEN, stanchions are going to require servicing. At some point in time they will need to be resealed, tightened, straightened, or possibly replaced. Builders should incorporated provisions for accessing without tearing the boat apart. I am not having problems with mine at this time; however, I dread having to deal with it when the time comes! Click to expand
I was able to get the nuts off. I removed the medicine cabinet in the head and that provided me assess with a deep socket and extender. I was ready to drill a large enough hole through the galley cabinet but when I reached in, I realized that it was open. Lucky break. Tomorrow, I'll see about getting off the gunwale rail off so I can repair the fiberglass. I'm still not impressed with these Stanchions. They seem to be for light use only, so I'll try to think up a better solution. If you have a bene, I recommend not using them except, maybe, for drying towels and clothes.
I was never impressed with those stanchions because they always felt flimsy even when they were tightened. Besides that, the overall height of the lifeline caught me at the back of the knee. I could picture myself doing a less than graceful backflip over the side…
Hi there, I had a leak when I bought my B331 3 years ago. I took that base off like you did by a socket extender and a wrench. Was very difficult to do. I went to order a new base and they are not made anymore! Beneteau only makes the one with out the little flange that goes over the inward side of the rail onto the deck. So what I did was order the one without the flange and I put one or two quarters in lieu of the flange, sealed it with butyl (not silicone) and it has not leaked yet.
sunlover said: I was able to get the nuts off. I removed the medicine cabinet in the head and that provided me assess with a deep socket and extender. I was ready to drill a large enough hole through the galley cabinet but when I reached in, I realized that it was open. Lucky break. Tomorrow, I'll see about getting off the gunwale rail off so I can repair the fiberglass. Click to expand
BigEasy said: sunlover said: I was able to get the nuts off. I removed the medicine cabinet in the head and that provided me assess with a deep socket and extender. I was ready to drill a large enough hole through the galley cabinet but when I reached in, I realized that it was open. Lucky break. Tomorrow, I'll see about getting off the gunwale rail off so I can repair the fiberglass. Click to expand
sunlover said: I just noticed that the stanchion didn't have a gasket and only a small lip to prevent leakage. Click to expand
sunlover said: [/ATTACH]First layer of fiberglass. Click to expand
- This site uses cookies to help personalise content, tailor your experience and to keep you logged in if you register. By continuing to use this site, you are consenting to our use of cookies. Accept Learn more…

IMAGES
VIDEO
COMMENTS
DetailsSailboat stanchions are vertical poles positioned around the perimeter of a sailboat deck. They are used for installing lifelines around the boat to keep people safe when the boat is on the water. If you need to replace the lifeline stanchions on your boat, keep reading to find out more about this project. And then be sure to watch our step-by-step installation tutorial at the end of ...
Stanchions are usually (and properly) separate and removable from their Stanchion Bases. It is common for Stanchions to bend (when meeting pilings or other boats); we believe it is not reasonable to require a boat owner to go through the extra time, difficulty and expense of unbolting the Stanchion Bases from the deck when only a Stanchion ...
Stanchions rebedded in this manner will provide many years of good service and add substantially to the security of the deck lifeline system. Safety-At-Sea Note: The American Boat and Yacht Council suggests that the entire lifeline installation be capable of withstanding a ÒstaticÓ force of about 600 lbs.
IL , 01.14.2024. "Products are easy to find and are a good price". Peter T. FL, 01.06.2024. "Easy to order in only 5 minutes! Clear website!" David N. CA , 01.26.2024. Deck Hardware Stanchions, Rails & Netting available from LFS for all sailboat needs.
Every Fall I remove the stanchions and lifelines from my sailboat, so I have to put them back on in the Spring. This video shows the procedure and also incl...
The SS Stanchions listed below are made from 1" OD (25.4mm) polished Stainless Steel tube with a .065" wall. Tapered to approximately 5/8" and welded to a variety of Top styles, the most common are listed below. Other configurations of 1" Tapered SS Stanchions are available, please contact us with complete specifications.
sailing. lifelines & terminals. stanchions. VETUS. Stainless Steel Stanchions. Model # P014046072. $114.99 - $133.99. Clearance offer reflects an additional 25% off the lowest price for in-store pick up only. Select a Product.
To be really effective, the lifelines should be taller than generally seen. Waist high should be the minimum. How the boat looks shouldn’t be an issue, but it is. The lifelines and the supporting stanchions and bases must be strong enough to withstand a lurching fall by a large crew member. Standards for stanchions and lifelines are meager.
Then with an assistant, get a wrench on the nut below the deck just to hold it. You should be able to unscrew it from above, being careful not to damage the peg that holds the stanchion. Don’t lose the nut and washer, if its there. You will probably have to get creative in order to put it back together. sunlover.