- New Sailboats
- Sailboats 21-30ft
- Sailboats 31-35ft
- Sailboats 36-40ft
- Sailboats Over 40ft
- Sailboats Under 21feet
- used_sailboats
- Apps and Computer Programs
- Communications
- Fishfinders
- Handheld Electronics
- Plotters MFDS Rradar
- Wind, Speed & Depth Instruments
- Anchoring Mooring
- Running Rigging
- Sails Canvas
- Standing Rigging
- Diesel Engines
- Off Grid Energy
- Cleaning Waxing
- DIY Projects
- Repair, Tools & Materials
- Spare Parts
- Tools & Gadgets
- Cabin Comfort
- Ventilation
- Footwear Apparel
- Foul Weather Gear
- Mailport & PS Advisor
- Inside Practical Sailor Blog
- Activate My Web Access
- Reset Password
- Pay My Bill
- Customer Service

- Free Newsletter
- Give a Gift

Cal 2-46: A Venerable Lapworth Design Brought Up to Date

Rhumb Lines: Show Highlights from Annapolis

Open Transom Pros and Cons

Mailport: Charley Morgan, Locker Safety, Fast Bottom Paint

Do-it-yourself Electrical System Survey and Inspection

Install a Standalone Sounder Without Drilling

The Tricked Out Tillerpilot

Resolving Common Steering Problems

Top-notch Wind Indicators

The Everlasting Multihull Trampoline

In Search of the Snag-free Clew

The Cruising Sailor’s Argument for High-tech Fibers

Breaking Point: What Can Go Wrong With Your Yanmar?

Rudder Mods for Low-speed Docking

Using Heat to Bend PVC Pipe

Mildew-resistant Caulks for Boats

Can We Trust Plastic Boat Parts?

Repairing Molded Plastics

Mailport: Marine plywood, fuel additives, through bolt options, winch handle holders

The Day Sailor’s First-Aid Kit

Choosing and Securing Seat Cushions

Cockpit Drains on Race Boats

Rhumb Lines: Livin’ the Wharf Rat Life

Resurrecting Slippery Boat Shoes

Shoe Goo’s Gift to Sailors

PS Advisor: Tank Monitor and Camera Mount Hacks

Tricks and Tips to Forming Do-it-yourself Rigging Terminals

Marine Toilet Maintenance Tips

Learning to Live with Plastic Boat Bits

The Ultimate Guide to Caring for Clear Plastic

Preventing Mildew in Marine Fabrics
- Sailboat Reviews
Tall-step Syndrome
... and other insults to the aging sailor..

Boat shows present a wonderful opportunity to not only explore boats well beyond your price range, but also to observe how designers answer the many compromises that each boat design requires. Some designs succeed, and some don’t-and often the weak spot is a simple failure to understand the customer.
At last falls U.S. Sailboat Show in Annapolis, Md., PS contributor Drew Frye was sitting in the cockpit of a lovely 50-foot catamaran with eight other mature sailors-all serious lookers whose legs were also throbbing from a long day of walking the miles of exhibit tents and touring many boats. These were sailors who had worked long years to accumulate the scratch to write a check for the $500,000-$1,000,000 that such a boat would cost. All were over 50 years old, most considerably older.

As Fryes eyes wandered around the boat, he saw many potential problems for him and his wife, and nearly all of them were steps. As spacious as this boat was, all of the steps were 16 to 19 inches high-more than double the seven-inch rise in an average stair step. These high steps would be particularly troublesome for his wife, who has a knee replacement and an arthritic ankle. And for the crowd of mostly older visitors who came aboard the catamaran, these steps were clearly difficult to navigate-even at the dock. One can only imagine the sort of obstacle they would present at sea.
Curious, Frye asked for a show of hands among the sailors gathered. How many of you have had either a joint replacement, or have a spouse or parent with a joint replacement or serious joint surgery? Six of the eight hands shot up, and the others said they anticipated surgery in the future.
Frye turned to the catamaran sales people-athletic 30-somethings-and asked, If this is your real demographic-its a long road to save this much money-then why isn’t the boat designed with our knees in mind? Keep in mind, most of us are not buying a boat for today, but for where our bodies will be in five to 10 years.
The salesmen responded with open mouths and no useful answers. The rest of the day, Frye posed the same question to salesmen and designers throughout the boat show, and got variations on the same answer: The reality of boat design requires cramming as much into the available space as possible, and thus a certain athleticism may be required of the crew. Frye accepted that reasoning with regards to pure performance boats-his former boat, a Stiletto 27, had some big steps (even those he modified to suit his familys needs). However, while this kind of compromise is fine for flat-out racers, it makes little sense for a cruising boat. Some designers have listened, and they create step sizes that are reasonable. But they remain the minority.
So what can we do? Between his wifes knee replacement and his own joint problems (he shattered his knee in college), Frye has had to make modifications to several of his boats, most recently a PDQ 32 catamaran. After looking at his own succesful solutions and making an informal survey of the ergonomics aboard boats at the most recent boat shows, he compiled the following report.

Adapting Existing Boats
Before running out to buy a new boat-most older sailors are happy with the boat they have-we should look at little modifications that can make big differences aboard the boats we have. Here are some modifications Frye and others have used to improve onboard ergonomics.
Runt steps: Many helm stations aboard big cats and some monohulls seem to be designed for 7-foot-tall sailors. Men of average height, women, and young sailors generally find their feet swinging comically in the air when they sit at the helm of one of these boats. This gives no leverage for working the wheel unless they sit on the very edge of the bench.
On catamarans, a runt box is a simple solution. The low-profile stool sits at the helm; it has rounded corners that cannot flip, slide, or snag ropes; and it has storage space for cockpit clutter in the hollow. It can be used permanently, or temporarily to check fit until a permanent step can be designed and installed. One of the boats Frye looked at, the very comfortable Antares 44 catamaran, comes with a runt box at the helm that can be customized to the height of the boat owner.
A well-made runt box can also be of assistance when you are getting in and out of the cockpit on a big catamaran. This is often a matter of stepping up onto the seats, and then up onto the deck, two 16- to 18-inch steps in a row. This can be double-trouble for damaged knees and for anyone carrying a heavy load. Fold-down steps can also work for this problem.
Another place where a portable step comes in handy is down below. Because of the way hulls curve, bunks are often set up high to take full advantage of the boats beam. In the case of his own boat, Frye found a custom-fitted sea chest to be a perfect solution, providing just the right step height, a convenient place to store shoes, and a nautical touch.
Hand loops and handholds: Sometimes steps cannot be made shorter, and an extra handrail would get in the way. For these places on board his boat, Frye has crafted some simple grab loops made from 1-inch webbing. He has found these to be better than grabrails because they are high and grip the wrist. They also provide considerable security when descending the stairs in an active seaway. They take no space, cost almost nothing to install, and can easily be stowed, although you could leave them rigged all the time. Frye used sail ties to create his loops during the boats first trip seven years ago. They have remained in use, unchanged, and since then, he has added a few more.
Stainless handholds are often too small in diameter for optimum grip. Wrapped tightly with line, they are more comfortable and secure. Fancy coach whipping is not required, but it does need to be applied very tightly. To make it really tight, don a pair of grippy sailing or gardening gloves, and give the wrapping a couple of hard twists.

Mast steps and companionway ladders: Frye is an enthusiastic climber; he spends summers on rock and winters on vertical ice. Yet, he finds the setups for mast steps and companionway ladders to be a challenge-and has since he was much younger. The norm for these installations seems to be around 15 inches between steps. Frye knew that rock-climbing etriers (tiny webbing ladders used when climbing big walls) are based on 10-inch steps. Why are sailors expected to climb steps so much higher than those designed for super-fit rock climbers?
According to the U.S. Occupational and Safety Health Administration (OSHA), ladder rungs should be 12 inches apart. Clearly when installing mast steps, you want to minimize weight aloft and reduce windage, but you also need to be realistic with the spacing. Companionway steps are also a common challenge. The companionway ladders on many of the boats Frye looked at were no better than his own, which has steps placed 15 inches apart.
Swim ladders also should have reasonable spacing, with at least four steps below the water. The steps should be proper, flat, deep steps (at least 2 inches deep) rather than tubes and railing extensions. A fit sailor can board with a lesser ladder, but when tired or boarding in bumpy conditions, a proper swim ladder will always be appreciated.
Lifeline gates: Stepping over a lifeline to take lines ashore can be treacherous, and stepping over them to board is just silly. Although it is less expensive to keep the lifeline circuit intact, adding additional gates fore, aft, or midships can make a big difference when boarding. One issue to be aware of is that if the stanchions at gates are not braced, you run the risk of creating too much slack in the lifeline when the gate is open. Boarding crew might reach out for the slack lifeline, only to feel it give under their weight. Frye, who added a gate near the bow for taking lines ashore, found that even though he could not brace the gate stanchion, he could lash the upper lifeline down to the stanchion with whipping twine to help keep the stays taught.

When checking out a new boat, your eye is drawn to a graceful sheer, efficient running rigging, and beautiful interiors, but often, not much thought is given to moving around easily. As you move around the boat, imagine yourself dead tired and sore, the decks wet and heaving. What features really matter?
Boarding: Have you noticed that many boats provide boarding platforms at the boat show, even though there will be none in the real world? Wouldnt you find that strange if you were buying a car or a house? Some boats offer easy boarding from a floating dock though opening transoms, but will you want to open the transom every time you board guests? Will you back in that close to the dock? Will stern lines cross right where the transom door will drop?
Then there is the matter of tides at fixed docks. Can you step, not climb, aboard as the boat moves through a 5-foot range? Yes, you can carry portable boarding steps (see Search for Safe Boarding Boost, this issue) on board, but they have to be stored and are not always the most stable climbing platforms-and perhaps none of the crew is spry enough to be in charge of placement and retrieval.
A boarding plank? These have to be well designed and can be difficult to stow (see The Art of the Passarelle, this issue).
Sugar-scoop transoms help if the sides are low, but often, high sides are sculpted for aesthetic reasons; unfortunately, this adds nothing to function and often ruins the easy side-access that sugar-scoop transoms can afford at any state of tide.
Weve also seen perfectly accessible transoms ruined by a fixed railing in the wrong place. Some boats mold steps into the topsides, but most are too shallow to be used by a man with his arms full.
Fryes solution? He bought a boat with sugar-scoop transoms that are easily accessed from the side, so one of the steps is always at the correct height at any state of tide. He devised a small tackle to pull the boat tight to the dock (it is only in place during active boarding). If the dock is slippery, he places either a high-grip mat or a towel, which sometimes grabs the dock better, on the edge of the dock.
Companionway steps: This is an area of common disagreement. People with knee problems often prefer shallower, angled companionway steps, more like a steep staircase, while others believe a steeper ladder is better in a seaway. Additionally, ladders can present a problem when loading supplies on a big boat. The ladders are not safe to descend facing outward, so, on a big boat where the cockpit is not within easy reach of someone standing on the cabin sole, supplies must be passed through the companionway to a partner. Stairs and ladders each have their pros and cons; the important thing is to consider which best meets your and your crews needs, especially while underway in rough conditions, or while loading supplies.
On deck: Can you move everywhere, above and below decks, without letting go of a handhold? Is the handhold a secure, round shape three-quarters to 1-inches in diameter? Will it be slippery when wet? Stainless is more secure when wrapped with leather or line. Be realistic about your hand strength. Is there a good place to run jacklines on deck, free of deck control lines? Are dedicated anchors provided, or can they be easily added? Shouldnt jacklines be incorporated in the basic boat design, like seat belts?
Dinghy boarding: Unless every stop will be at a marina, the mobility-
challenged sailor will find themselves isolated on the boat while the group runs off to play unless there is easy dinghy boarding. Most boats provide no safe facility for the less agile sailor to board a dinghy. Can you imagine a car or home manufacturer expecting you to use a portable ladder every time you entered or exited?
A portable, folding ladder will serve in a pinch, but ideally, a cruising boat should have a fixed swim ladder and solid boarding steps. For those with more significant mobility issues, a proper boarding platform is the best solution. There should be a way to tightly secure the dinghy to the platform and a solid handhold between the dinghy and the platform. Davits and the tackle hanging from them can serve well.
Swim ladders: Swim ladders should always have at least four steps with full treads. Three steps just don’t work for old knees, and tubing is tough on the feet. There should also be handgrips as they come up.
Are these major design challenges? We don’t think so. Some designers get it, and build very accessible boats. Others live in an alternate reality, expecting the buyers to bend to what they are presented, blinded by appearance and overlooking function. Perhaps, if we speak up, more builders will listen.

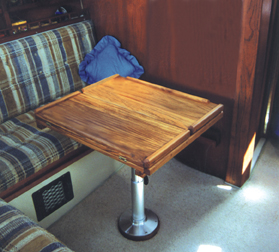
1. A fixed, high railing on this center-cockpit boat provides security and easy handholds at sea. Notice the cut-away step to get into the high cockpit. The railing can help ease this transition when leaving the cockpit to go forward or aft. 2. Rigid louvers built around saloon windows on this catamaran serve two purposes: They cut down on heat below, and they double as easy steps to get up to the mast, which unfortunately does not have enough flat area for a proper standing workstation. 3. A fixed, centerline dining table and overhead handholds make this boat’s main saloon safe to traverse, even in a seaway. 4. The more open “dance floor” on this cruiser gives crew few places to brace themselves or hold on when moving forward or aft.
RELATED ARTICLES MORE FROM AUTHOR
re: Tall-step Syndrome … and other insults to the aging sailor.
would have been interesting to learn the height of the author…. soooo many boats are in fact designed for the short to ultra short , if I hear one more NavArch or broker describe 6’3″ is Cathedral headroom I’ll throttle them. I am 6’5″. The author looks like a typical short man with issues.
Bet you’re fun at parties.
Ergonomics are a complicated issue, with problems for the particularly large or small only being a part. As the article implies, design for the intended users vs. for marketability at the boat show dock.
I can’t help pointing out some oddities in the pictures accompanying the articles. In the set of four under the heading, “50-foot Catamaran Details,” the first and third are clearly a monohull. And, as a former owner of own, I’m pretty sure the second picture is a 42-foot Manta Catamaran. The louvers described as doubling up as steps actually were not engineered to be used as steps. In fact, based on my recollection, I’m pretty sure that the fuzzy rectangle visible in the picture on the left top of the uppermost louver is a sign which reads, “DO NOT STEP HERE.”
Another ergonomic quirk of the Manta was that the companionway door sill was something like 6-8 inches above the cockpit floor but an unexpected 12-14 inch drop on the other side to the salon floor. Just enough to throw you off. Courtesy of the location of the fuel tank.
LEAVE A REPLY Cancel reply
Log in to leave a comment
- Privacy Policy
- Do Not Sell My Personal Information
- Online Account Activation
- Privacy Manager
LAHOWIND » Just you, me, + the dog.
Just you, me, + the dog.

© 2024 LAHOWIND | ProPhoto Blogsite • Designed by Swoone

- Sails & Canvas
- Hull & Structure
- Maintenance
- Sailing Stories
- Sailing Tips
- Boat Reviews
- Book Reviews
- Boats for Sale
- Post a Boat for Sale
- The Dogwatch
- Subscriptions
- Back Issues
- Article Collections
- Free for Sailors
Select Page
A Step Above (or Below)
Posted by Drew Frye | Interior , Projects

Safety and comfort increase with a companionway fix
Sailboat designers have good knees. I know this because I’ve owned three sailboats with companionway step heights twice as high as the building-code-specified 7½ inches. My Stiletto 27 had a 21-inch-high step and my Corsair F-24 has a 19-inch step. Even my PDQ 32 cruising cat had 16-inch steps to climb to reach the cockpit, something my aging parents, my wife’s artificial knee, and I struggled with. In the case of each boat, there was room for designers to accommodate proper ergonomics, they just didn’t do it.
Beyond my three examples, I’ve found that aboard many smaller boats, crews are supposed to grab the edges of the companionway and muscle their way up and down, I suppose. Depending on sea and knee conditions, this ranges between uncomfortable and unsafe.
A tested, effective, and simple solution is to lay one or more planks, across the cabin at the correct height, in fitted cleats. These steps are light and easily removed for under-companionway access. The Stiletto 27 came from the factory with a single step built this way (and conveniently, it serves also as a bench seat). Unfortunately, the drop into the cabin was nearly 40 inches, making for two very long strides across the single step. To this boat I added two additional, like steps, creating a set of stairs that was easy to navigate and easily set aside for access to the aft-storage area.
This seemed like the best solution for my Corsair F-24 as well. Because the total drop was 19 inches, I needed to add only a single step.

Drew made the step cleats from oak pieces, shaped to fit the cross-section of a salvaged dinghy seat.
I started by considering what I had on-hand: a surplus foam-and-fiberglass inflatable dinghy seat (alternatively, I could have used a ¾- x 8-inch board, as I have on other boats). Cutting the molded ends off the seat allowed me to see the cross section of the seat, and the shape that cleats would need to accommodate.
With this knowledge, I cut cleats from 2- x 2-inch hard- wood blocks on a table saw. I cut the rabbet (a notch or groove) in two passes, being sure to leave more than half of the material below the deepest groove to ensure strength and room for bolts. When finished, I glued 1 ⁄ 4 -inch endplates to the backs using thickened epoxy and then trimmed them to shape with a disk sander.
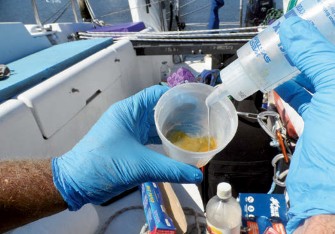
G/flex epoxy is semi-flexible when cured, an important property in this application, as the bulkheads may give a bit.
I mounted each cleat differently because the port and starboard bulkheads I had to work with were very different. To port was a thin hull liner, to the back of which I epoxy-bonded a 3 ⁄ 1 6 -inch-thick fiberglass backing plate, about 1-inch larger in both dimensions than the cleat. Then I epoxy-bonded the cleat to the liner and fastened the whole sandwich together using 2 1 ⁄ 4 -inch bolts.
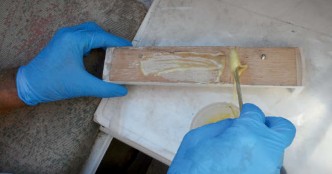
Drew thickened the epoxy with colloidal silica before applying to the backs of the cleats. He made sure the epoxy was thick enough to fill gaps and thin enough to penetrate. Another approach would have been to paint the surfaces with un-thickened epoxy, then thicken and apply the bedding coat.
The starboard side was more complicated because the carpeted bulkhead is one side of a balsa-cored centerboard case (and there is water on the other side of it). Here, I cut away a cleat-sized rectangle of the carpet and removed the crumbly old glue and prepped the fiberglass surface with a cup brush on a drill and a multitool with 80-grit sandpaper. To mount the cleat, I epoxy-bonded it and used wood screws (just long enough to bite into the first layer of fiberglass, but not penetrate the inner skin) to apply light clamping pressure. These screws will never carry the load, but in addition to providing clamping pressure while the epoxy sets, they provide visual symmetry with the port-side cleat.

Finished cleats installed and ready for the step.
In all cases, I used West System’s G/flex epoxy blended with colloidal silica. I ensured that it was thin enough to penetrate and wet, but not so thin that it ran. G/flex is not as strong as regular epoxies, but it bonds better to plastics and imperfectly prepared surfaces, and it better tolerates the small amount of flexing I expected from the thin hull liner (even with the backing plate).
The last step was to cut the surplus dinghy seat to the right size. I cut it about 1 ⁄ 8 -inch shorter than the actual span to prevent jamming and allow for hull movement. Then I dug out 3 ⁄ 16 -inch of foam from each end and filled with thickened epoxy to finish them.
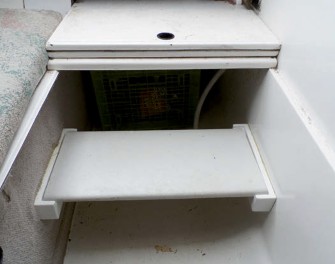
Project complete: a factory-finish-looking step where one was sorely needed.
The result is a rugged factory-looking step that is easy on the knees and simple to remove. Total cost of the project? It was all scraps, but $20 should cover it if you have the paint and glue on hand.
About The Author

draws on his training as a chemical engineer and pastimes of climbing and sailing to solve boat problems. He cruises Chesapeake Bay and mid-Atlantic coast in his Corsair F-24 trimaran, Fast and Furry-ous, using its shoal draft to venture into less explored waters. He is most recently author of Rigging Modern Anchors.
Related Posts

Is There a Saildrive in Your Future?
May 1, 2018
Hints and Pointers for Installing AIS
July 1, 2015

Clean Prop for Christmas – Propspeed
May 12, 2020

On-Deck Propane Storage
March 1, 2019
Now on Newsstands
Join Our Mailing List
Get the best sailing news, boat project how-tos and more delivered to your inbox.
You have Successfully Subscribed!

- Forum Listing
- Marketplace
- Advanced Search
- About The Boat
- Gear & Maintenance
- SailNet is a forum community dedicated to Sailing enthusiasts. Come join the discussion about sailing, modifications, classifieds, troubleshooting, repairs, reviews, maintenance, and more!
Refinishing companionway steps
- Add to quote

Looks great... btw did you know you can get the nonskid self adhesive strips in clear??
No I didn't... I did notice that Jamestown Distributors sells it by length so I don't have to buy a 50m reel... I forgot to mention that I did try sweating out some of the dents... worked quite well (they came out maybe to 1/3 of their original depth) and then filled the remainder.

I've heard of that being done... haven't ruled it out either...

Don't use the non-skid strips. Your work is beautiful and they're ugly! Like taking a shower and putting on dirty underwear afterward. I routed two 1/4" strips into each tread and inserted sacrificial ash strips with a drop of epoxy on each end. The strips are 1/8" proud of the tread and are unfinished. They grab bare and shod feet nicely and we've never slipped on any heel or in wetness. It's an idea that Sabre uses on their new boats and that I retrofitted to ours. You can see them in the following link: VICTORIA (and her mistress)
MarkSF said: ...I stripped the steps chemically, sanded, and ... Click to expand...
I used good old methylene chloride-based stripper.. the strongest I could find. It's really nasty though. Used two pairs of latex gloves, and a chemical vapour respirator, and still felt a bit odd at one point. Next time for the floor, it's going to be soy-based stripper even if it does take a lot longer. Sabreman - looks very nice as does the whole interior. Did you do anything with the sole? Any tips for someone about to embark on refinishing it?
Thanks. I sanded the sole with 220 grit on a 5" random orbit sander connected to a ShopNVac. I replaced the sanding disks every 2 or 3 linear feet (translation: often), sanding enough to scuff the floor evenly. I vacuumed the entire floor and then let the dust settle and shut the hatches. Then I tacked the entire floor. Starting at the front, in bare feet I applied Minwax Spar Urethane with a good china bristle brush. Do not squeeze excess finish on the can's edge, tap the brush on the inside of the can. Do not dip the brush more than 1/2" in the finish. Working continuously, I worked backward toward the companionway, tacking each section as I moved. The last 2' are always a challenge as I climb on the quarter berth or chart table seat to get the last sections, but it's fun contortion. Many people will wax poetically on various finish brands but i find that a spar urethane is easy to apply, is virtually indestructible and easy to find.
I see, so you just sanded enough to key the new varnish, rather than going back to the veneer?
Hi MarkSF, Looks like a lovely job. May I ask how did you sweat out the dents and fill ? I have numerous small nicks and dents along galley teak fiddles and several larger dents in my sole that I would like to attend to in the off season. Thanks
I soaked some cloths in water and left them on the dents overnight. Seemed to work. Then I filled with wood dent filler I bought from the hardware store. This filler takes a stain. Yes, I have quite a few dents in the sole too.
- ?
- 173.7K members
Top Contributors this Month


CatalinaOnly.com
Catalina sailboat upgrades, new companionway doors.
Companionway doors highly customizable and can be manufactured from a variety of materials, with our specialty being handsome teak wood appropriate for upgrades and new installations on sailboats with wood trim. All of Cruising Concepts’ companionway doors utilize fixtures that are designed for limited exposure, improving security while preserving the aesthetic consistency of the vessel. Each set of doors is designed for the customer’s specific dimensions and our installation kits are simple and easy.
Companionway Doors
Yacht Tables
At Cruising Concepts we appreciate the legacy and class of the Catalina line of sailboats. Our teak products add to the grandeur and class of any Catalina with new retrofit windows and companionway doors; and improve livability and functionality with our classic teak cockpit and dining tables. We are familiar with almost any model of Catalina sailboat and can design our products for any specification and dimension required. Our long history with different sailboats allows us to tailor our doors, tables, and other products for other pleasure craft as well. Click on any gallery to see the pictures.
Retrofit windows.
Boarding Ladders
PHOTO GALLERIES
Catalina Companionway Doors Catalina Cockpit Tables Catalina Interior Tables Companionway Doors Replacement Boat Doors Boat Doors in the Shop Pictures Boat Door Hardware Pictures Yacht Tables Show Case Yacht Tables Show Room Interior Boat Tables Inlays Pedestal Boat Tables Binnacle Tables Transom & Deck Dining Table Hardware

Dr. Teak’s Blog
More dr teak beneteau love . boat flooring . boat shows . catalina mine . current events . customer props . faq finishing . installation notes . island packeting . ladder all . picture this . sale . shout out . table talk . teak to me . the doors . they’re inlays . tongue & groove . uncategorized . window shopping . wood care, more information.
CruisingConcepts.com Companionway Doors CruisingConcepts.net TeakConcepts.com Starboarddoors.com CockpitTables.com CatalinaOnly.com YachtTables.com Boardingladders.us YachtEntertainmentSystem.com
Cruising Concepts DIY Videos
All Videos Video: Cruising Concepts Catalina Hatch Upgrade Video: Cruising Concepts Testimonials Video: How to upgrade to a Beckson Port on your boat Video: Cruising Concepts Cockpit Table and Cup / Binocular Holder Installation Video: How to do a Hatch Upgrade Retrofit on your boat V ideo: How to measure companionway doors for your boat

Technical Specifications and Diagrams
Cockpit Tables IP Island Packet Cockpit Table Teak Adapter Installation Instructions Cockpit Tables Pedestal Throttle Shift Lever Casing Inf0: Yacht Specialties Whitworth Catalina Hunter and Others
Aluminum Frame Boat Windows Boat Window Installation Specs Catalina 30 & 38 Aluminum Flange Measurement Diagram Recessed Frameless Boat Windows Catalina Recessed Boat Window Installation Catalina 30 34 36 42 Configuration Check (1987 – 1992)
[email protected] Hosting by Orcas Web Website design by Orcas Web Design
Catalina Interior Tables Catalina 30 Interior Table Installation Instructions Catalina 30 Interior Table Pedestal Diagram Companionway Doors Benetau Companionway Door Measurement Instructions Hunter Companionway Doors Catalina Companionway Doors Companionway Doors Measurement Diagram Interior Tables for Boats Configuration Diagrams
© 2019 Cruising Concepts. All rights reserved.
- BOAT OF THE YEAR
- Newsletters
- Sailboat Reviews
- Boating Safety
- Sailing Totem
- Charter Resources
- Destinations
- Galley Recipes
- Living Aboard
- Sails and Rigging
- Maintenance
- Best Marine Electronics & Technology
Building a New Sailboat Companionway Door
- By Roger Hughes
- Updated: September 25, 2019

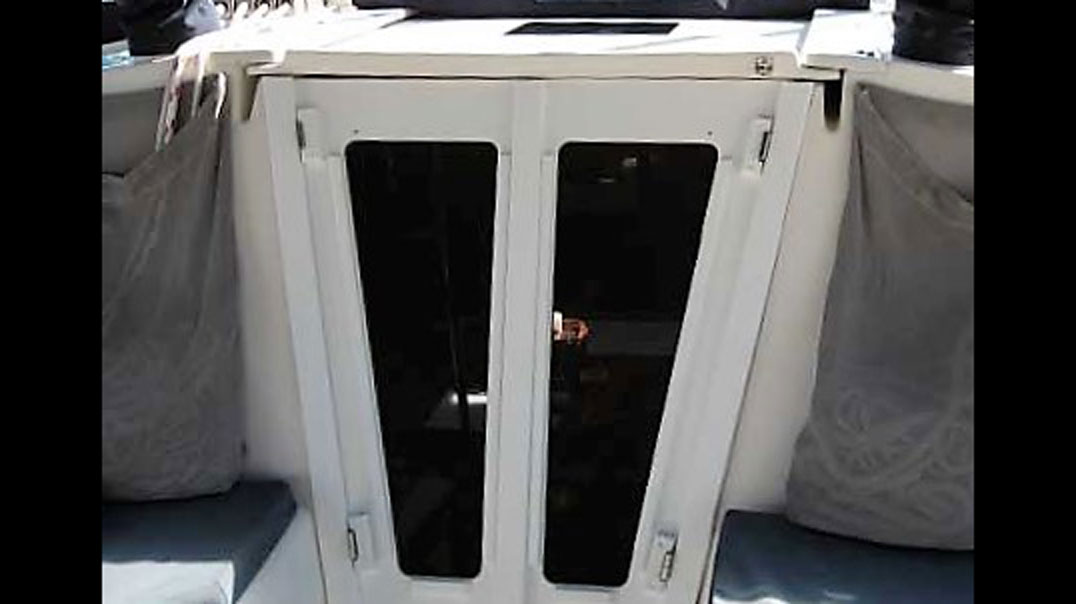
For some time I had planned to repair and modify Britannia’s front door, or to use the more-correct nautical term, companionway. The hatch housing leaked, al- lowing rainwater to seep into the plywood sliding top and causing it to delaminate. My wife and I were also heartily fed up with the two heavy washboards used to close the opening. When in place, the two teak boards completely blocked all light through the entrance.
First the hatch-housing leaks needed sealing, then the hatch itself needed to be repaired. I also had an idea about how to be rid of the horrible washboards and improve the actual companionway access.
Sealing the cracks in the large teak housing was easy enough. I sanded off all the old varnish, filled the cracks, and then rolled on four coats of Cetol Marine Natural Teak from Interlux paints. The Natural Teak is a brownish color, and I think it enhances the deep color of teak. More important, by not sanding be- tween coats, it created an excellent nonslip surface in an area where I frequently stand when working at the mast.
The large sliding hatch had been built as a permanent structure. By that, I mean it could not be taken out with- out one side of the slider guides first being removed. It came as no surprise to find the guides weren’t just fastened with self-tapping screws like 90 percent of the rest of the boat, but rather they were bolted through the fiberglass deck with 1⁄4-inch bolts, whose nuts were encapsulated in the fiberglass underside.

Down below, I had to re- move part of my new saloon ceiling panels to be able to chisel the resin off around the nuts before I could hold them with vice grips to unscrew them.
To make matters more challenging, the hatch frame was built to where I couldn’t reach all the fasteners, so I had to cut the guide in half with my oscillating saw before I was able to lift the hatch completely out. Who was it who said, “Working on boats, one job leads to another”? Oh yes, it was me!
I lugged the deceptively heavy hatch to my garage workshop, where I dismantled it by drilling out all the wood- en plugs and withdrawing the long stainless self-tapping screws holding the four sides to the top.
The top was made of 1/2-inch marine plywood with another 1/4-inch teak-faced plywood sheet glued on top. The layer of teak had rotted and was beyond repair, but the 1/2-inch- thick base was still good, except for some delamination around the edges. I wanted to reuse it to save having to curve a new sheet into the same shape. Using screwdrivers as levers, I pried open the damaged edge laminations, one edge at a time, then squirted wood glue into the seams. I then clamped the panel in my woodworking bench vice and left it overnight.

The next question was what to replace the rotten wooden top with?
Having dismantled the hatch, I made short work of the flaking varnish on the sol- id teak sides and stringers with my belt sander.
I then took all the parts back to the boat because I wanted to see if it was possible to make the hatch slide farther into the housing, to give more companionway headroom. I also wanted to sand and varnish the companionway surround, which was now much easier to get to with the hatch removed.
By trial and error, I found I could cut 2 inches off the back of the hatch so it would slide that much farther into the housing, and provide more headroom when descending or ascending the ladder. The hatch was then carted back to my workshop for modification, reassembly and final finishing.
At Lowe’s I bought a sheet of fiberglass paneling made by Crane Composites (cranecomposites.com). It’s a little more than 1/8-inch thick but very strong and completely water- proof and mold-proof. One side is dimpled and the other smooth, so I used the smooth side uppermost to match the surrounding deck. This would waterproof the top and prob- ably be stronger than the original plywood. I glued the fiberglass sheet to the plywood using Loctite Power Grab adhesive, a type of waterproof glue suitable for fiberglass and wood. After the glue set, I trimmed the new top flush with the edges of the renovated underpanel.

Luckily, the underside of the original 1⁄2-inch plywood panel that I was able to reuse had a teak-veneered face, so I care- fully sanded this before reassembling the hatch.
I reattached the hatch trim pieces with waterproof wood-working glue and fastened them using the same stainless screws I’d taken out. The original assembly appeared not to have been glued, which I think allowed water to eventually seep into the end grain of the plywood. With its fiberglass top and glued sides, that won’t happen again.
Completing the job required quite a bit of finishing off by hand. I sanded the side trim flush with the new top, and then glued 28 teak plugs into the screw holes and sanded them flush. As an added touch, I ran a molded edge along both sides of the top using my hand router.

After masking the top panel, I applied a coat of Cetol NaturalTeak to the sides.Then I turned the hatch over and rolled Cetol on the teak underside. I then applied three coats of Cetol gloss all over, rubbing down between coats with 250-grit sandpaper. This produced a beautiful glossy finish that further enhanced the appearance in the saloon when the hatch was closed.
The finished hatch sat in my workshop for a week while the Cetol hardened, and I sanded and varnished the remainder of the teak surrounds framing the companionway.

When everything was thoroughly dry, I simply lifted the hatch back into the left-side guide and refitted the right guide—but this time I used 1⁄4-inch stainless self-tapping screws to fasten it to the deck, bedding it with 3M 5200 adhesive caulk. This will be more than adequate, since the guides carry no load, just acting as guides for the hatch. I filled the screw holes with 1⁄2-inch teak plugs, and the hatch was finished.
Next up: Make new weather doors.
Originally the companionway had two large sol- id-teak washboards, which stacked one on top of the other in slots. As I said, they were heavy and cumbersome, and my wife could hardly handle them. Then, when they were out, there was nowhere to store them in the cockpit.
The washboard concept is part of a traditional design, which hypothesizes that if a giant wave floods the cockpit, the boards would stop water from entering the saloon. That, of course, presupposes the boards would actually be in place. In practice, they are nearly always removed when we’re aboard because they completely prevent access to and from the cockpit. For a short-handed crew, I consider semipermanently closing off the companionway in this way to be actually dangerous, because it effectively prevents quick access, both in and out. Also, the prospect of a total cockpit flooding is remote, especially on a center-cock-pit boat like Britannia , with its high freeboard and coamings that are 7 feet above the waterline.

I used the 3⁄4-inch solid-teak boards to make two doors, which I hung with piano hinges on either side of the companionway. One side locks with a sliding bolt into the bottom sill, and the other with a heavy deadbolt into the solid beam of the sliding hatch. We can now easily close one door, or both, as we wish. To complete the job, I bought two oval glass panels of light- houses from amazon.com, and recessed them into each door, adding a touch of elegance when daylight filters through.

In addition to now having a waterproof companionway hatch, the refurbished entrance presents a very classy appearance. It’s our new “front door”.
Roger Hughes is a dedicated do-it-yourselfer and a frequent Hands-On Sailor contributor.
Supplies and Costs:
- Cetol Natural Teak: Johnstown Distributors, $30
- Fiberglass panel: Lowe’s, $39.20
- Adhesive: Lowe’s, $7.99
- Piano hinges for doors: Lowe’s, $15
- Oval glass inserts for doors: amazon.com , $85
- Total: $177.19
- More: hatches , How To
- More How To

3 Clutch Sails For Peak Performance

It’s Time to Rethink Your Ditch Kit

8 Ways to Prevent Seasickness

How To De-Winterize Your Diesel Engine

The Moorings Expands in Croatia

C-Map Updates North America Charts

New to the Fleet: Italia Yachts 12.98

St. Vincent Court Orders Deportation For Hijacking Suspects
- Digital Edition
- Customer Service
- Privacy Policy
- Terms of Use
- Email Newsletters
- Cruising World
- Florida Travel + Life
- Sailing World
- Salt Water Sportsman
- Sport Fishing
- Wakeboarding
Many products featured on this site were editorially chosen. Cruising World may receive financial compensation for products purchased through this site.
Copyright © 2024 Cruising World. A Bonnier LLC Company . All rights reserved. Reproduction in whole or in part without permission is prohibited.
Cruising Sailors Forum Archive
Messages in this thread.
Cruising Sailors Forum Archive is maintained by SailboatOwners.com Powered by Tetra-WebBBS 6.22 © 2006-2013 tetrabb.com
- Forums New posts Unanswered threads Register Top Posts Email
- What's new New posts New Posts (legacy) Latest activity New media
- Media New media New comments
- Boat Info Downloads Weekly Quiz Topic FAQ 10000boatnames.com
- Classifieds Sell Your Boat Used Gear for Sale
- Parts General Marine Parts Hunter Beneteau Catalina MacGregor Oday
- Help Terms of Use Monday Mail Subscribe Monday Mail Unsubscribe
H38 Companionway steps hinge screw holes stripped out on stair side
- Thread starter Damspacher
- Start date Oct 30, 2019
- Hunter Owner Forums
Has anyone had this issue? This has caused the steps to pull away at the top where the hinges are screwed into the steps which make the latch at the bottom of the steps very difficult to open and close. Any suggestions for a fix.

I don't know your boat but... Can you drill out the stripped screw holes, fill with thickened epoxy, re-drill pilot holes appropriate for the original screw size and location of attachment point, then remount steps?. If so, Google "Filling holes with thickened epoxy".

quadrille38
Yup had that issue when the boat was new. Was told about it by friends who had same boat but a year earlier. the fix was to replace the screws with through bolts. You can get to the back side to put the nits on the bolts bu going up through the engine compartment. It’s not terribly easy and requires a little body contortion activity but then what repair on a boat can be done without contortion and sacrificing at least one knuckle. Our marina owner often says it’s not a real boat project unless there is blood drawn. oh if the boat wasn’t put away for the winter I’d get pictures for you but alas it’s covered and secure
Sounds like your repair was on the engine side of the hinge. These holes are striped out on the step side of the hinge.

Drill the holes, glue in (with titebond III or comparable water resistant wood glue) a comparable diameter length of wood dowel. Let dry and trim off. You want something that will flex and grab onto the threads pid the screw. Real simple and repeatable in the future.
You can adjust the latch on the inside, should hold the steps, but not to tight.
Damspacher said: Sounds like your repair was on the engine side of the hinge. These holes are striped out on the step side of the hinge. Click to expand
quadrille38 said: I can’t recall exactly as it’s been a number of years (10) since I did it but I’m thinking I put bolts on the step side too. Wish boat wasn’t covered so I could confirm for you Click to expand

letskeepriding
The hinges on my 38 are falling off too. I'll be looking at it in a week or so and pondering the fix. So far I like the through bolted suggestion as it sounds stout. But the insert fix sounds interesting too. Likely they used too small a screw for the job or the wood is not up to the task. IE too thin or too soft. I'm shocked that a boat manufacturer skimped on something. Has anyone put longer support stays on the steps to hold them up higher ? Not even sure if its possible but mine are shot and I'm going to look into it. Just completed the sale and when I get home from being out of town I've got a long list of things to look at but with the cold setting in I'm hoping for a few warm days to get more than the winterizing done.
letskeepriding said: The hinges on my 38 are falling off too. I'll be looking at it in a week or so and pondering the fix. So far I like the through bolted suggestion as it sounds stout. But the insert fix sounds interesting too. Likely they used too small a screw for the job or the wood is not up to the task. IE too thin or too soft. I'm shocked that a boat manufacturer skimped on something. Has anyone put longer support stays on the steps to hold them up higher ? Not even sure if its possible but mine are shot and I'm going to look into it. Just completed the sale and when I get home from being out of town I've got a long list of things to look at but with the cold setting in I'm hoping for a few warm days to get more than the winterizing done. Click to expand
Hmm, yeah, I haven't taken a good look at it yet. I'll let you know if I come up with anything. I though the wood might be particle board but didn't want to speculate. I was hoping they weren't that cheap. Now I see why you went with through bolts.
There are a few youtube videos in Sail Life that use Forsner bits to drill out the hole quite large and then refill them. Makes the hole stronger and water tight.
Mike Oldak said: There are a few youtube videos in Sail Life that use Forsner bits to drill out the hole quite large and then refill them. Makes the hole stronger and water tight. Click to expand
Artboas, I'm not exactly sure the type of insert you are referring to. would you be able to send me picture of one or a link to them ? After taking a quick look at it the other day I can see the appeal of this solution. Have you used them on this application and into particle board ? there appears to be a fair amount of side stress on these screws (hence the failures). At least the steps aren't falling off yet and I can procrastinate till they rip off the hinges and fall on my head while I'm checking the oil some day. : ) Might be best not to lift the steps up anymore. I'm sure the oil is fine. Problem solved.

kappykaplan
Google “helicoil insert”.
kappykaplan said: Google “helicoil insert”. Click to expand
Thanks. I'll give it a look
MikeHoncho said: Not exactly.... search Amazon for "threaded inserts" they look like this View attachment 172652 Click to expand
Update. I ended up using the insert method for my repair last fall. It lasted about 2 months. That would translate to lifting the steps about 10-15 times before the inserts pulled out of the wood. I was afraid this might happen but it was the easiest repair and looked solid when first done. My issue is on the step side of the hinge. I can access the backside of the lower hinge holes so I'll through bolt those. I cannot feel where the upper holes are on the inside and those are the ones that take most of the strain. I'll be taking a better look next time I'm at the boat. It appears there were prior repairs made to the steps and the wood that the hinges screw into may have been replaced with a soft wood. As we know, Once the hinges start the loosen it gets difficult to open the latch at the base of the steps. It appears that a simple adjustment of the latch will take care of it but it doesn't. I tried to add another hole in the hinge but that stainless is tough and the bits I had weren't up to the task. I'll let you know that happens.
- This site uses cookies to help personalise content, tailor your experience and to keep you logged in if you register. By continuing to use this site, you are consenting to our use of cookies. Accept Learn more…
IMAGES
VIDEO
COMMENTS
It turned out to be our favorite build in our boat restoration project so far and that's building a new companionway steps for our salvage sailboat. Our comp...
The heavily trafficked companionway is a critical area of transition from topside to below. If it's poorly designed, the potential for accidents is high. Let's start with the offset companionway, often seen in older, classic-plastic production boats. This was a design response to ketch rigs, in which the mizzenmast is often stepped in the ...
209. Capital Yacths Newport MKIII 30 Punta Gorda, Fl. Jan 29, 2015. #3. I cut thin non slip strips and put 2 rows on each step. I got the non slip paper (self sticking) from Wall-Mart cheap. They come in sheets and you can cut them to the size you need.
We're back to working on Freebie, but we've got to be a little creative and choose our projects wisely because until the construction of the home she's docke...
The ladders are not safe to descend facing outward, so, on a big boat where the cockpit is not within easy reach of someone standing on the cabin sole, supplies must be passed through the companionway to a partner. Stairs and ladders each have their pros and cons; the important thing is to consider which best meets your and your crews needs ...
03-14-2013, 08:43 PM. Re: The Rise and Fall of companionway stairs help. Keyhole-shape fixtures ( mounted on the bulkhead the width of the ladder) and slightly protruding carriage bolt heads at the top of the ladder/steps stringer would be secure, as well as quick and easy to deploy and no moving parts.
We built DIY stairs for our sailboat companionway. It was a cheap boat project that has been a game changer for daily life. When we first bought this sailboa...
My husband and I recently retired, sold the house and moved aboard a Tayana 48. We're enjoying many projects and making the boat into a home. The companionway stairs are beautifully finished wood of
You may remember this post about teaching Oliver to use the companionway stairs in our boat. And how it went "oh so seamlessly."Well, Oliver's willingness to use the stairs lasted about two point five seconds after that post. ... Endeavour 37, LahoWind, Laho Wind, Cruising Blog, Adding Traction to Companionway Stairs, Gripper Pads for Sailboat ...
Safety and comfort increase with a companionway fix. Sailboat designers have good knees. I know this because I've owned three sailboats with companionway step heights twice as high as the building-code-specified 7½ inches. ... To this boat I added two additional, like steps, creating a set of stairs that was easy to navigate and easily set ...
The varnish also covers my companionway steps. (This is way different from Stu's boat which has that nice deep, rich colored teak and I believe his steps are either natural or treated with oil.) So, my varnish is wearing thin and I will need to refinish the steps soon and I would like to get rid of grooves used for non-skid as they tend to ...
Refinishing companionway steps. Here's a pic of the the refinished companionway steps. I've not decided if I need more non-skid-ness, if so I will try the self-adhesive 3m tape. I stripped the steps chemically, sanded, and applied a light layer of Varathane Golden Mahogany stain. To get a light layer, rub this on with a tissue, don't brush.
Location: Frederick, MD. Boat: Beneteau Oceanis 40. Posts: 251. getting the dog up and down companionway stairs. Picture a 40 foot monohull, a 50 pound dog and us in our 60s. Our companionway stairs are steep, typical of monohulls. I've added huge, no-slip treads to the steps. Still our dog needs a boost going up and to be carried down.
At Cruising Concepts we appreciate the legacy and class of the Catalina line of sailboats. Our teak products add to the grandeur and class of any Catalina with new retrofit windows and companionway doors; and improve livability and functionality with our classic teak cockpit and dining tables.
We need to replace two steps on our companionway stairs, and I have not been able to find any after searching online. Does anyone have any ideas? This is my first posting here. We are new Catalina 270 owners, and on one of our first sails, a friend broke two of the steps in half. Thank you!
Supplies and Costs: Cetol Natural Teak: Johnstown Distributors, $30. Fiberglass panel: Lowe's, $39.20. Adhesive: Lowe's, $7.99. Piano hinges for doors: Lowe's, $15. Oval glass inserts for doors: amazon.com, $85. Total: $177.19. hatches, How To. A DIYer replaces his companionway hatch boards with a set of doors.
We have inlaid grey "nonskid" in our companionway stairs -- you can see it under the beer display. We both take our shoes off as soon as we board the boat and are constantly barefoot -- sometimes for weeks on end. This winter back in Florida will be different. But hopefully we can get stuff fixed
This site uses cookies to help personalise content, tailor your experience and to keep you logged in if you register. By continuing to use this site, you are consenting to our use of cookies.
Regardless of the origins of the word, a companionway is now found on nearly every boat or ship. Stairs or ladders leading from one deck on a ship to another are called companionways. A primary concern in the design of a companionway is the need to balance ease of access with the ability to secure the ladder or stairwell against rough seas or ...
Dont be shocked. Every boat is a compilation of compromises. And this is one that Hunter should not have made. Screws into particle board for a weight bearing application like this is a bad idea. The particle board just does not have the screw holding strength to support the weight of the stairs when in up position.