
RC Sailboat Rigging Setup- Briefed in 17 Easy Steps
Table of Contents
Introduction
To build a model sailboat, you’ll need a lot of time, patience, and talent. Remote control sailboat beginners should start by altering or fixing a pre-existing model. It is possible to create a quicker and more sophisticated sailboat by rigging an existing model.
What to do for the rc sailboat rigging setup ?
Tether the retaining bolt and wire mainsail luff. Insert the mast stub and slide the entire main boom assembly. Push the masthead and backstay crane. Adjust the sail to match the mast reinforcement ring. Attach the eye in the mainsail clew. Close the hooks. Set the backstay’s length to the right.
To get the overall understanding, read the entire article.
Things to Bring
- Stitching Device
- Sailboat Controlled via Remote
- Thread Made From Polyester
- Fisherman’s Spectra Line
- Dacron Sails
- Utility knife
Procedure for Rigging
Use these rigging guidelines to their full extent. This ensures that the boat will sail with the qualities and performance that its creators intended. You can also check the RC dirt oval setup guide to ease your work.
Step 1: Replace Old Sails
Remove and replace the old sails. Cut out the new main and headsails from Dacron. Measure the old ones from the model and add a half-inch on each side to the new measurements. Tether the retaining bolt.
Step 2: Wire Mainsail with Eyelets
All six eyelets on the mainsail luff should have wired mainsail luff rings attached to them.
Step 3: Place the Mast Stab
Be careful not to get the plastic collar’s bevelled edge. Insert the mast stub into the bottom of the mast.
Step 4: Slide Main Boom
From the bottom, slide the entire main boom assembly onto the mast stub.
Step 5: Slide Rings Under the Mast
Starting at the luff of the mainsail, slide all rings beneath the mast one at a time.
Step 6: Assemble Plug
Push the masthead and backstay crane. Assemble the plug into the mast. Cut a 250mm Dyneema length and tie the mainsail’s head to the backstay crane.
Step 7: Layout the Sail
Adjust the sail to match the mast reinforcement ring at its highest point. The sail’s head may readily swivel. Poles are sheeted out at an angle of 80 degrees when the boat’s sailing with the breeze.
Step 8: Attach the Cunningham
Attach the Cunningham (downhaul) as demonstrated by cutting a 300mm length of Dyneema. Tie a cord to the eye in the gooseneck fitting’s uppermost eye.
Step 9: Tie Bowsie’s Eye
Follow this path: First, tie one end to a Bowsie’s eye. Then, tie a second Bowsie’s eye; finally, tie a third Bowsie’s eye.
Step 10: Attach the Mainsail Clew
Attach the eye in the mainsail clew (bottom right corner) to the mainsail clew using a line.
Step 11: Close the Hook
Close the hook’s open end with thin-nosed pliers. Keep your sail from falling off while you’re out on the water.
Step 12: Replace the Sail If Needed
If you need to replace the sail, simply use a flat-bladed screwdriver to pry it open once again.
Step 13: Cut Dyneema
For the Backstay, cut a 900mm length of Dyneema. The Backstay Crane’s end hole has a loop where you can tie a piece of string.
It’s time to attach one of our 6mm stainless steel rings to its bottom end. Using a Mast Socket, insert the mast and the rigged Mainsail into the hull.
Step 14: Attach the Loop
Once you’ve cut a 500mm piece of Dyneema, tie a loop in one end. Weave the other end through the first small gaps in a Bowsie. Then throw the rim at the bottom of the Backstay.
Finish it back at the Bowsie. Using a metal hook in the Transom (rear edge of the hull), attach the loop to the backstay. Then put the Bowsie nearly halfway along the bottom rope and secure it.
Step 15: Tighten the Leech
To allow the leech (back edge) of the main to twist a little, lightly tighten the compression strut. Such that the leech (back edge) is under mild tension. Adjust the Cunnigham such that the luff of the sail is just slightly strained.
Step 16: Adjust the Position of the Rings
Set the backstay’s length to the right. A spacing of roughly 25 millimetres between the boom tube’s centre. Achieve the sail foot midway by adjusting the position of the silicon rings (SR5) and the mainsail clew hook.
Step 17: Connect the Foresail
Use the spectra fishing line to loop between the grommet and the eyebolt. Connect the foresail to the top of the mast before the mainsail.
To make use of the foresail, equip the boat’s bow with a second, shorter boom. Connect the sail’s grommets to the short boom’s front and back eye bolts with spectra lines.
You can check these suggested rigging tools. You need these tools for rigging setup-
Apply a few drops of thin CA adhesive into the Dyneema cord at the point of the cut. Then cut through it at an angle. The cut end will be firm and pointed, making it simple to weave through the Bowsies.
A dollop of thin CA adhesive applied to the knot can help keep it in place. Once you’ve tied it, trim any extra rope.
Don’t use hot gun glue as it doesn’t stick to this type of surface. If you take the time to secure all knots now, you’ll have a long-term reliable vessel.
Tips for Better Setup
A Dacron sleeve should be added where the lines come into contact with the hulls or plastic parts. Because Spectra is extremely powerful and can shred into the material.
Ask sailmakers for scraps or old, ripped sails that you may use to build the remote control boat sails. Only if they are willing to part with them.
There are a few things to keep in mind when it comes to rigging more sophisticated rigs. Like double mast designs or using spinnakers until you’ve gained some experience in the activity. Always clean your RC boat as you clean your RC car to avoid rusting.
How tight should the rigging on a sailboat be?
If you push or tug on them, they shouldn’t wiggle about too much. So make sure they’re snug. Tighten them up if they’re still slack or floppy.There is no need to tighten any of the other shrouds after the cap shrouds are in place. Because they follow in consecutive order.
What’s the simplest way to sail a boat?
The Lateen Rig is a great starting sailboat. It only requires 2 ropes in its basic form.The Lateen Rig is one of the most basic sailing rigs. A spar, boom, and mast are all part of this rig. As are a single jib sheet and mainsheet.
How much does it take to replace a sailboat’s rigging?
Re-rigging a sailboat can cost anything from $1,000 to $5,000. Re-rigging a 40-foot boat with wire is estimated to cost roughly $100 per foot. Which includes the round-trip costs of hauling, launching, and unstepping the rig (about $2,500).
Final Words
We’ve discussed here in detail on the rc sailboat rigging setup. This should help with the rigging setup, and we sincerely hope it does.
OK, so the above may look a little daunting. You’ll be able to recall this procedure with ease after completing it five or six times. Be familiar with and comfortable with your tools, settings, and methods.
The very best to you!
Travis Murray
Leave a Comment Cancel reply
Save my name, email, and website in this browser for the next time I comment.

How to Sail an RC Sailboat – Step by Step Instructions – 5 Minute Read

Affiliate Disclaimer
As an affiliate, we may earn a commission from qualifying purchases. We get commissions for purchases made through links on this website from Amazon, the Ebay Partner Network (EPN) and other third parties.
Sailing an RC sailboat is fun, but it takes some practice before you get good at it. I certainly needed it when I started! If you want to take your interest in RC model boats to another level, then you should consider learning how to sail an RC sailboat.
However, learning how to sail RC sailboats requires patience and perseverance. There are several things that you need to master before you can begin sailing. This article will teach you how to sail a radio-controlled sailboat.
Read on below to discover tips that will avoid failure in learning how to sail model sailboats, that apply to all size boats.
Step by step Instructions
How does a yacht sail, how are the sails and rudder of an rc sailboat moved, moving forward in a straight line, sailing into the wind, sailing away from the wind, final thoughts.
First, here’s a summary step by step approach to learning how to sail an RC sailboat:
- Consider joining a local club ( USA UK ) where you’ll find lots of helpful RC sailors and RC sailing events that will help you learn. You may even be tempted to get into RC sailboat racing.
- In any event, choose a day with a gentle, consistent, light wind, preferably with the wind direction towards you, just in case you lose control of your boat.
- Find a medium-sized lake or pond, and avoid rivers or the sea, where there may be strong undercurrents. A local club will have a safe sailing area. Look out for areas that may have weeds or reeds, or shallows that could strand your boat. Remember to factor in the depth of the keel, which, on most model sailing boats, is significant.
- Check you are able to sail in your chosen area – ie no prohibitions – and keep clear of swimmers, people fishing, full sized boat traffic, and wildlife.
- Avoid days when it’s busy in your sailing area with other modelers until your sailing skills are such that you can feel confident.
- Set up your RC sailboat on its stand, and check the rigging is as it should be according to the boat’s instructions. Ensure you have brought the boat battery pack charger, the batteries are charged, and you have spare AA batteries for transmitter. Turn on the transmitter, and test that the rudder control and sail servos are all working properly.
- Ensure you understand the basics of sailing, set out below, before launching your RC sailboat. Keep a keen eye on how your boat reacts to the wind, and be ready to react in turn by altering the sail angle to maintain the boat speed as far as possible.
The first thing you’ll need to know is how does a yacht sail? An rc sailboat sails just like a full size yacht. The wind energy pushes against the sails and flows over them, creating a difference in wind pressure on each side of the sail, which is translated to forward movement by the keel of the boat. Without the keel, the boat would be pushed in the direction of the wind.
To keep the yacht moving forward, the sail angle to the wind is adjusted depending on the position of the boat. Paradoxically, a sailing boat can sail into the wind, as well as with the wind. The only direction that can’t be sailed is with the wind directly in front.
The direction of the boat is adjusted by the rudder, which is at the back of the boat.
The following diagram shows the sail angles at different points of the wind:
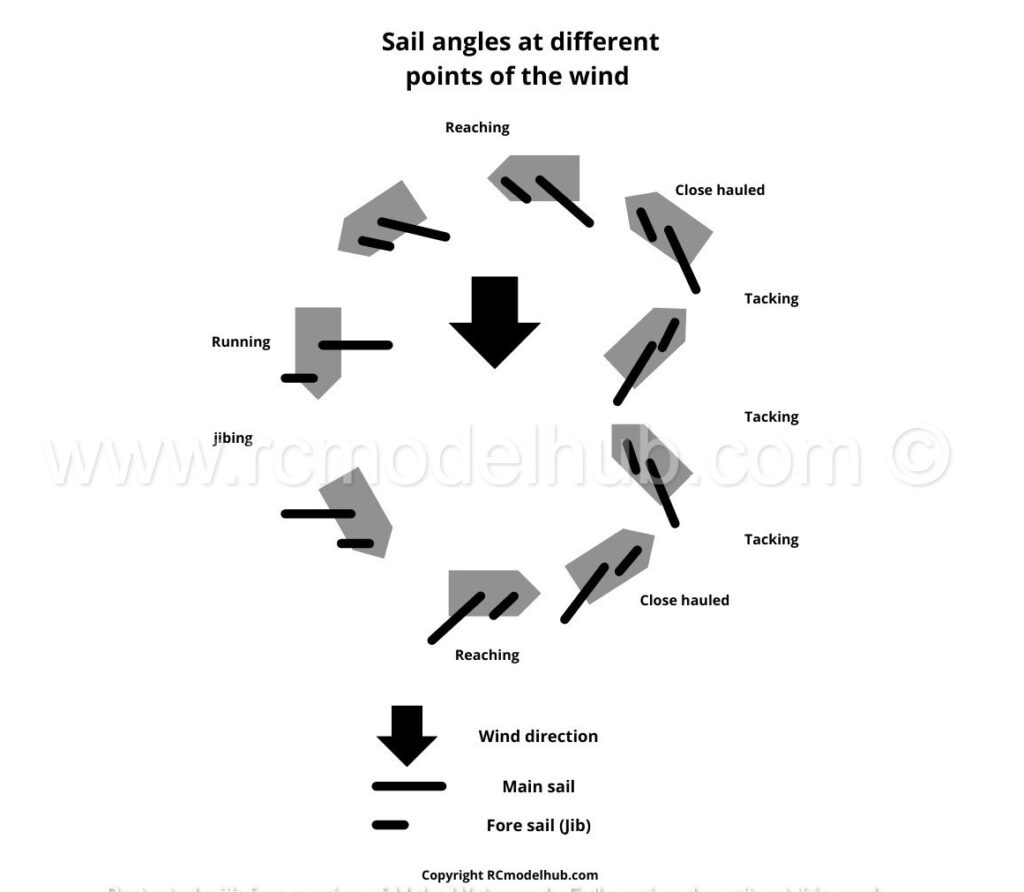
As a beginner RC sailing boat helmsman, many of these terms will be confusing to you, but they will soon become familiar.
The controls of an RC boat are explained in more detail in t his article , but basically, the hull (body) of the boat contains batteries that power servos which in turn move the rudder, the main sail, and the fore sail (the “jib”). The servos are controlled by a receiver, that takes commands from the RC transmitter which you hold in your hand. Here’s a short video that explains the transmitter controls:
How to sail an RC sailing boat
First, the basic skills. With the boat in the water, start with the wind half way between the front (bow) of the boat, and the side (beam). Keeping the rudder straight, trim (move) the sails so that they are close to the hull (close hauled) and the boat should move forward. If the wind is gusty, or very strong, move your transmitter control to let out the sails, spilling the wind, to keep the boat from keeling over.
If you’re sailing into the general wind direction, you’ll need to learn to “tack”, which involves turning the boat from a position where the wind is coming on one side of the bow, through the head-on wind, to end with the wind on its other side. This is achieved by moving the rudder to turn the yacht, whilst changing the angle of the sails to the wind – see the diagram above.
So the boat moves forward via a zig zag course.
As the boat turns into the wind, it slows, so this maneuver should be completed as quickly as possible, otherwise, the boat could get stuck with the sails flapping – this is called being “in irons”.
If the direction you wish to sail in means the wind is behind the boat, it is called running before the wind. In this case, turning the boat involves “jibing”, which is the opposite of tacking.
To change direction whilst running with the wind, move the rudder so the wind goes around the back (stern) of the boat and haul the sails in. As the boat comes round, the wind will move from one side of the sails to the other.
If this is not done smoothly, it could cause the sails to violently move in the opposite direction, possibly causing damage and maybe even capsizing the boat.
So those are the basics of learning how to sail an RC sailboat. As I’ve said above, the best way to refine your skills is to get out on the water and practice.
if you have any interest in remote control sailing but aren’t sure where to begin, use the step-by-step guide above to learn how to sail an RC sailboat. Once you’ve mastered the basics, you can move on to the exciting world of racing sailboats.
If you’re still considering your first RC beginner sailboat, take a look at our article on beginner RC sailboats , or for the more adventurous, consider building your own RC sailboat from a kit. More about that here .
Image credit Nick Kinkaid
About the author
It all started with a line controlled spitfire 50 years ago….
That turned into a life long interest in models, in particular radio controlled models, but I’ve only got back into it since I’ve been retired. As a result a lot has changed, and I’ve been happily starting afresh, researching into the hobby and finding answers to the questions all beginners have when starting out.
I hope you find some answers to the queries you have, and go on to enjoy all aspects of this fascinating hobby.
Latest posts

VOLANTEXRC P51 Mustang RC Plane Review: A Beginner’s Dream?
I was thrilled when I discovered the VOLANTEXRC RC Plane. This 4-channel WWII RC Airplane, specifically the P51 Mustang model, is truly a beginner’s dream come true. With its ultra-stable Xpilot gyro stabilizer system and 3-level flight control system, it’s incredibly easy to fly, whether you’re a novice or an experienced flyer. The impressive 2.4…

RTF RC planes with SAFE technology: No More Crashes?
RTF RC planes with SAFE technology have revolutionized the world of remote control aviation, offering a new level of ease, control, and safety for both beginners and experienced hobbyists. What a change from my early days of flying RC planes, when you fully expected to come home with your plane in bits! These innovative aircraft…

Top Race RC Plane TR-C385 Review: Stunt Flying Delight
I recently had the chance to test out the Top Race 4 Channel RC Plane TR-C385. It surpassed all my expectations. Designed for adults and older kids, this ready-to-fly airplane offers an exhilarating stunt flying experience. With precise control and maneuverability, thanks to its 4-channel system, this RC plane is a great starter or intermediate…
- Vanquish 65
- Mini Maniac
- RG65 Appendages
- Maniac MK II
- IOM Appendages
- Marblehead Class
- Marblehead Appendages
- RT65 Ragnarok
- RT65R Armageddon
- RC65 Adrenaline
- ST65 Sowelu
- Mini40 / F48 Class
- Nightmare X
- Nightmare MK VIII
- MultiOne Class
- FireDragon 1000
- DIY Sail Winch
- Rig Building
Rig building


Sail Winches

RMG Sailwinches
Rmg smartwinch the best winches on the market, header content region, insert text, image or banner ads here, or just delete this text and leave this area blank.

1/25 (36") Scale America's Cup high performance model sailboat
5ft Replica of the 1962 Americas Cup 12 Meter
45" Scale Model of the Olympic Star Boat
J Class Boat-Shamrock V
1/16 (8'-10')Scale Replica of the 1930's America's Cup Class Yacht
RMG Sail Winches
High Performance sail control winches

- Create as many news links as you need. News links are simple bullet lists.
This is where you would add your text, images, or advertising banner

Chesapeake Performance Models is the authorized North American service center for the RMG winches

All RMG Smartwinches are compatible with Spektrum Radios
Standard Drum Sizes
Tapered Spiral Drums

Copyright © 2021. Chesapeake Performance Models LLC. All Rights Reserved..
- Order Status
- Sign in or Create an account
Advanced Search | Search Tips
- Standard Drums
- Self Tensioning Drums
- Spiral Drums
- Miscellaneous
- Ordering, Shipping & Returns
- Specifications
- UserGuide J
- UserGuide_H_v_S8
- UserGuide_H
- UserGuideG-v3
- How To Program a SmartWinch
- RMGSwitch-BEC
- Repairs & Upgrades
- SmartWinch & 2.4GHz Radios
- Self Tensioning Drums Description and Use
- SmartWinch and High Power Servos
- How To Replace FETs
- Parts (Elect)
- Parts (Mech)
Our Newsletter
How To Program a SmartWinch E Series Revision 1
The programing differences:
- Revision 1 uses ground pin for Setup 1 and Setup 2.
- Revision 1 uses signal pin for Setup 3.
- Setup 2 and 3 are combined in revision 2.
- Signal pin is used for all adjustments in revision 2.
- Ramp Rate is not available in revision 1.
For description of the adjustable features click here .
Adjustments are made by placing the winch in setup mode. Setup is entered by connecting the Setup Lead to a spare ground pin for Setup 1 and Setup 2 or signal pin for Setup 3 into the Rx. The Setup Lead is the single wire with a small connector.
The picture shows a multi channel Rx. If using a two channel Rx the rudder servo lead will need to be removed to access a signal pin. The Setup Lead is shown connected to a signal pin. For normal operation, leave the Setup Lead connected to any spare center pin (positive). Allowing the lead to dangle free in the bilge is a recipe for corrosion and Setup Lead failure.

Ground pins are the outside row and are used by the black (or brown) wire of the servo lead.
Positive pins are the center row (red wire).
Signal pins are the inside row (white or yellow).
The inside row pin of the Rx battery connector is not a signal pin and can not be used for Setup.
If the Setup Lead is connected to a signal or ground pin when the winch is turned on, there will be a rapid repeated beep. Reposition it to a center pin for normal operation.
Setup is not essential to operate the SmartWinch . Travel can be set using a Tx EPA if available. However this is a powerful servo which can do damage if overrun occurs. Setup 1 is a simple and safe way to adjust travel.
Setup does not correct faults. If the winch has a problem Setup will not solve it. Settings can be overwritten thousands of times so you can experiment with different settings as much as you like.
- Remove drum if first time for Setup 1 or after reset done in Setup 2. Turn radio and winch on and check that the winch is responding to the Tx.
- Place Tx stick at full in position and adjust trim all the way in the same direction as the stick.
- Connect Setup Lead to Rx ground pin and wait for a 1 second long sound signal . About 2 seconds after connection there will be a ring tone like sound signal.
- Move Tx stick to full out and wait for another 1 second long sound signal. The 2nd sound signal indicates that the Tx end points have been read and saved.
- Move Tx Stick back to full in. If not already there, the winch will drive to its zero point then sound a third sound signal.
- Fit drum and manually adjust the lines to set the main boom at full in. Ensure Tx stick remains at close hauled for this step.
- Using the Tx stick, drive the winch out until the booms are at the desired full out position. The winch will run at a lower speed at this time. Take care not to go too far out as travel is set to maximum at this time.
- With the winch still at the new full out p osition, remove Setup Lead from Rx. The SmartWinch will automatically restart with the new settings. This completes Setup 1. If no more adjustment is required then push the Setup Lead onto a spare centre pin for storage during normal winch use.
Note: Setup 1 must have been run previously but does not need to be done each time Setup 2 is run.
- Turn Tx and winch on and ensure winch is responding to Tx.
- Place Tx stick at full in to turn Battery Monitoring on OR Place Tx stick at full out to turn Battery Monitoring off.
- Push Setup Lead onto Rx ground pin and wait for a 1 second long sound signal. About 2 seconds after connection there will be a ring tone like sound signal.
- Remove the Setup Lead from the Rx. Do not move the Tx stick before doing so. 1, 2, 3 or 4 beeps will sound indicating battery monitoring level set. The winch will then restart itself with the new settings.
This completes Setup 2. If no more adjustment is required then push the Setup Lead onto a spare centre pin for storage during normal winch use.
Note: Setup 1 must have been run previously but does not need to be done each time Setup 3 is run.
- Place Tx stick at desired position. For SLT & ISDB, drive the SmartWinch (via Tx stick) to full in for minimum, full out for maximum or any intermediate position as desired. For LBS, place boom at desired shutdown position. The range available is half to maximum turns. A position of less than half will result in half turns position. For Reset to default, stick position is not important.
- Push the Setup Lead onto a spare RX signal pin. About 2 seconds after connection a there will be one beep per second up to 10 beeps.
- Remove the Setup Lead immediately the required number of beeps has sounded. See table 1 below. If you accidentally pulled the lead out at the wrong number of beeps then just turn the winch off now and the previous setting will not change.
- Hold the Setup Lead onto a signal pin until the startup signal then remove the Setup Lead from the Rx. There is no need to push it completely onto the pin for this step. The startup signal indicates that the SmartWinch has restarted with the new setting.
This completes Setup 2. If no more Setup is required then push the Setup Lead onto a spare centre pin for storage during normal winch use.
Setup 3 Beeps Count Table 1
All prices are in AUD . Copyright 2024 RMG SAILWINCH. Online shop software by Interspire
- Classifieds
- Remember Me Forgot Password?
- Boats Sailboats Discussion Newby - Sailboats and RC Setup
- Electric Flight
- Advertising
- Our Sponsors
- Review Policies
- Terms of Service
- Privacy Policy
- Site History
- Mark Forums Read
- Member Search
- Upcoming Articles
- Do Not Sell My Data
- Manage Consent
- Back to Top
IMAGES
VIDEO
COMMENTS
Here's how I built the sail winch system in my RC (48" schooner) sailboat. I use a HiTec radio and operate the winch servo with the throttle channel. I also ...
Visit http://www.bearospaceindustries.com/boats2.html to learn about Gary's unique RC sailboat designsMusic - My Trains a comin' by Unicorn Heads - A Schoone...
This is the easiest way to set your winch servo and sail in average winds. You need a 20 Kilograms servo or greater.
Surmount Loop Winch (4 min 6 sec) And this one shows an arm winch with double haul and a tensioning elastic.... The double haul (pulley on end of servo arm) provides twice the winch line travel than would be available if the winch line was connected directly to the servo arm. This sort of setup suits smaller boats (say up to 800mm), a drum ...
Here are four most popular commercial sail winches used in boat classes between 90 cm and 1.50 m length: - RMG sail winch from Australia - Powerful, fast, the most famous. - Regatta sail winch from Graupner, Germany. - Sail Winch SW-2 from Robbe, Germany. - High torque and 180 degree servos, servos from 1/5 scale cars or servos for quarter ...
The centre piece of ply in each half circle is a slightly smaller diameter so as to provide a groove that will accept a length of nylon tubing to be held in place with a covering of thickened epoxy. One of these assemblies is fix mounted far up into the bow and the other is fitted with a spring attached to the rudder post.
Re-rigging a sailboat can cost anything from $1,000 to $5,000. Re-rigging a 40-foot boat with wire is estimated to cost roughly $100 per foot. Which includes the round-trip costs of hauling, launching, and unstepping the rig (about $2,500). Final Words. We've discussed here in detail on the rc sailboat rigging setup.
RC Sailboats - Winch Setup? - Hello everyone, I'm new to r/c sailboats and I have this Proboat Ragazza that I'm trying to get on the water. I was wondering if someone could give me a few pointers on how to install the winch lines, in what direction? I'm guessing install one line going one way, and the other line going
Moving forward in a straight line. First, the basic skills. With the boat in the water, start with the wind half way between the front (bow) of the boat, and the side (beam). Keeping the rudder straight, trim (move) the sails so that they are close to the hull (close hauled) and the boat should move forward.
About Press Copyright Contact us Creators Advertise Developers Terms Privacy Policy & Safety How YouTube works Test new features NFL Sunday Ticket Press Copyright ...
In June 2017 I finally bought myself a radio controlling sailing boat having wanted one for longer than I can remember, I went for a Joysway Dragonforce 65 V.6 (DF65) an inexpensive RC sailboat. I regularly sail a full sized boat and having made plenty of boats and gliders as a kid was especially curious about sailing an RC scaled down version. I hadn't had RC models of any kind till now.
Rig Building Tips: IOM class rules don't allow rotating masts and the masts mostly used are without an internal track. The best mast is 12mm or ½" aluminum tube available at local hardware and metal stores. If you want to invest more you can order from RC yachting accessory dealers as well and save maybe 50g with the rig.
The Soling 1m single arm setup on the You Asked page has a single purchase for the jib sheet and a double purchase for the main sheet, but a single arm setup. CR-914's come with a single arm sail servo, and use a single purchase setup too. If it's a wide boat then a double arm can be used and a long arm can be mounted to it.
In this very simple video we explain how to set up K2 and its RMG winch & Drum, hope we helped out to many of you who approached us with a request to help yo...
Chesapeake Performance Models is the authorizedNorth American service center for the RMG winches. Suitable for IOM to East Coast 12 meter Sailboats. 4.8 to 7.2 volts nominal supply range. Integral 5 Volt regulator for single battery operation. Weight 4.8 oz. Adjustable from 1 to 18 inches of travel with standard drum.
Adjustments are made by placing the winch in setup mode. Setup is entered by connecting the Setup Lead to a spare ground pin for Setup 1 and Setup 2 or signal pin for Setup 3 into the Rx. The Setup Lead is the single wire with a small connector. The picture shows a multi channel Rx. If using a two channel Rx the rudder servo lead will need to ...
About Press Copyright Contact us Creators Advertise Developers Terms Privacy Policy & Safety How YouTube works Test new features NFL Sunday Ticket Press Copyright ...
"radio controlled racing sailboats" by Chris Jackson is a great book. it is well thought out and organized. it shows how to make hulls, fins, sails, set up sail controls, and much more. it is a great book to have.
In mine, the sail lines just run direct from the ends of the arms, thence to a tiny hole in the deck and from there right to the requisite sails. You can't get simpler than that. For winch setup pics, try google image search using RC sailboat winch setup as terms. Best of luck!
RC- sailing with special genoa winch. Tacking like the real think...Model Sailingyacht: Lenght:1850mm, Mastlength: 2500mm, Sailarea: 1,6m²