
The 5 Knots Every Sailor Needs to Know and Why
July 1st, 2020 by team

by B.J. Porter (Contributing Editor)
Now and then, I open the knot book to look up something for a specific application. I’ve come to it with questions like “what’s the best way to tie this slippery piece of uncovered Spectra to this anchor chain so it never slips” or some other specialized knot. But for most applications on a boat, a handful of knots will do the job for you. Learn them, and you’ll rarely need a knot book.
The bowline is the ubiquitous knot for putting a loop in something that needs a line to it. You can use a bowline for everything from connecting your dinghy painter to the bow of your boat to putting the sheets on your headsail. In the last few days I tied dozens of them (and square knots) as we dressed ship for a celebration, connecting strings of flags with grommet holes and no lines. We tie our dinghy to the stern with one. Hardly a day goes by without a bowline in it.
The bowline is easy to tie and is non-binding and easy to break and remove. It’s not a permanent loop. Two cautions though – the knot structure can reduce the working load of high modulus lines, and it does not hold well with more slippery lines.
I use this knot enough that I learned how to tie it without looking. If you can tie it behind your back with your eyes closed, you should be able to tie it in the dark on a pitching deck with your arms wrapped around the mast.
Stopper Knot
A simple stopper knot can save you a lot of headaches if a line pops out of a self-tailer or slips from your hands. The most common stopper we’ve seen is the Figure 8 Knot , but we’re also fond of another knot, which I learned at J/World many years ago. It’s similar to a Double Overhand Stopper .
A stopper knot puts to put a non-binding lump of line at the bitter end to stop your sheet or halyard from pulling through a block, clutch, or hole in the mast and get lost. It keeps the lines where they belong and gives you a chance to recover from mistakes and mishaps.
There are times you don’t want a stopper, such as on a spinnaker sheet while racing, in case you need to blow it quickly. But most sheets, lines and halyards should have a stopper on the end.
Clove Hitch
The clove hitch is a quick way to get a line around a pole or bar. We’ve used them to tie the boat to pilings, tie the dinghy off at dinghy docks, and to put lines on a variety of antennas and poles we’ve had to hoist over the years.
It’s not the strongest knot, but it’s quick to tie and holds well. With practice, it can be thrown over pilings and posts using two half hitches. There are several ways to tie the clove hitch, the exact technique you use depends on whether you’re putting it over a piling , attaching it in the middle of a twenty-foot bar, or putting it on a pig stick and where in the line you are tying it.
Cleat Hitch
Tying a boat to a cleat should be a simple procedure, yet the cleat hitch may be the most abused knot in the marina. There’s no need to entomb a cleat with rope like you’re mummifying it for the afterlife. A few quick loops and a belay can lock the boat tight and make getting off just as easy. Our preference is to use the version with a belay at the end which is slightly different and a little more secure.
Square Knot (or Reef Knot)
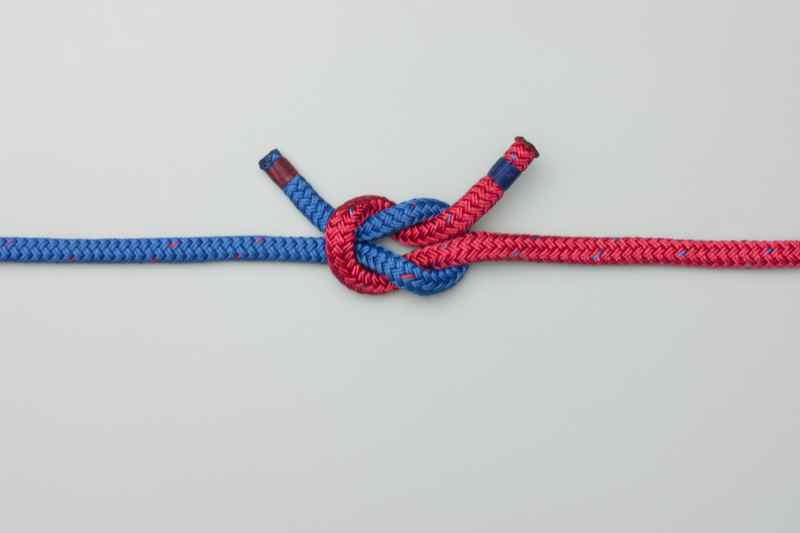
This is about the most basic knot, and one of the most useful. The square knot is for connecting the bitter end of two lines together and is quick to tie and easy to remove. One common use is tying reef lines around a slab reefed sail, hence the second name for it.
For anything you need to through a quick loop around and tie it in place, the square knot is a good choice. You can also add another hitch to increase the strength of the knot.
The disadvantage of the square knot is that it is hard to tighten down on what you are holding. If you need to tie something down so it absolutely doesn’t wiggle, then tension is important and the square not may not be the best choice. But if tension isn’t critical, it’s a great, simple knot to put in and take out when you’re done.
- Posted in Blog , Boat Care , Boating Tips , Cruising , Fishing , iNavX , iNavX: How To , Navigation , Sailing , Sailing Tips
2 Responses to “The 5 Knots Every Sailor Needs to Know and Why”
August 08, 2020 at 4:31 am , Kat said:
My stopper knot is about 12 – 18 inches from the end of the line! It gives me something to grab if I need to pull it back in quickly! Thanks
June 15, 2021 at 5:21 pm , Martyn Adams said:
Very good. I would add 1 more. The Sheet bend, used to join two lines with unequal diameter or composition.
Leave a Reply Cancel reply
Your email address will not be published. Required fields are marked *
Notify me of follow-up comments by email.
Notify me of new posts by email.

Send us a message
Sailing Orlando
Sharing the Beauty of Sailing with Central Florida
- Sailing Blog
- How to Sail
Top 5 Essential Sailing Knots

The use of knots is a key element in sailing. Whether it’s to tie a fender off the side of your boat or to secure your boat at the dock, it’s important to know these top 5 knots essential for sailing (or just boating in general)!
Read on to learn more about tying these nautical knots and watch our video tutorial.
How to Tie Nautical Knots
Before we dive into how to tie these essential knots and what they’re used for, let’s go over the parts of the rope or “line”.
- Standing End : The “long” end of the rope, often tied or fixed to another object.
- Running End : Sometimes referred to as the “bitter end”, is the free end of the line that will be worked.
- Bight : A half-loop formed in the rope when it’s turned back on itself.
Knot #1: The Bowline Knot
The Bowline Knot is sometimes referred to as the “King” of all essential knots and is formed by tying a fixed loop at the end of a line.
This loop can serve multiple purposes on a sailboat to include fastening a halyard to the head of a sail, tie something off on deck, or can be used as a “rescue” knot to wrap around oneself in the event of man-overboard.

How to Tie a Bowline Knot
- Make an overhand loop on the standing end.
- Take the running end up through the loop.
- Bring the running end around the standing end.

- Pull the running end through the loop.
- Tighten the knot by holding the running end and the loop while pulling on the standing end.
- Check the strength of the knot by holding the loop and pulling on the standing end

Knot #2: Figure 8 Stopper Knot
The Figure-Eight stopper knot is used to keep a line secured when it’s passed through a block or a fairlead. This is often used for jib sheets or main sheets on a sailboat to prevent the line from slipping out of the block and out of reach from the sailor while underway.
How to tie a Figure 8 Stopper Knot
- Make a u-shaped bight at the end of a line.
- Twist the bight one full rotation.
- Wrap the running end around the standing end.

- Pull the running end through the loop to form a figure 8.
- Turn your hand to grab the bottom of the figure 8 toward the standing end.
- Pull tight to complete the stopper knot.

Knot #3: Clove Hitch
A Clove Hitch is a very useful knot and is great for securing a line to a pole, spar or loop. When it is tied correctly it will stay secured in place, however if it is not tied tight enough, it could loosen or slip. This is commonly used to secure loose ends and is a great option for tying your bumpers/fenders for docking.

Knot #4: Cleat Hitch
The Cleat Hitch is an essential knot used on or with any vessel. This knot secures a line to a cleat on either the boat or a dock and is often tied incorrectly. It is most commonly used to secure a vessel to a dock, but also has other uses. On many sailing vessels, a cleat is fixed to the deck or mast and is used to tie the halyard off after hoisting the sail.

How to tie a Cleat Hitch
- Make one full complete turn around the cleat.
- Lead the running end across the top of the horn.

- Run the line around the bottom of the horn to create a figure eight.
- Twist the line in to a loop and hook onto the horn to create parallel lines.
- Pull tight!

Knot #5: Round Turn 2 Half-Hitch
The Round Turn and 2 Half-Hitch knot is another great knot to use. It creates a strong, non-slipping knot where when under load, pressure is put on the object it is tied around, not the knot itself. This makes it easy to undo when you need to remove it. This versatile knot is used to tie your boat onto a post, ring, rail or any other object.

How to tie a Round Turn 2 Half-Hitch
- First wrap the line around the anchoring point.
- Make a full turn around the object with the running end.
- Make your first half-hitch over the standing line.

- Tie a second half-hitch (general knot)
- Pull tight.

Learn to Boat with the Central Florida Boating Association
Discover Orlando’s premier on-the-water boating lessons and youth sailing programs through the Central Florida Boating Association (CFBA). Whether you’re honing your skills in power boats or embarking on the journey of learning to sail, CFBA’s classes are designed to enhance your skills and boost your confidence on the water. Visit www.CFLBoating.org to enroll today!
You may also like.

Introduction to Sailing: Parts of a Sailboat
Recent posts.

Best Lakes for Boating in Central Florida

The Yearling Trail: A hike through history

Save 40% off! Join our newsletter and get 40% off right away!
Sailboat Life
Sailboat Cruising and Lifestyle Magazine.

Basic Sailing Knots Every Sailor Must Know

Here are 5 basic sailing knots that every sailor must know. These sailing knots are essential for beginners to learn, and every ol’ salt uses one or more of these knots every day on a sailboat. They’ll save your sails, ensure a good mooring, and might even save a life. So what are the most essential sailing knots every sailor must know?
- Bowline – Creating a loop or attaching a line to anything.
- Square Knot (Reef Knot) – Attaching two lines together.
- Clove Hitch – Securing lines to a piling or pole
- Round Turn & Two Half-Hitches – Securing a line to a pole or tubing.
- Figure-8 Knot – A stopper knot for the end of a rope or line.
How to Tie a Bowline Knot
Apart from a knife, the bowline knot is the most essential thing you’ll need on a sailboat. Here’s how to tie a bowline in 5 simple steps:
- Form a loop by passing the end of a bight over the standing part.
- Pullt it out through the loop thus formed.
- Open up the bight and bring it round the entire knot.
- Continue to bring it up till it encircles the standing ends.
- Hold the standing part and pull the loop downwards to tighten.
How to Tie a Square Knot
A square knot, also known as a reef knot is one of the oldest most basic knots. It’s used with two different ropes or with one rope and two free ends.
Step 1: Hold each end Hold one end of a rope in your right hand and one end in your left to prepare to tie the knot.
Step 2: Loop right over left Loop the right end over the left end all the way around.
Step 3: Loop left over right Loop the left end, formerly the right end, over the right end all the way around.
Step 4: Pull on four strands Pull on all four strands at the same time that extend from the knot created. This should tighten the knot into place, resulting in a proper square knot.
How To Tie a Clove Hitch
This is a small and versatile knot that’s easy to tie. It is used to hitch a rope to another object.
In this knot video, you will see how to tie the clove hitch in three different ways, including how to tie the constrictor knot (which is a slight variation on the clove hitch.
How to Tie a Round Turn and Two Half Hitches
This knot is great for tying fenders on and attaching objects that need to be secured for a longer period of time.
How to Tie the Figure-8 Knot
If you don’t want your lines sliding out of your hands or out of the clutches, you’ll tie off the bitter end with a figure-8 knot. Here’s how to tie this essential knot for beginner sailors.
That’s it the most basic knots every sailor should know.
There are dozens more knots for different usages. You’ll soon be able to master more after tackling these 5 essential sailor knots.
If you don’t know a knot, just tie a lot. – An old salt
So which sailing knot do you use the most? When do you use it? Which knot would you like to learn? Do you have any tips to share? Join the conversation below.
Share this post!
Throw in your two cents, start a discussion cancel reply, related articles.

The Voyage of the Sea Star – 35ft Sloop to Bermuda

Living Aboard a 30-36ft Sailboat: A Guide for the Curious and Adventurous

Summer Sailboat Video, Bikinis, Sails, and Fun

Saved Up For This Dream
- Sailing Knots: A Comprehensive Guide for Every Sailor
1. Introduction
Sailing is an exhilarating and adventurous activity that requires a diverse set of skills. One crucial skill that every sailor must possess is the ability to tie various knots. Sailing knots play a vital role in securing ropes, adjusting sail trim, and ensuring the overall safety of the vessel. In this comprehensive guide, we will explore the different types of sailing knots, their applications, and provide step-by-step instructions on how to tie them.
2. Understanding Sailing Knots
2.1 the importance of knots in sailing.
Knots are integral to the sailing experience as they enable sailors to control the rigging, adjust sail shape, and secure various elements of the boat. Whether you're a novice or an experienced sailor, understanding and mastering sailing knots is essential for smooth sailing, safety, and effective maneuvering.
2.2 Basic Knot Terminology
Before delving into specific knots, it's crucial to familiarize ourselves with some basic knot terminology:
- Standing End: The part of the rope that is not actively used in forming the knot.
- Working End: The active part of the rope used to create the knot.
- Loop: A circular or semicircular shape formed by bending the rope back on itself.
- Turn: A single pass of the rope around an object or itself.
- Bight: A U-shaped bend or curve in the rope without crossing itself.
3. Essential Sailing Knots Every Sailor Should Know
3.1 the square knot (reef knot).
The Square Knot, also known as the Reef Knot, is one of the most basic and versatile knots in sailing. It is primarily used to join two ropes of equal diameter securely. Its simplicity and efficiency make it a favorite among sailors for a wide range of applications.
3.2 The Bowline Knot
The Bowline Knot is a reliable and easy-to-tie knot that creates a secure loop at the end of a rope. It is often used to create a fixed eye, attach halyards to sails, or rescue someone who has fallen overboard. The Bowline Knot is considered one of the essential knots every sailor should know.
3.3 The Clove Hitch
The Clove Hitch is a simple yet versatile knot used for attaching a rope to a pole, post, or any other cylindrical object. It provides a temporary grip and can be easily adjusted or released when needed. Sailors commonly use the Clove Hitch for securing fenders or tying off the boat to a dock.
3.4 The Figure-Eight Knot
The Figure-Eight Knot is primarily used as a stopper knot to prevent ropes from slipping through blocks, cleats, or other fittings. It is easy to tie, untie, and inspect, making it a popular choice for securing lines under load. The Figure-Eight Knot is essential for maintaining control and safety on a sailing vessel.
3.5 The Sheet Bend
The Sheet Bend is a reliable knot for joining two ropes of different diameters or materials. It is commonly used when extending the length of a line or attaching a smaller line to a larger one. Sailors often utilize the Sheet Bend when rigging additional lines or making repairs on the go.
4. Advanced Sailing Knots for Experienced Sailors
4.1 the double sheet bend.
The Double Sheet Bend is an enhanced version of the Sheet Bend knot and is specifically designed for connecting two ropes of unequal diameters. It offers increased security and stability when joining lines that vary significantly in thickness. Experienced sailors often utilize the Double Sheet Bend in demanding sailing conditions.
4.2 The Rolling Hitch
The Rolling Hitch is an invaluable knot for gripping a line that is under load or passing over another rope. It provides a strong hold that can be adjusted easily when needed. Sailors frequently employ the Rolling Hitch for tasks such as tensioning a line or securing a boat to a fixed point.
4.3 The Cleat Hitch
The Cleat Hitch is a popular knot for securing a line to a cleat, a device used to secure ropes on a boat. It is simple to tie and untie, making it convenient for quickly securing lines during docking or mooring. The Cleat Hitch is an essential knot for maintaining control and stability in various sailing situations.
4.4 The Anchor Hitch
The Anchor Hitch, also known as the Fisherman's Bend, is a secure and reliable knot used for attaching a rope to an anchor or weight. It is designed to withstand heavy loads and can be easily released when required. Sailors often rely on the Anchor Hitch for anchoring their vessels in a safe and stable manner.
4.5 The Taut-Line Hitch
The Taut-Line Hitch is a versatile and adjustable knot used to secure a line under tension. It can be easily adjusted to increase or decrease tension, making it ideal for securing tents, awnings, or lashing objects on a boat. Sailors find the Taut-Line Hitch particularly useful when dealing with changing weather conditions or variable loads.
5. Common Applications of Sailing Knots
5.1 securing the sheets and halyards.
Sailing knots play a crucial role in securing the sheets and halyards, which control the position and shape of the sails. Properly tying knots such as the Bowline Knot, Square Knot, and Figure-Eight Knot ensures the sails remain in the desired configuration, optimizing the boat's performance.
5.2 Tying Off Fenders and Bumpers
Fenders and bumpers are essential for protecting the boat's hull from damage during docking or mooring. By using knots like the Clove Hitch, sailors can easily and securely attach fenders to the boat, safeguarding it from impact and abrasion.
5.3 Creating a Temporary Clothesline
When sailing for extended periods, it's essential to dry wet clothes and gear. Sailing knots enable sailors to create temporary clotheslines by tying ropes between two fixed points on the boat, utilizing knots like the Clove Hitch or Sheet Bend to secure the line.
5.4 Attaching Objects to the Deck
Sailing often involves carrying various equipment, such as kayaks, paddleboards, or fishing gear. Sailing knots like the Bowline Knot and the Anchor Hitch allow sailors to securely attach these objects to the deck, preventing them from shifting or falling overboard.
5.5 Rigging a Boom Vang
The boom vang is a critical control system that helps maintain proper sail shape and controls the tension on the boom. Sailing knots like the Taut-Line Hitch or Cleat Hitch are used to secure the boom vang to the mast and boom, ensuring proper sail trim and control.
Read our top notch articles on topics such as sailing, sailing tips and destinations in our Magazine .
Check out our latest sailing content:
Introduction to chartering with a skipper, traditional sailor tattoos: meaning of the swallow, the most popular catamarans of 2023, explore tuscan archipelago in one week, skippered boats: how to pack for a yachting holiday, boat rental with skipper: everyone can go to sea, skippered boats: myths about sailing, sail from lefkada for 14 days. where to, what not to miss when visiting lefkada, skippered boats: step-by-step boat rental, where and why to sail from lefkas marina, don’t panic: handling maritime emergencies, skippered boats: how to choose a boat, the best sailing routes from biograd na moru, yachting away from ourselves: a voyage to inner peace, sail to the 7 most beautiful sights in greece, skippered boats: how to put together a crew, skippered boats: the most popular yachting destinations, what skipper's licence do i need, skippered boats: what you can experience when yachting, from lefkada or corfu to paxos and antipaxos, discover the paradise of paxos and antipaxoss, skippered boats: typical day on board, skippered boats: what it actually looks like on a boat, discover corfu: sailing adventure in the ionian, sextant and navigation: survival without gps, 5 best sailing routes in the bahamas, skippered boats: how much does a boat holiday cost, yachting guide to the bahamas, the ultimate yacht cleaning kit.
6. How to Tie Sailing Knots: Step-by-Step Instructions
6.1 square knot (reef knot).
To tie a Square Knot (Reef Knot), follow these steps:
- Cross the left end of the rope over the right end.
- Take the left end under the right end.
- Pass the left end over the right end.
- Bring the left end under the right end again.
- Tighten the knot by pulling both ends simultaneously.
6.2 Bowline Knot
To tie a Bowline Knot, follow these steps:
- Create a small loop with the working end of the rope, ensuring the end is on top of the standing end.
- Pass the working end through the loop from the underside, going around the standing end.
- Continue passing the working end around the standing end and back through the loop.
- Tighten the knot by pulling the working end and standing end simultaneously.
6.3 Clove Hitch
To tie a Clove Hitch, follow these steps:
- Pass the rope around the object you want to secure.
- Cross the working end over the standing end, forming an X.
- Cross the working end over the standing end once more, creating a second X.
- Tuck the working end under the second X and pull it tight.
6.4 Figure-Eight Knot
To tie a Figure-Eight Knot, follow these steps:
- Create a small loop with the working end of the rope, crossing it over the standing end.
- Pass the working end behind the standing end and bring it back through the loop.
- Continue passing the working end over the standing end and back through the loop.
6.5 Sheet Bend
To tie a Sheet Bend, follow these steps:
- Create a bight in the thicker rope and hold it in your non-dominant hand.
- Pass the working end of the thinner rope through the bight from underneath.
- Wrap the working end of the thinner rope around both parts of the bight.
- Pass the working end of the thinner rope back under itself, forming a loop.
- Tighten the knot by pulling the standing end of the thinner rope and the thicker rope simultaneously.
7. Tips for Mastering Sailing Knots
7.1 practice makes perfect.
Like any skill, mastering sailing knots requires practice. Take the time to practice tying and untying knots until they become second nature. Regular practice will improve your speed and accuracy, enabling you to tie knots effortlessly in various conditions.
7.2 Keep Knots Clean and Well-Maintained
Inspect your knots regularly and ensure they are clean and free from debris. Moisture, dirt, or sand can weaken the knot's grip and compromise its reliability. Untie and re-tie knots if you notice any signs of wear or damage.
7.3 Learn Knots for Different Situations
Expand your repertoire of sailing knots to cover a wide range of situations. Learn knots suitable for securing different types of ropes, joining ropes of varying diameters, or tying knots under load. The more knots you are familiar with, the better equipped you'll be to handle any sailing scenario.
7.4 Seek Guidance from Experienced Sailors
Don't hesitate to seek guidance from experienced sailors or attend sailing courses where knot tying is taught. Learning from those with practical experience can provide valuable insights, tips, and techniques that may not be evident from written instructions alone.
7.5 Experiment with Variations and Combinations
Once you have a solid foundation in basic knots, feel free to experiment with variations and combinations. Some knots can be modified to suit specific situations or combined to create new knots. Just ensure that the resulting knot remains secure and reliable.
8. Conclusion
Sailing knots are an integral part of every sailor's skill set. Whether you're a beginner or an experienced sailor, mastering various knots will enhance your sailing experience, improve safety, and enable you to navigate challenging conditions with confidence. By understanding the different types of sailing knots, their applications, and practicing their tying techniques, you'll become a more proficient sailor.
So what are you waiting for? Take a look at our range of charter boats and head to some of our favourite sailing destinations.
FAQ everything about tying knots
I am ready to help you with booking a boat for your dream vacation. contact me..

Denisa Nguyenová
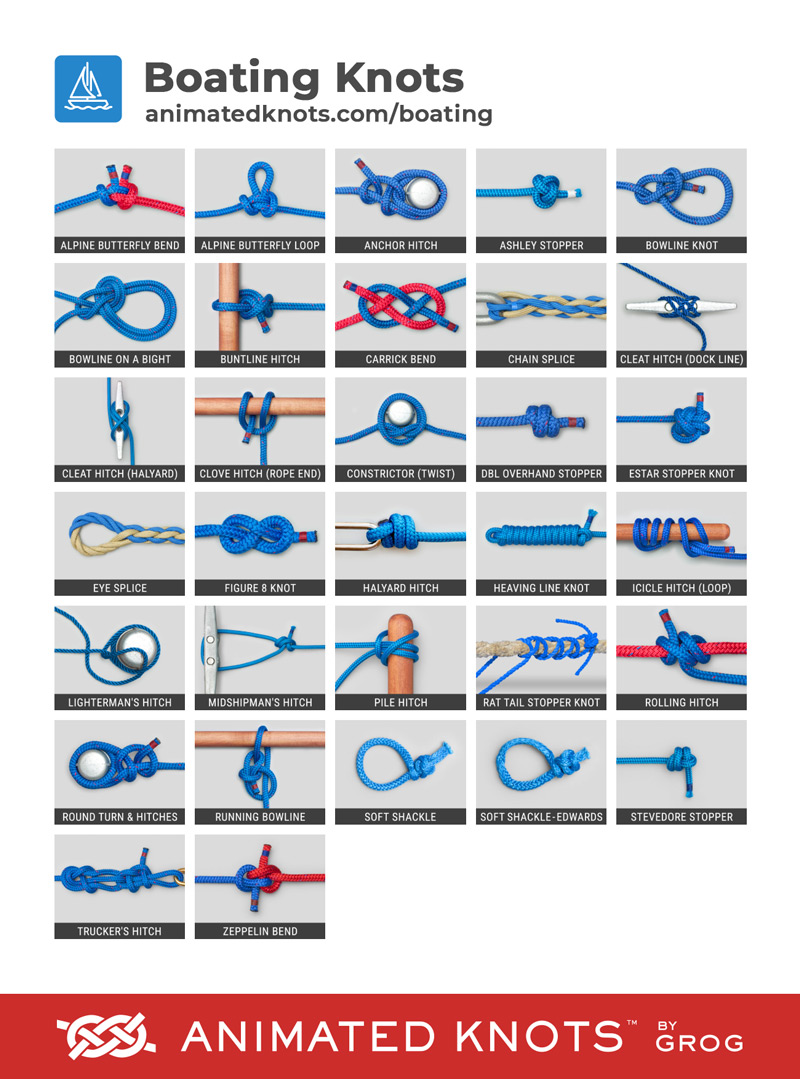
Boating Knots
Choose a knot below, or scroll down for more information: .

Reliable bend used to join two ropes of roughly similar size.

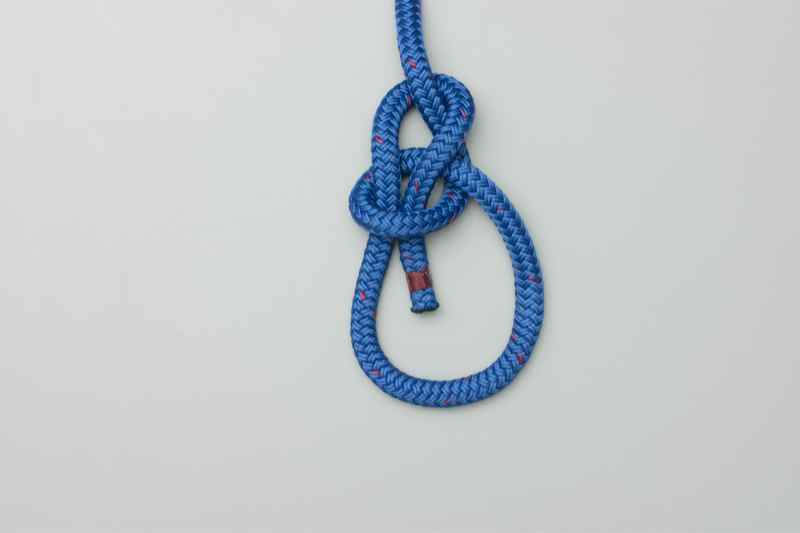
Secure loop in the middle of a length of rope.

Excellent knot to attach an anchor line to an anchor.

Makes reliable bulky stopper knot in the end of a rope.

Reasonably secure loop in a rope's end - and easy to undo.

Bowline relative, but a double loop in the middle of a rope.

Secure hitch originally used to join buntlines to square sails.

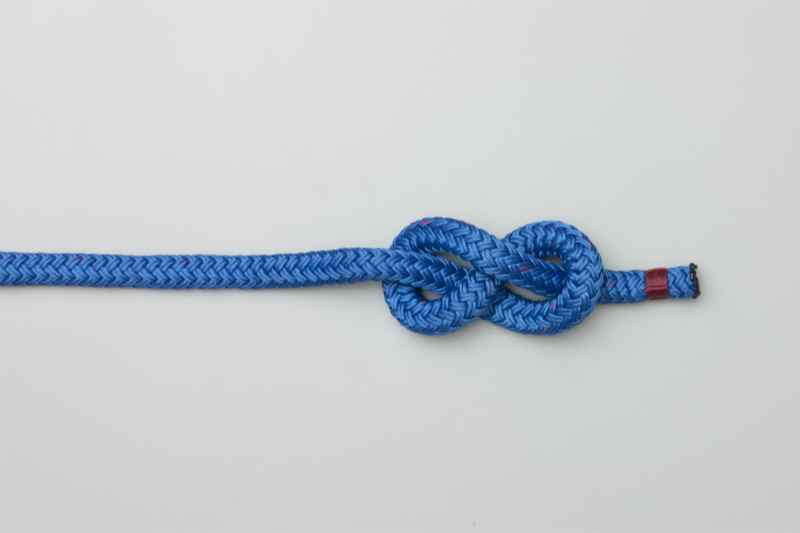
Secure rope join, readily untied even after a heavy load.

Securely attaches three-strand rope to anchor chain

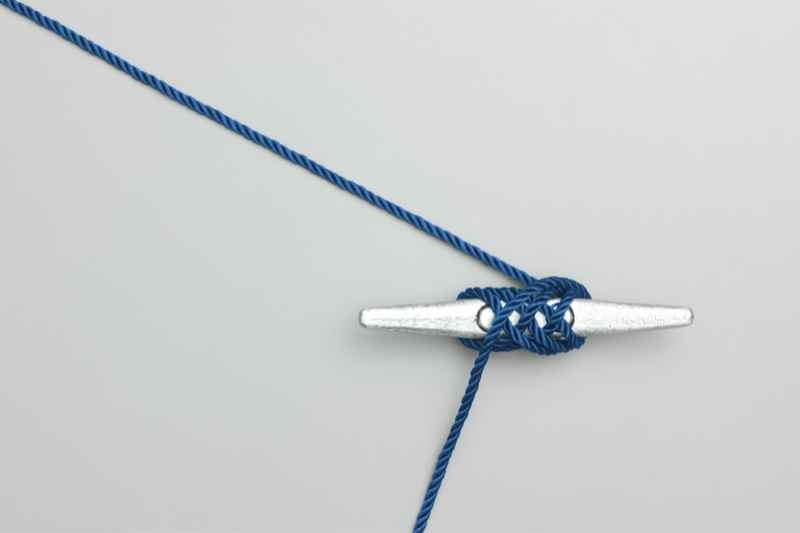
Attaches rope to cleat. Often used for Dock Lines.

Attaches rope to cleat - used for halyards, clotheslines, etc.

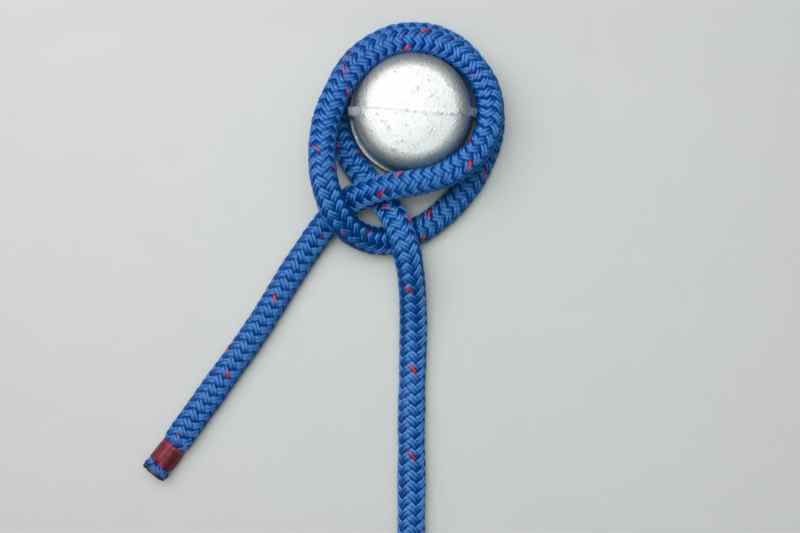
Temporary hold, e.g., stage scenery or mooring buoy

Tie the Constrictor knot using the twisting method.

Makes a reliable, moderately large, stopper knot.

Stopper knot suitable for slippery rope like Dyneema

Secure loop in the end of 3 or 4-strand rope.
Non-binding, quick and convenient stopper knot.

Compact knot to join halyard to a shackle at top of a sail.

Weights end of a rope to make it carry further when thrown.

Very secure slide and grip knot that may grip on tapered pole.

Simple strong way to secure a tow line to a bollard

An adjustable loop tied using a Rolling Hitch

Easy attachment to a mooring pole or to make rope fence.

Takes a mooring line's load during transfer to the Bitts

Popular slide and grip knot, may fail with modern ropes.

Excellent way of securing a rope to a post or ring.

Bowline encircles the standing end to create a noose.

Neat method of creating a soft shackle in hollow-braid rope.

Edwards style shackle made out of hollow-braid rope.

Intermediate size stopper using one more turn than the figure 8.

Valuable knot usually used for securing loads or tarpaulins.

Joins two ropes and avoids the risk of jamming.
No results found.
Welcome to boating knots.
These animated knots are primarily for boaters, but many are useful for anyone who uses rope and values safety.
The selection of knots is based on many years of sailing combined with feedback and advice from several helpful captains. The knots are arranged in alphabetical order.
Boating Knot Characteristics
Rope used in boating is durable and expensive and is often handling heavy loads, e.g., when berthing, mooring, towing another vessel, preparing for a storm, or managing sails. The emphasis, therefore, is on safety, reliability, and convenience. In contrast to the fishing knots, value is also placed on being able to use the rope repeatedly and untie each knot without difficulty .
Standing End, Tail, and Bitter End
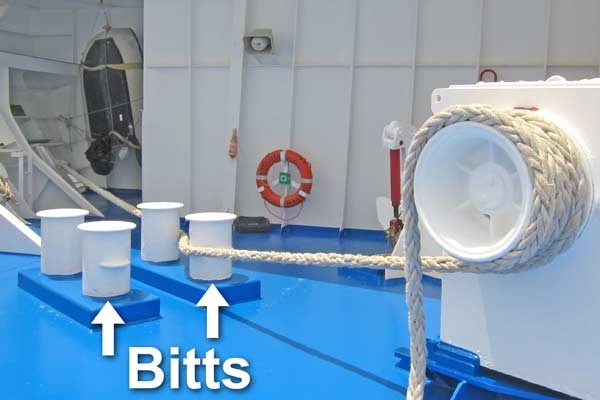
In many knots there is Standing End - which takes the strain, and a Tail - the loose end in your hand. On large ships a shore line is initially tightened with a winch. The tail is then properly called a Bitter End as it is transferred to the Bitts . To do this, a second rope is tied to the shore line with a Rat-Tailed Stopper or a Rolling Hitch to take the strain temporarily.
Mooring Lines and Names
Mooring lines on large ships are nearly always made of a high-modulus polyethylene (HMPE) such as Vectran ® or Dyneema ® . These ropes float and their minimal elasticity reduces risk of injury due to "snap-back" in the event of a breakage. Each line serves a specific purpose. On large vessels two lines often run in parallel ("doubled up") for safety. The following diagram shows a typical arrangement:
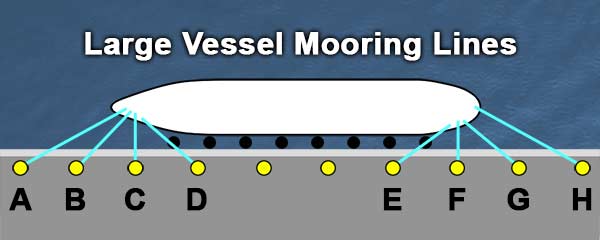
A. Head Line B. Head Line C. Forward Breast Line D. Forward Spring E. Aft Spring F. Aft Breast Line G. Stern Line H. Stern Line
On yachts mooring lines are more likely to be made of nylon, or polyester (Dacron ® or Terylene ® ). By contrast with mooring a large vessel, distances are usually small and movements due to waves and tide are proportionately greater. Moreover, because far fewer lines are used, it is critical to understand their purpose:
Breast Lines prevent rotation and should run roughly at 90 o to the dock. To gain length, they should be led from the farthest part of the boat: the bow itself (or the outer hull of a catamaran) and from the far quarter of the stern.
Spring Lines prevent fore and aft movement and should run nearly parallel to the dock and may cross each other to obtain an optimal lie.
Direction: The Bow Spring may be led forwards and the Stern Spring aft, but MUST lead in opposite directions.
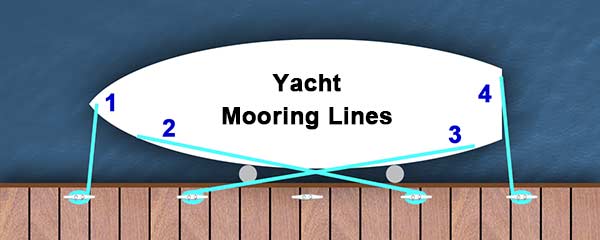
1. Bow Breast Line 2. Bow Spring Line 3. Stern Spring Line 4. Stern Breast Line
Doubling-Up and Sharing a Bollard
When two lines run to the same Bollard, especially when they are from different ships, the second line should be threaded up through the eye-splice of the first. This is called Dipping the Loop and allows either line to be released with out tangling.
Which Knot Should I Use?
Joining Two Ropes Secure safe bend to join two ropes Secure safe bend to join two ropes Attach rope to itself or another taut line Join 2 ropes using a loop in each end Take the strain off a foul-turned winch Take the strain of mooring line Join two very large ropes Secure "spring" lines - readily adjusted
Make a Loop at End of Rope Make a loop in the end of a rope Adjustable Loop using Rolling Hitch Splice a loop in a three-strand rope
Make a Loop in Middle of Rope Single loop in middle of rope Double loop in middle of rope
Loop Round Standing End Bowline slides up rope as a noose
Attach Halyard Cleat Hitch Halyard Hitch
Secure Rope to Flapping Sail Buntline Hitch Soft Shackle
Secure a Load or Tarpaulin Tighten Using a Trucker's Hitch
Secure Mooring Line to Dock Secure mooring line to a cleat Wrap mooring line round post and tie it Make a loop to drop over the dock post Tie a dinghy bow line to a rail or ring Secure mooring line – easily undone. Quickly secure mooring line to post
Attach Rope to your anchor Attach rope to your anchor Secure, permanent rope splice to chain
Stopper Knots Larger three-lobed stopper knot Secure compact stopper Quick convenient stopper Secure even in Dyneema Secure Stopper Knot
Slide and Grip (Friction) Knots Knot that won't slide along a rope Knot that won't slide along a bar Grips strongly on a pole
Weight a Rope's End for Throwing Heaving Line Knot
Stop a Rope's End Fraying Drop a Constrictor Knot on the End
Miscellaneous Attach a fender to the rail Shackle using rope Better soft shackle
Related Knots
Four similar bends: Alpine Butterfly Ashley Hunter's Zeppelin
Three quick-release hitches: Highwayman's Mooring Tumble
Two versions of the cleat hitch: Deck Halyard
Three stopper knots: Ashley Double Overhand Figure 8
Three ways to tie the Clove Hitch: Half Hitches Loops Using the End
Three ways to tie the Constrictor: Twisting the Rope Using the End Folding a Loop
10 Popular Sailing Knots and How to Tie Them

Last Updated by
Daniel Wade
June 15, 2022
Whether you're new to the sailing scene or just a simple wind-seeker, who has been around the dock a couple of times, knowing the different types of sailing knots, learning how to properly tie them, and how to use them effectively is, without a doubt, some of the most priceless skills that every sailor should acquire.
Ropes, sailing, knots, and boating have one thing in common: they go hand in hand once you're out there on the water. When it comes to sailing, ropes and knots are everywhere. Knowing how to tie knots on boats are legendary and a source of great pride. For many centuries, sailors have heaped praises not just on their knots but also on their skills to tie them. The good thing is; knots are integral to sailing and safety. In addition to securing and anchoring the boat to docks, knots can be of great help when using lines to trim sails. Knots can also be used to tie various objects to the deck to prevent them from washing overboard. In essence, a good sailing knot will make your sailing much better and can save lives in dire situations.
Although there are unlimited types of sailing knots that anyone can use, most of them are not so popular with sailors. There are, however, ten popular sailing knots that are very useful when sailing. When it comes to sailing knots, they can fall into three different categories: when a rope is connected to a cleat, when a knot is used to join two pieces of rope, and when a knot is tied at the end of a rope. Tying sailing knots is simple, but the first step is to know various types of sailing knots.
In this article, we'll highlight ten popular sailing knots and how to use them properly.
Table of contents
Bowline Knot
The Bowline knot is hailed as the most useful knot by many sailors. It's one of the most basic knots that every sailor should know how to tie and use. The Bowline knot is hugely popular for its versatility given that its fixed noose will ensure that your rope doesn't run or slip. Bowline knot has been around for over 400 years and is generally referred to as the "king of knots".
In addition to being versatile and very secure, a bowline knot can be easily undone despite how tight the knot is. It can also support a huge amount of weight and can be easily untied even after holding heavy loads. You can as well use a bowline when you require a fixed loop at the end of the line.
Here is how to tie a bowline knot.
- Create an overhand loop in the line
- Pass the tail end of the line through the loop
- Wrap the line around the standing part
- Pass through the loop in the opposite direction just like you did the first time
- Pull the knot tightly to secure it
The Square Knot (Reef Knot)
The square knot is a classic knot that is generally used to tie two lines together. That's not all; a square knot can be used for a couple of other things such as to tie the boat to another line, to create longer lines, and to combine lines for other tasks. The square knot is typically used for furling or reefing sails. In essence, the square knot is highly reliable and can perfectly tighten without stress.
The square knot is more secure and stable and is almost akin to the normal shoelace knot. Although the square knot is great for tying two different lines, you shouldn't use it if the lines are of different sizes as one can easily slip out. The square knot has been around for over 4,000 years and is trusted beyond the maritime field as it's used in the medical field too. It's easy to tie, easy to master, super strong, and easy to release when the day is over.
Here's how to tie the square knot.
- Take two ends of two different lines of the same size
- Cross the right line over the left line to create an overhand knot
- Do the same with the left line by crossing it over the right to make another overhand knot
- Pull it to make it tight and secure
Figure-Eight Knot (Flemish Knot)
The figure-eight knot is multi-functional and can be used to interconnect two lines to work together. This is a very well-versed knot and is a common figure in the maritime field. It's the ultimate stopper knot that will only become stronger with the increase of pressure. Better still, tying it is easy and can be done in seconds. It's a knot that you can trust to hold everything in place even when lives or the vessel is at stake.
Here's how to tie a figure-eight knot.
- Pass the free end of the line over itself to form a loop
- Continue under and around the line
- Pass the working end down through the original loop
The Anchor Bend Knot
Ask any random sailor and they instantly tell you that having your anchor untied spells doom. This is where the anchor bend knot comes in handy: it is generally used to secure the line to an anchor. In addition to securing the anchor to the ship, this hitch knot can be used to secure the line to a ring or to another point of termination.
Here's how to tie an anchor bend knot.
- Run the working end of the line through the anchor's shackle twice
- Leave both ends of the lines open
- Take the working end of the line behind the standing line of the rope
- Feed it through the first turn and tighten
- Tie the end of the rope to the standing line with a backup line. This is to make sure that the line doesn't untie
The Sheet Bend Knot
Unlike the square knot which isn't great for tying two lines of different sizes, the sheet bend knot is the perfect type of knot if you want to tie together two lines of different sizes and materials. This is a good knot, especially if the two lines are not under load or any form of strain. The best part of using the sheet bend knot is that it's appropriate to join two lines that couldn't normally join either because of differences in materials or diameters.
Here's how to tie the sheet bend knot.
- Bend the slippery or thicker line into a J shape like a fish hook
- Pass the other line through the J shape from behind and wrap it around the shape
- Do not pass the working end under or over the J shape as this can make it insecure
- Instead, tuck the thinner line through and around the J shape
The Half Hitch Knot
The half hitch knot is great for securing a line either to a pole or a post. It involves the use of two half hitches to create a reliable and secure hitch. This knot can be insecure when used alone, so it should be used together with other types of knots to create secure knots.
Here's how to tie a half hitch knot.
- Wrap the rope around the standing end of the line to create a loop and the first hitch
- Wrap the rope the same way again to make the second hitch
- Pull it tight
- For added security, you can tie an overhand knot with the end of the line to prevent the half hitches from slipping
The Clove Hitch Knot
The clove hitch knot is the fastest way to attach a fender to a lifeline. This is because it allows you to raise or lower the fender without fully untying it. You can use this knot to secure your boat to a dock that has rails instead of cleats.
Here's how to tie a clove hitch knot.
- Run the working end of the line around the post
- Cross the line over itself and run it around the post for the second time
- Slacken the last loop a little, slide the end under, and pull it tightly to secure the knot
Cleat Hitch Knot
The cleat hitch knot is a cousin to the clove hitch knot given that they're almost the same. While the clove hitch knot is used when tying a boat to a dock with rails, the cleat hitch knot is typically used to tie boats to docks with cleats.
Here's how to tie a cleat hitch knot.
- Take a full turn around the cleat with the rope
- Create a figure-eight around the first cleat and then the next one
- Do the same to each cleat while passing the rope underneath the figure-eight shape and pulling tightly
The Rolling Hitch Knot (Magnus Hitch)
The rolling hitch knot is great for fastening a rope to a pole, a rod, or to another rope. This is a perfect knot if you want to pull any given object lengthwise without angles. You can use this knot to loosen a tensioned sheet or sail line to allow you to safely clear a jammed winch. You can also use it to rig a stopper.
Here's how to tie this sailing knot.
- Coil the rope around the other rope or the object
- Bring it in the direction of pull and between the standing part of the line and the object
- Create a similar coil but in the opposite direction
- Finish with a half hitch around the other rope or the object in the same direction of the coils and pull tightly to secure
Stopper Knot
When sailing, all lines on your sailboat must have a stopper knot, particularly the halyards. Remember, having a loose halyard will mean that your mainsail drops fast and this isn't good for your sailing. Without a proper stopper knot, you can lose your sail and the weight of the line can even pull the halyard out of the cleat or out of the position.
Here's how to tie a stopper knot.
- Make a tiny loop at the end of the working line. You can do this by passing the tag end over the standing line
- Tie an overhand knot around the standing line
- Run the tag end through the loop end
- Pull the tag end through and slide the knot down until it becomes tight
- Pull both ends tightly to secure the knot
Bottom Line
Ropes and lines will always be part of sailing and invaluable parts of your sailboat. Whether you want to reef the sails, moor the boat, or hold objects in place, you'll have to use the lines at one point when sailing. But to use these lines perfectly, you have to know how to tie different knots not just to make the lines secure but also to ensure that they're working effectively.
The above-described knots are popular, easy to learn, and tie. All you have to do is practice how to tie them and they'll serve you diligently and make your sailing even more fun and safe.
Related Articles
I've personally had thousands of questions about sailing and sailboats over the years. As I learn and experience sailing, and the community, I share the answers that work and make sense to me, here on Life of Sailing.
by this author
How to Sail
Sailing Knots
Most Recent

What Does "Sailing By The Lee" Mean?
October 3, 2023

The Best Sailing Schools And Programs: Reviews & Ratings
September 26, 2023
Important Legal Info
Lifeofsailing.com is a participant in the Amazon Services LLC Associates Program, an affiliate advertising program designed to provide a means for sites to earn advertising fees by advertising and linking to Amazon. This site also participates in other affiliate programs and is compensated for referring traffic and business to these companies.
Similar Posts

How To Choose The Right Sailing Instructor
August 16, 2023

How To Sail From California To Tahiti
July 4, 2023

How To Tow A Skier Behind A Boat
May 24, 2023
Popular Posts

Best Liveaboard Catamaran Sailboats
December 28, 2023

Can a Novice Sail Around the World?
Elizabeth O'Malley

4 Best Electric Outboard Motors

How Long Did It Take The Vikings To Sail To England?

10 Best Sailboat Brands (And Why)
December 20, 2023

7 Best Places To Liveaboard A Sailboat
Get the best sailing content.
Top Rated Posts
Lifeofsailing.com is a participant in the Amazon Services LLC Associates Program, an affiliate advertising program designed to provide a means for sites to earn advertising fees by advertising and linking to Amazon. This site also participates in other affiliate programs and is compensated for referring traffic and business to these companies. (866) 342-SAIL
© 2024 Life of Sailing Email: [email protected] Address: 11816 Inwood Rd #3024 Dallas, TX 75244 Disclaimer Privacy Policy
- Find A School
- Certifications
- North U Sail Trim
- Inside Sailing with Peter Isler
- Docking Made Easy
- Study Quizzes
- Bite-sized Lessons
- Fun Quizzes
- Sailing Challenge
- Knots Made Easy
An American Sailing Association Educational Series
There are as many sailing knots as there are stars in the night sky — or so it seems. But the reality is that most sailors can get along with only knowing a few, as long as they’re the right ones. Our Knots Made Easy video series includes some of the most important sailing knots, explaining what they’re used for and how to tie them. Don’t forget, it’s necessary to practice these in order to get them down. Your fingers need the tactile learning experience in order to develop muscle memory that will allow you to tie them quickly when you need to!
Knowing these basic knots will make you more useful as a sailing companion. Next time you go out sailing with a friend, take a charter, or join a flotilla, you’ll feel more comfortable helping out around the boat when it’s time to put fenders out, tie up to the dock, or make a line fast.
One of the most beautiful and useful sailing knots is the bowline. The bowline forms a temporary eye, or loop, in the end of a line and is commonly used to attach a jib sheet to the clew of the jib. Remember, practice makes perfect! Watch Now >

Fast Bowline
If you want to impress your friends here’s a trick for tying a quick bowline. With a bit of practice this method can be lightning fast. Watch Now >

Cleat Hitch
Every sailor needs to know the cleat hitch. It is essential for docking. Many do it incorrectly – watch this video and learn it the right way. Watch Now >

Clove Hitch
The Clove Hitch is usually employed for temporary needs. Using the Clove Hitch you can quickly tie a line to a pole, a ring, or the standing part of another line. It’s secure, as long as it’s under a constant load, but will work loose when subjected to on and off loads and can be difficult to untie under pressure. Watch Now >

Coiling A Line
Lines on a sailboat need to be kept neatly. Most lines that are not in active use are stowed in a neat coil, and active lines often need to be coiled as well. Check out this video to see how it’s done!. Watch Now >

Figure Eight / Stopper Knot
This knot is fun to tie and can save you a lot of hassle. It’s commonly tied at the bitter end of halyards and sheets to prevent them from getting inadvertently pulled out of the block, fairleads, and jammers they’ve been led through. Watch Now >

Square / Reef Knot
The Square Knot, also called the Reef Knot, is well known to school children who have given up on trying to tie their shoe laces. On a boat it is used primarily for tying a rope to itself. Like when you are securing an item to the boat or a spar. Watch Now >

Rolling Hitch
This valuable hitch can be used to tie a line to the standing part of another line or to a spar. It’s especially useful when you need to transfer the load from one line to another – remember that winch override? It’s similar to the clove hitch but with an extra turn on the side that’s in the direction the load will be applied. Watch Now >

Round Turn & Two Half Hitches
This may be the most underrated knot. It’s fast to tie under load and applicable all around the boat. It’s much more reliable and certainly easier to untie than its cousin the clove hitch. This knot is secure, does not allow the line to chafe, and is easily undone. Use this hitch to tie a dock line to a mooring. Watch Now >

- Learn To Sail
- Mobile Apps
- Online Courses
- Upcoming Courses
- Sailor Resources
- ASA Log Book
- Bite Sized Lessons
- Catamaran Challenge
- Sailing Vacations
- Sailing Cruises
- Charter Resources
- International Proficiency Certificate
- Find A Charter
- All Articles
- Sailing Tips
- Sailing Terms
- Destinations
- Environmental
- Initiatives
- Instructor Resources
- Become An Instructor
- Become An ASA School
- Member / Instructor Login
- Affiliate Login
11 Boating Knots You Need To Know | Nautical Knots For Sailing & Boating
Nautical knots for boating and sailing: here is a list of the top boating knots you should know:.

Table of Contents
Essential boating knots.
- Figure-Eight Knot
- Square Knot (Reef Knot)
- Double Half Hitch
- Rolling Hitch
- Clove Hitch
- Round Turn and Two Half Hitches
- Anchor Bend
Most Important Sailing Knots
Best boat knots to dock a boat:, basic boat knots every boater should know, common boating knot questions and answers.
Boating and sailing not only require skill and knowledge of navigation but also a mastery of various knots. These knots ensure safety, efficiency, and reliability. Whether you’re mooring, anchoring, or securing sails, the right knot can make all the difference. Here’s an expanded and detailed guide on essential boating knots, including their uses and step-by-step instructions.
Uses: The Half Hitch is often used in combination with other knots to add security. On its own, it’s a quick and simple way to temporarily secure a rope to a post, ring, or another rope. It’s not highly secure by itself but is a fundamental component of many more complex knots and hitches used in boating and sailing.
How to tie:
- Pass the end of the rope around the object (post, ring, etc.) to which you’re attaching it.
- Bring the end of the rope over and around the standing part.
- Pass the end through the loop you’ve just created.
- Pull tight to secure the hitch.
Note: For added security, multiple half hitches can be used in succession, and they are often combined with other knots to secure the rope more firmly.
Video link: How to Tie a Half Hitch
Uses: The bowline creates a secure loop at the end of a line, ideal for attaching to mooring posts, rings, or through items you’re securing. It’s vital for boating and sailing because it doesn’t slip or bind.
- Create a small loop in the standing part of the line, known as the ‘rabbit hole.’
- Tighten by pulling the standing part while holding the loop and tail.
- Pass the end of the line (the rabbit) up through the loop, around the standing part (the tree), and back down through the loop.
Video link: How to Tie a Bowline Knot
Uses: Essential for securing your boat to a dock or cleat. This knot is quick to tie and release, even under load.
Wrap the line around the base of the cleat, once completely.
- Make a figure-eight pattern around the arms of the cleat.
- On the final wrap, form an underhand loop and slip it over the arm of the cleat.
- Pull tight to secure.
Video link: How to Tie a Cleat Hitch
Uses: A stopper knot, preventing the end of a rope from fraying or slipping through a pulley or block.
Make a loop by twisting the rope on itself.
- Pass the end of the rope over the standing part, then back through the loop you created.
- Pull tight to form the figure-eight shape.
Video link: How to Tie a Figure-Eight Knot
Uses: Joining two ropes of equal thickness, ideal for securing reefing lines or tying off sail material. Not recommended for critical applications due to slippage with uneven loads.
- Take two rope ends, one in each hand.
- Tie a simple overhand knot by passing the right end over the left, then under it.
- Tie another overhand knot, this time passing the left end over the right, then under it.
- Pull both ends to tighten the knot.
Video link: How to Tie a Square Knot
Uses: Joining two ropes of different thicknesses. It’s especially useful in sailing for attaching sheets (lines that control the sails) to the sails themselves.
Make a bight (a U-shape) with the thicker or more slippery rope.
- Pass the end of the other rope through the bight from behind.
- Wrap the end around both parts of the bight, then back under itself.
Video link: How to Tie a Sheet Bend
Uses: Securing a rope to a pole or ring, useful in mooring and securing tarps or covers.
Pass the rope around the object.
- Bring the end over and around the standing part, then through the loop created (first half hitch).
- Repeat the process to create the second half hitch.
- Tighten both half hitches against the object.
Video link: How to Tie a Double Half Hitch
Uses: Attaching a rope to a pole, another rope, or to relieve tension on a jammed rope or pulley in sailing.
Wrap the rope around the object it’s to be attached to.
- Make a second wrap in the same direction, ensuring it lies next to the first.
- Make a third wrap, but this time cross over the first two wraps.
- Tuck the working end under the third wrap and pull tight
Video link: How to Tie a Rolling Hitch
Uses: Starting and securing lashings, tying a rope to posts, and temporary mooring. Not the most secure hitch, but quick to tie and untie.
Pass the rope around the post or object.
- Cross over the standing part to create a second wrap.
- Pass the end of the rope under the last wrap.
- Pull both ends to tighten.
Video link: How to Tie a Clove Hitch
Uses: Ideal for mooring and securing a boat to a dock or a buoy. Provides a secure attachment with the ability to adjust tension.
Wrap the rope around the object twice (round turn) for extra security.
- Tie a half hitch around the standing part of the rope, close to the object.
- Tie a second half hitch for added security.
- Tighten the knot by pulling on the standing part.
Video link: How to Tie a Round Turn and Two Half Hitches
Uses: Primarily for attaching a rope to an anchor. Known for its strength and security.
Wrap the rope around the anchor’s ring twice.
- Pass the end of the rope through the wraps in the direction opposite to the initial entry.
- Secure the end with two half hitches on the standing line.
- Tighten the knot and ensure it’s secure.
Video link: How to Tie an Anchor Bend
In sailing, knots serve critical roles in the handling and adjustment of sails, as well as in securing the vessel. Besides the universally useful Bowline and Cleat Hitch, sailors rely on several other specific knots which we have also covered in detail above:
- Bowline: Essential for creating a secure loop at the end of a halyard to attach sails.
- Cleat Hitch: Used to secure halyards and sheets to cleats on the deck.
- Figure-Eight Stopper Knot: Often tied at the end of lines to prevent them from running through pulleys.
- Single and Double Sheet Bend: Ideal for joining two lines of different sizes, commonly used to attach a jib sheet to the cleat.
- Rolling Hitch: Allows sailors to attach a line to a rod or another line under tension, useful for adjusting the tension on a line without releasing it.
Docking requires knots that can be both securely fastened and easily released, as conditions at the dock can change:
Cleat Hitch: The standard knot for tying a boat to a dock cleat, ensuring the boat stays put while allowing for quick release when needed.
Bowline: Used to create a loop that can be easily placed over a piling or a dock cleat.
Spring Line Hitch: A method of using lines at an angle to prevent the boat from moving forward or backward along the dock.
Fender Hitch: A quick and secure method to hang fenders on the side of the boat to protect the hull when docking.
Other Maritime Knots And Marine Knots Expanded
Beyond the basics, several knots have specialized uses in various maritime activities:
Carrick Bend: Used for joining two heavy lines, such as when towing or mooring.
- Stopper Knot: Essential for preventing a line from slipping through a block or a hole, with the Figure-Eight Knot being a common choice.
- Heaving Line Knot: A knot tied at the end of a light line to add weight, making it easier to throw.
For those new to boating or in need of a refresher, mastering the following knots will cover most scenarios you’ll encounter:
Bowline: The quintessential boating knot for creating a loop that won’t slip under load.
- Cleat Hitch: Essential for docking, allowing the boat to be securely tied but quickly released when necessary.
- Figure-Eight Knot: A basic stopper knot, preventing the end of a rope from running through retainers.
- Sheet Bend: Perfect for joining two ropes of different diameters, a common need in boating.
- Half Hitch: Used for securing a rope to a post, ring, or another rope, often used in combination with other knots for added security.
What is the most useful knot for a boat?
The Cleat Hitch is arguably the most useful knot for boating. It is versatile, easy to tie, and essential for docking, making it indispensable for boaters.
What is the strongest marine knot?
The Double Fisherman’s Knot (also known as the Grapevine Bend) is considered one of the strongest knots. It is primarily used for joining two lines of similar thickness and is known for its strength and stability.
What is a good knot to tie a boat to a dock?
The Cleat Hitch is the go-to knot for tying a boat to a dock. It is secure yet easy to untie, even after being under load. Its simplicity and effectiveness make it ideal for this purpose.
What are the 4 basic maritime knots?
- Bowline: A versatile loop knot that is secure and easy to untie.
- Cleat Hitch: Essential for docking, allowing for quick and secure fastening to a cleat.
- Figure-Eight Knot: A basic stopper knot, providing a quick method to prevent a rope from running out.
- Sheet Bend: Ideal for joining two ropes of different thicknesses, essential for many boating scenarios.
What are the 4 knots essential for sailing?
The 4 basic maritime knots listed above are 4 basic knots that are considered essential for sailing . They include:
- Cleat Hitch:
What are the 8 basic knots?
The 8 basic knots include the 4 basic maritime knots and 4 additional knots. Here is the full list:
- Reef Knot (Square Knot)
These knots form the foundation of maritime knot-tying, covering a wide range of boating, sailing, and general maritime activities. Mastery of these knots ensures readiness for most situations encountered on the water, enhancing safety, efficiency, and the overall maritime experience.
In conclusion, each knot serves a specific purpose, from securing your vessel to a dock, joining ropes of different sizes, to ensuring the safety of your sails and cargo. By familiarizing yourself with these knots, you equip yourself with the knowledge and skills to handle various situations at sea confidently. Practice tying these knots regularly to ensure you can tie them correctly and efficiently when the need arises.
Happy boating!

Related Posts

Confident Captain: Learning to Dock a Boat

How does the effect of alcohol while boating compare to its effect while on land? Boating Test Study Guide

How Long Can You Finance a Boat? Average Boat Loan Term Ultimate Guide

What is the risk when a PWC passes too closely behind another boat? Boater Test Questions And Answers

Better Sailing

The 6 Most Important Sailing Knots
A good knot is a secure one, with excellent holding power. It should also come untied quickly so that the line can be used. There are many knots used in sailing, but these six common, easy-to-tie, and important sailing knots will handle most, if not all, of your needs. Learn the knots well because an improperly tied knot is useless or worse.
Here Are The Most Important and Common Sailing Knots
The bowline (boe-lin).
This knot puts a non-slipping loop at the end of a line. The knot becomes more secure under pressure but remains easy to untie. It is the most commonly used knot on sailboats and to tie to a ring or post. Among its many applications, the bowline is used to attach the jib sheets to the clew of the jib. One distinctive feature of a Bowline is that the more load it has, the tighter it holds.

Here Is How To Tie a Bowline
- To tie a bowline, put a small loop in the line where you want the knot to be. Make sure the end crosses on top of the standing part of the line. This small loop will end up as part of the knot.
- Run the end up through the loop you just made, down behind the standing part, back up over the edge of the loop, and down through the loop again.
- Snug the knot together, making sure the knot holds, and the remaining loop does not slip.
Figure-8 Knot
Often called and a stopper knot, this knot looks like its name. It is tied on the end of a line to keep the line from slipping through a fitting. It is easy to untie, and it is usually used on the ends of the jib sheets in the cockpit.

Here Is How To Tie a Figure-8 Knot
- Pass the end over the standing part.
- Cross the end back under the standing part
- Bring the end down through the loop. Tighten the knot.
Square Knot
Also called a reef knot, this is a multi-purpose knot. It is often used to tie two lines of the same diameter together. Moreover, it is usually used in reefing the Mainsail. In making a Square/Reef Knot, just keep this rule in mind: left over right, right over left. This knot is not recommended for tying two lines together because it can be difficult to untie. It is used mainly for sail lashings.

Here Is How To Tie a Square Knot
- Cross the line from the right over the line at the left.
- Loop the Working part of each line around. The new Working end at the left should pass over the Working end at the right.
- Pull on both Working ends to tighten the knot. The end result should be a symmetrical knot that resembles a square.
A sheet bend is used to tie two different sized lines together. It looks like a bowline, and it is secure and easy to untie. When tying Lines of different diameter, make the loop in the thicker line.

Here Is How To Tie a Sheet Bend
- Make a loop at the end of the smaller line, with the end crossing over on top. Run the larger line up through the loop.
- Run the larger line down around the standing part of the smaller line, up over the edge of the loop, and down through the loop again
- Tighten the knot.
Clove Hitch
A clove hitch is used to tie a line to an object. It is not a very secure knot. It is very easily untied and, with an extra half-hitch, can be used to secure a tiller.

Here Is How To Tie a Clove Hitch
- Wrap a loop of the end around the object.
- Cross over the standing part and wrap a second loop around the object.
- Tuck the end under the crossing you just made and tighten.
Round Turn and Two Half-Hitches
This knot should use a loop to secure a line to an object.

Here Is How To Tie a Round Turn and Two Half-Hitches
- Wrap the end of the line twice around the object.
- Cross the end over the outside of the standing part.
- Use the end to tie two half-hitches onto the standing part.
Most Common Sailing Knots – Summary
In Sailing, there are many knots that come in a variety of features and purposes. Sailing Knots are useful in various situations, such as joining two Sailing Lines, tying up to a piling or post, or securing a Sailboat.

Peter is the editor of Better Sailing. He has sailed for countless hours and has maintained his own boats and sailboats for years. After years of trial and error, he decided to start this website to share the knowledge.
Related Posts

Sailing with Friends: Tie Knots, Navigate the Seas and Create Unforgettable Memories

Best Boat Generators

Living on a Boat in London: What you Need to Know (Best Liveaboard Marinas, Costs, etc)

Tips For Living On a Boat In The Winter
- Buyer's Guide
- Destinations
- Maintenance
- Sailing Info
Hit enter to search or ESC to close.
5 Basic Boating Knots for Beginners

Every boat owner needs to know how to perform some important tasks, like docking a boat , tying up a boat , and anchoring a boat . All of these endeavors and many other common boating procedures share one thing in common: they involve handling lines. And just about any time line-handling is involved, knot tying may be, too. Here are the five most commonly used boating knots.
5 Basic Boating Knots:
- Cleat Hitch
- Clove Hitch
- Half-Hitch (also call the Overhand Knot)
- Figure Eight
Bowline Knot
The bowline is used to create a loop in the end of a line, which can come in handy for any number of reasons ranging from securing a line to a piling, to attaching two lines together. The big advantage it has over other knots one might use to put a loop in the end of a line is that it’s very easy to un-do, even after the line’s been under a large amount of tension.
- Step 1: Make a small loop in the line a couple feet from the end, then pass the end of the line up through the loop you just made.
- Step 2: Wrap the end around the main line above the loop, turn the end back down, and thread it back down through the loop.
- Step 3: Tug hard on the end and on the main line above the loop you’ve created, to snug the knot down.
Cleat Hitch Knot
Whether you’re pulling into the fuel dock or cleating off an anchor line, you need to know the cleat hitch. The good news? It’s amazingly simple.
- Step 1: Wrap the line around one side of the base of a cleat, under the “horns” (the ends on either side).
- Step 2: Pull the line across the top of the cleat, then loop it under the horn on the other side.
- Step 3: Reverse directions, and go across the top of the cleat going the other way.
- Step 4: To finish the cleat hitch, reverse direction again as though you were going to wrap under the opposite horn again. But instead of passing the line under it, form a small loop and flip it upside-down. Put the loop you just made over the horn, the pull hard so the line cinches down on itself. Then repeat the same process, on the second horn of the cleat.
Clove Hitch Knot
Clove hitch knots come in handy when you want to secure a line to a rail. Many boaters use them for tasks like hanging coils of line for neat stowage, or securing fenders so they hang down from a bowrail. You can actually tie the clove hitch in one of two different ways, depending on if you’re tying it around a rail, or if it’s a pole or post with an open end. First, let’s look at the rail method.
- Step 1: Wrap the line one time around the rail or pole.
- Step 2: Begin wrapping around the rail a second time, with the line crossing over top of the first wrap. Finish the second wrap, but before pulling it tight, pass the tag end back underneath. Then tug, to secure the clove hitch in place.
If you’re tying a clove hitch to a pole with an accessible end, you can cheat a bit and make it faster and easier with the same result.
- Step 1: Make a loop, and pass it over the end of the pole.
- Step 2: Make a second loop and flip it over so the tag end faces the first loop, then pull it tight.
One word of caution about the clove hitch: if the line isn’t under slight pressure all the time, or if it rotates on the rail or pole, it can come undone. So never use this knot for heavy-duty tasks like securing a boat to a dock. Some people even like to add a half hitch knot on top of a clove hitch, just to be safe.
Half Hitch (Overhand) Knot
Just about the simplest knot on the face of the planet, remember that half-hitches aren’t reliable all on their own. But they are a good way to secure then end of the line after tying a different knot, two half hitches together work just fine for securing a light-duty load, and they can be tied in a fraction of a second.
- Step 1: Pass the tag end of the line across the main line, pull it through the loop you just made, and give it a tug.
That’s it! You can tie a half hitch both in a line, and around a rail.
Figure Eight Knot
The figure eight knot is useful when you want to stop a line from passing through something, like a chock or a pulley (and is sometimes called a “stopper” knot for that reason). Be careful, though, because if both ends of the line are put under a lot of stress, you may have difficulty getting the figure eight back out of the line later on.
- Step 1: Make a loop in the line.
- Step 2: Wrap the tag end over the main line, and pass it back through the loop.
- Step 3: Pull both ends to cinch it tight, or push the knot to adjust its position and then cinch it tight.
Bonus Knot: Loop-to-Loop
Okay, a loop-to-loop is really more of a tactic than a knot. It’s used to join two lines with loops on their ends to one another, so as you know how to tie a bowline, you can always use the loop-to-loop to connect lines with one another. And, it’s uber-easy and fast. Just pass the tag end of a line through the loop of line number two, and then pass it through the loop in its other end. Then pull on the tag end until the two loops come together.
Read Next: How to Tie Up a Boat
You Might Also Like:
- How to Dock a Boat
- Anchoring a Boat: Step-by-Step Guide
- How to Tow a Boat
- Best Boats for Beginners
- The Ultimate Boat Buyer's Guide
Join Our Newsletter!
Get community news, buying bargains, and how-to guides at your fingertips.
Ten Nautical Knots and How to Tie Them
In This Chapter
^ Securing the most common types of knots ^ Mastering the more advanced knots
No one but an acrobat or a sailor could have got up to that bell-rope from the bracket, and no one but a sailor could have made the knots with which the cord was fastened to the chair.
— Sir Arthur Conan Doyle
■X es, you can tie the knot on a boat, but we're not talking about marriage.
This chapter reviews the basic knots on a sailboat and shows you how to tie them. On most boats, you can find a bowline, a figure-eight knot, a square knot, and maybe a couple of half hitches somewhere.
Knowing how to tie these knots (especially the bowline and the round turn with two half hitches) and using them properly can save you a great deal of time and make your life afloat safer. With a 5-foot length of rope, you can practice these knots at home and master them quickly. Master them, and you're well on your way to becoming an "able seaman."
Overhand Knot
An overhand knot is the basic knot that you use to begin tying your shoes and, as you see in the following sections, is the first step of many sailing knots. If your mother only lets you wear shoes with Velcro straps, and you can't make an overhand knot, see Figure 19-1 on how to begin tying your shoes. (You may want to buy Getting Dressed For Dummies as soon as it comes out.)
Continue reading here: Glossary
Was this article helpful?
Related Posts
- Using Your Dinghy - Sailing Fast
- Seizing - Seamanship Knots Guide
- Noose Tying Up A Boat - Knots for Sailing
- MakeS iffiTlT - Seamanship Knots Guide
- Identifying the types of buoys
- Heading up and bearing away
Readers' Questions
How to tension nautical rope?
To tension a nautical rope, follow these steps: Determine the amount of tension needed for your specific application. This will vary depending on the purpose and load the rope is intended to carry. Attach one end of the rope to an anchor point securely, such as a cleat or a strong fixed object. Make sure the anchor point can withstand the tension you are applying. Feed the rope through any necessary blocks, pulleys, or other tensioning devices, depending on your setup requirements. Pull the free end of the rope firmly but gradually to create tension. Use your body weight, mechanical advantage, or winches if necessary to achieve the desired tension. While pulling on the free end, ensure that the rope is properly aligned and not twisted or tangled along its length. Once you have achieved the desired amount of tension, secure the free end of the rope to another anchor point or a cleat. Make sure it is tied securely to prevent it from slipping or releasing tension. Check the tension periodically to ensure it remains at the desired level. If necessary, readjust and re-tension the rope as required. Remember, proper tensioning is crucial for the safety and effectiveness of the rope, so always follow manufacturer guidelines and consider seeking advice from experienced sailors or rigging experts.
How to make a knot that tightens when pulled?
To make a knot that tightens when pulled, you can use a type of knot called the "slipknot" or a variation of it. Here's how to tie a slipknot: Step 1: Start by forming a loop with the working end of the rope or string. The working end is the loose end you will be pulling to tighten the knot. Step 2: Bring the working end over the standing end (the part of the rope connected to the spool) to create a loop around it. Step 3: Take the working end and pass it through the loop you just created, forming a new loop within it. Step 4: Ensure that the working end crosses over the standing end within the loop. Step 5: Hold onto the standing end with one hand and the loop with the other hand. Gently pull on both ends to tighten the knot. Step 6: To loosen the knot, hold the loop and push the standing end gently to release the tension. By following these steps, you will have tied a slipknot that tightens when you pull the working end of the rope or string.
How to make a nauticalstyle knot?
To make a nautical-style knot, you can try the following steps to create a classic sailor's knot known as the "Square Knot": Take two ropes or cords of equal length and lay them parallel to each other. Take the left rope in your left hand and cross it over the right rope, forming a right-over-left "X" shape. With your right hand, reach under the right rope and grasp the left rope, forming a loop. Bring the right rope over the top of the left rope and through the loop created in the previous step. Hold both ends of the ropes and tighten the knot by pulling them in opposite directions. Make sure the knot is secured and properly tightened. The result should be a simple and symmetrical knot, perfect for a nautical-themed decorative touch. You can use this knot for various purposes, such as tying down boat fenders, securing ropes, or even for some DIY crafts.
How to make a nautical knot?
Take two ropes, strings, or cords of equal length. Secure one of the ropes to a stationary object, such as a post or a tree. Take the other rope in your hand and make a loop. Cross the other rope over the loop. Take the end of the rope on the left side and pass it over the front of the loop. 6.Pass it up and through the back of the loop. Take the end of the rope on the right side and pass it over the front of the loop. Pass it up and through the back of the loop. Pull both ends of the rope to tighten the knot and make sure the two ends of the rope are even. Once the knot is secure, trim off any excess rope to make it look neat.
How to make nautical knots?
Square (Reef) Knot: Start by crossing the left over the right and then taking the end of the left and tucking it underneath and then up through the center. Next, cross the right over the left, tuck the end of the right underneath and up through the center. Tighten by pulling on the ends of the rope in opposite directions. Sheet Bend: Start by taking the thicker rope (the load rope) and folding the end over into a “J” shape. Take the thinner rope (the bend rope) and pass it under and then over the “J” shape. Take the end of the bend rope and tuck it under the bend rope to form a loop. Pull the load rope and bend rope in opposite directions to tighten the knot. Bowline: Start by forming a loop with one end of the rope and passing the end of the rope up through the loop. Take the end of the rope around the standing part of the rope and then back down through the loop. Tighten the knot by pulling on the ends of the rope in opposite directions. Anchor Bend: Start by taking one end of the rope and passing it through the standing part of the rope and then back around itself once to form a loop. Take the second end of the rope and pass it through the loop and then around the standing part. Pull the ends of the rope in opposite directions to tighten the knot.
How to tie a bell rope?
1) Measure the desired length of the bell rope. Cut a length of heavy duty cotton rope to size. 2) Begin at one end of the rope and form a loop that’s twice the size of the bell it will be attached to. 3) Now, thread the opposite end of the rope through the loop. Pull firmly to secure the loop. 4) Take the end of the rope and wrap it around the standing part of the rope twice. Wrap it so that the loop is snugly on the rope’s end. 5) Using the end of the rope, thread it back through the loop. 6) Wrap the end of the rope around both sides of the loop twice. Pull firmly to secure the knot. 7) Now, attach the rope to the bell by looping the free end of the bell rope around the clapper and bell’s attachment eyelet. 8) Secure the rope to the bell by tying a secure knot.
How to tie a nautical knot?
Take two strands of rope, each the same length. About 8 inches is a good starting point. Cross the middle parts of the strands. Take the bottom part of the right strand and loop it over the top part of the left strand. Take the bottom part of the left strand and loop it over the top part of the right strand. Take the bottom part of the right strand that you just looped over the left and draw it up through the middle of the two strands. Take the bottom part of the left strand that you just looped over the right and draw it up through the middle of the two strands. Pull the two strands in opposite directions, cinching the knot slowly until it tightens.
How to tie nautical knots?
Square Knot: Also known as the reef knot, the square knot is a binding knot used to secure a rope or line around an object. To tie a square knot, cross the ends of the rope and make a loop. Pass the ends of the rope around the loop and tie an overhand knot. Tighten the knot and repeat the sequence in reverse to secure it. Bowline Knot: The bowline knot creates a secure loop at the end of a rope. To tie it, form a loop in the rope and pass the end of the rope through it. Pass the end of the rope around the standing line and then back up through the loop again. Pull tight to secure. Sheet Bend Knot: The sheet bend knot is used to join two ropes together. Begin by making a bight in one of the ropes. Thread the end of the other rope through the bight and then wrap it around twice. Thread the end of the rope through the loop again and pull tight to secure. Clove Hitch Knot: The clove hitch knot is used to secure ropes to an object. To tie it, make a loop in the rope and cross the ends of the rope over the object. Pass the ends of the rope around the object and tuck them back through the loop. Pull tight to secure the knot. Figure 8 Knot: The figure 8 knot is used to create a stopper knot at the end of a rope. To tie it, form a loop first and then pass the end of the rope through the loop. Make a second loop and pass the end of the rope through it. Pull tight to secure.
Sailing Knots
These knots could prove to be some of your best sailing companions. They need ample practice so that you can tie them perfectly and quickly when you need them. Your rope handling skills would come handy whenever you need to tie knots for mooring, anchoring, securing cargo, managing sails, preparing for a storm, towing another vessel, decorative purposes, etc. It helps if you take note of the pros and cons of the popular sailing knots. You should use ropes that can be used repeatedly and can be untied easily. The emphasis here is on reliability, safety and convenience.
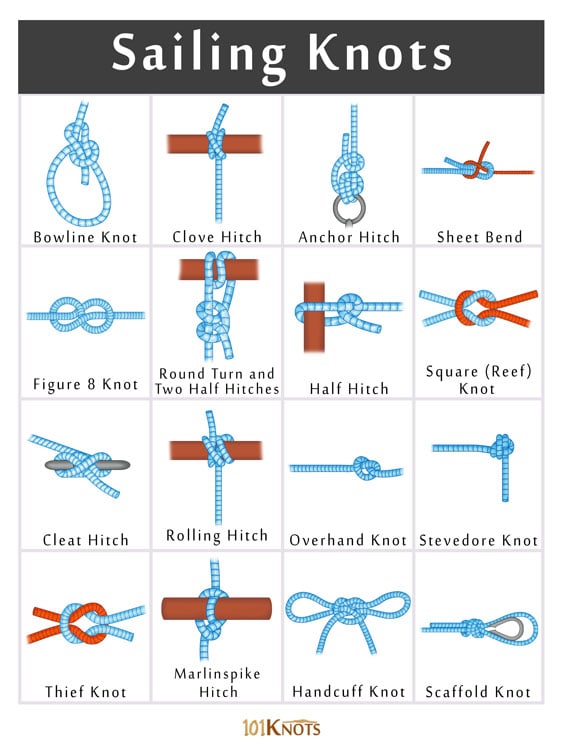
Essential Knots to Know for Sailing
- Bowline knot
- Figure 8 knot
- Square (reef) knot
- Clove hitch
- Round turn and two half hitches
- Cleat hitch
- Rolling hitch
- Anchor hitch
- Overhand knot
Other Different Sailing (Nautical) Rope Knots
- Stevedore knot
- Scaffold knot
- Diamond (lanyard) knot
- Buntline hitch
- French bowline
- Highwayman’s hitch
- Monkey’s fist
- Barrel hitch
- Marlinspike hitch
- Carrick mat
- Handcuff knot
- Sheepshank knot
- Timber hitch
- Two half hitches
- Double sheet bend

Timber Hitch The timber hitch is used to secure a rope round a post or any cylindrical...
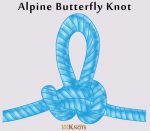
A useful midline knot, the butterfly knot has its uses in glacier travel and rock...
Carrick Bend The Carrick bend is a powerful knot to join two heavy ropes, hawsers...
Dropper Loop The dropper loop, also known as a dropper knot forms a secure structure...
- Privacy Policy
- Terms and Conditions
© 2024 ( 101Knots )
What is the Ideal Wind Speed for Sailing?
Do you like a challenge, or are you a fairweather sailor like me? I've actually checked the facts (and many opinions) and came up with these wind speeds for different sailing styles:
The ideal wind speeds for sailing are:
- most comfortable sailing: 5 - 12 knots
- absolute beginners: under 10 knots - anything under 10 knots prevents capsizing
- for more serious training: 15 - 20 knots
- for heavy offshore boats: 20 - 25 knots - anything under 12 and the boat doesn't even come to life
- 25 knots and up is considered rough for any small/mid-sized boat
The best wind speed for sailing is one that allows you to navigate the boat safely, within your abilities, while at the same time challenging you - without exceeding the hull speed of the boat (making the trip unnecessarily dangerous).
In all honesty: there is no ideal wind speed for everyone all the time. But there is one for you, for this particular moment. It depends on your skill level, boat type, your desires, location, and many other conditions. But if you know what you're after, I can probably give you a good range to work with.
So instead of giving you one answer, I'll try to explain what speeds and different combinations of these factors look like - so you can make your own decision on what's best for you at the moment.

On this page:
Best wind speed for training, when is it too windy, how to try out faster wind speeds, planning your trip, estimate wind speed using waves.
There are two ways to go at it. One is to say you want to play it safe, and in any case, you want to avoid the risk of capsize at all cost. Try and find winds of under 10 knots. This will give you time to get to know your boat and get a feel for the handling.
The other is to say: train as you fight. If you want to be able to sail in all conditions, and not just 7-knots-sunny-beers-and-burgers kinda weather ... you should train in all conditions. I'm a fan of this last one, as I've noticed my improvement go through the roof anytime I overstretch my skills a bit.
As with anything in life, if you want to get skilled, you should expose yourself to some discomfort. I'd say 15 - 20 knots is a great opportunity for learning.
So, if you want to get better, you should:
- know what type of wind you're great in, and enjoy the easy ride
- know what type of wind you're a mess in
- go after that wind speed and up - extend beyond your comfort zone
So in short, if you want to really improve your sailing, train in conditions you suck in. Really consider 20 knots a blessing, not a threat.
Also, if you feel unsafe and in over your head, you're probably right. Trust your intuition. It's a fine line between challenging and hurting yourself.
Easiest wind speed
It's tempting to say: the lower the better. But anyone who's ever tried to get into motion by using any type of sail, knows this is not the case. There should be wind. Sailing in light winds can be difficult and also a drag. I'd say that winds under 6 knots don't do much for me, however, it requires skill also to maneuver with little wind.
The easiest wind speed for sailing is anything from 7 - 10 knots. It's not fast enough to risk capsizing, but it's enough wind to allow for some interesting maneuvers.
Minimum wind speed
The minimum speed for sailing is about 5 knots. Anything under won't get you into motion (except for very small sailboats, such as sunfish). If you can't detect it on a gauge, it won't do much in your sails.
Sailing in light winds is a skill on its own. Most experienced sailors that have learned to rely on feel over the years tend to overreact to any impulses from the wind, losing speed.
If you do find yourself in very light winds, try not to oversteer and to overadjust. Let the sails catch wind and just hang back.
Wind Speeds For Different Boat Types
- Sunfish dinghy: stay under 15 knots - risk of overpowering your boat
- Up to 26' sails best between 10 - 20 knots
- Heavy > 26' sailboats can go out 15 - 25 knots without problems.
First off: you shouldn't try to avoid bad weather, because it's you will run into it at one point - and that's the worst moment to figure out how to deal with all of it. Better to face it now willingly and be prepared.
So when should you definitely avoid getting out?
It's not so much the wind speed, as the height of the waves you should look out for. Wind is easy to manage (simply reef down). As long as you have flat water, it's smooth sailing. The water can be great at 20 knots.
The second thing is gusts over a steady wind. I prefer a 25 knots steady wind over 18 knots wind gusts with waves anytime.
Mid-sized (26') boats start to heel a lot at about 23 knots, so that's when the ride can become uncomfortable. Small boats start to heel a lot sooner.
Also, check the manufacturers specifications of your boat. Every boat is designed with certain conditions in mind, and it will handle best in those conditions. Try to keep to the manufacturers recommendations as much as possible (the hull speed, for example).
Okay, you're planning to go out with 20 knots. If you're feeling a bit uncertain, that's fine, and understandable. How to do it responsibly? Simply build it up slowly.
I recommend by going out reefed down. Reefing is your friend. It takes off the edge. Do a couple of runs. If it feels alright, shake it out and go for it.
Top tip: reef the main sail before you go out. It's way easier than doing it in full winds
It doesn't mean it's too windy when the wind speed requires you to reef down. Reefing is just another tactic to handle your boat comfortably, and I encourage you to use it when you need to. The need to reef over 15 knots is normal.
Having too much sail is always uncomfortable, though many sailors are permanently overcanvassed.
Docking may be the hardest part
The most challenging part of heavy winds is docking and getting in and out of the marina. Always dock at a speed you're comfortable with hitting things (it will happen). When rolling out, use your throttle, be decisive where you want to go, otherwise the winds and waves will take you for a ride. Have a docking plan ready.
Can a Bigger Boat Take More?
Yes and no. It's not all about the size of your boat, the amount of sail is also important. Bigger boats usually have better rigging and systems for dealing with heavier wind. It makes sense: since they require more wind to get into motion, they should be able to handle more wind as well. But it's not true that small boats can't take high wind speeds.
It's important to check the forecast before leaving for your trip. Keep in mind that any forecast predicts average wind speed. Wind gusts will be up to 40% faster, so take this into the equation.
Wave conditions are also an important part. You should know how your boat reacts to short and sharp waves against longer, flatter waves. If you sail offshore, take swell waves into account. Swell waves don't reach enclosed waters, but they do affect their entrances.
Beaufort wind scale to knots - mph - plain English
In planning your trip and checking the forecast you might encounter F5 - F6 - etc. This is the Beaufort wind force scale. It's used to express the speed of wind and is indicated in Force (F). Below you'll find a Beaufort scale conversion table.
| knots | mph | Beaufort (F) | English |
|---|---|---|---|
| 5 | 6 | 2 | Light breeze |
| 10 | 12 | 3 | Gentle breeze |
| 15 | 17 | 4 | Moderate breeze |
| 20 | 23 | 5 | Fresh breeze |
| 25 | 29 | 6 | Strong breeze |
| 30 | 35 | 7 | High wind |
| 35 | 40 | 8 | Gale |
| 45 | 52 | 9 | Severe Gale |
| 55 | 63 | 10 | Storm |
| 60 | 69 | 11 | Violent storm |
| 65 | 75 | 12 | Hurricane |
If you want to convert your knots to mph yourself, simply multiply by 1.1508:
One knot is about 1.1508 mph
A forecast isn't always right. Not only can the weather change in an instance, they can also be just blatantly wrong. It's always a good idea to know how to check the wind speed yourself. You can use a wind gauge for this, but you can also easily check by looking at the waves.
Reading the waves to estimate wind speed is a quick and reliable way to make sure you don't get in over your head. Water doesn't lie: it always shows. I encourage to take a look at the pictures below to get a sense of the different wave types for each wind force.
Wind force 0
Mirror-like sea, no waves whatsoever.

Wind force 1
Ripples but no white foam.

Wind force 2
Small waves that don't break.

Wind force 3
Large waves, crest begin to break; whitecaps.

Wind force 4
Waves become longer and more pronounced, regular white horses.

Wind force 5
Fairly long waves, many white horses.

Wind force 6
Waves become pronounced and large, many white crests, probably some spray.

Wind force 7
Visible spindrift (spray blown from crests of waves). White foam from breaking waves visible.

Wind force 8
Longer and pretty high waves; lots of spindrift. Very clear streaks of foam that is blown in direction of the wind.

Wind force 9
High waves. Dense streaks of foam along the direction of the wind. Sea begins to roll. So much spray it restricts visibility.

Wind force 10
Very large waves with overhanging crests. The whole sea gets a white appearance.

Wind force 11
Exceptionally high waves, able to hide small boats from sight for long periods of time. The sea is covered in white patches of foam.

Wind force 12
Hard to see due to foam and spray. Entire sea is covered in a white layer.

Get Started Sailing Fast (and Save Money)
I have written a detailed e-book that contains actionable step-by-step lesson plans for different budgets and situations. This book will save you hundreds of dollars, hours, and a headache. You can get it here. Please check it out. You will support our work, and more importantly: it will help you get started much quicker and cheaper.
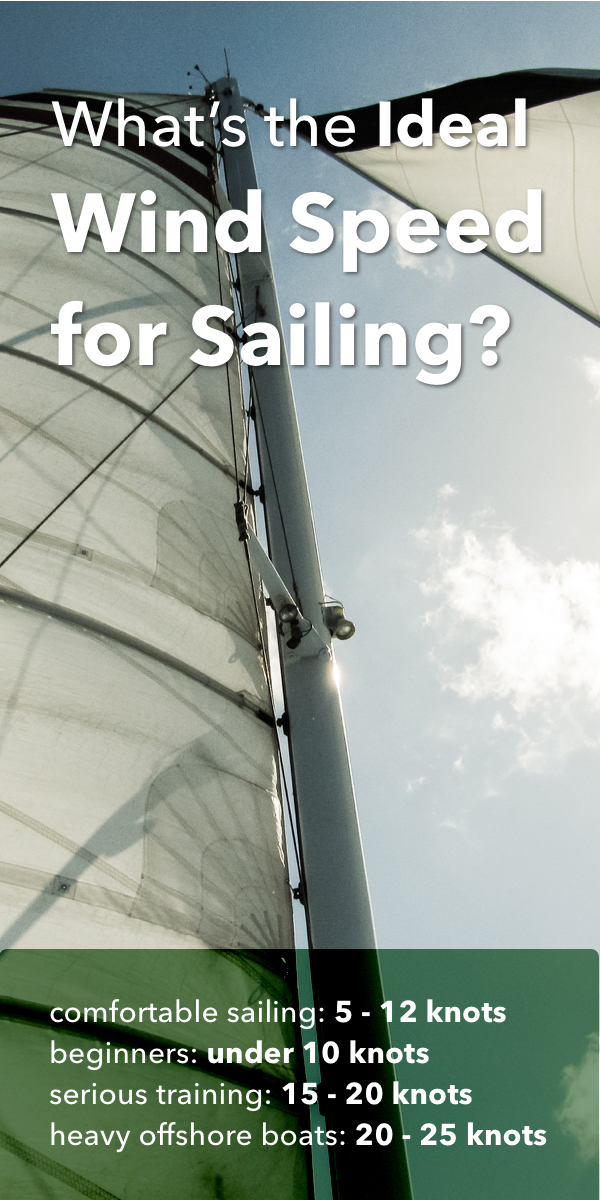
Joseph Agius
Hi am 65 years old and I just bought my first sailing boat Dromor 1992 Apollo 12 40Ft. I had my boat since 12 July 2019 I been out every week from zero wind to 10 knots. This Saturday 21St October 2019 first time going out with wind up to 10 konts to 13 knots I am not an expert but I feel confident going out after I read your article any advice please. Regards Joseph
Your article give me more confident to sail you explained every aspect of wimd, waves and wrote many ideas about sailing save, which makes me more comfortable.
Tracey Shadday
Your article on wind speed and sailing was interesting and helpful. Yesterday I took a Sunfish out in what I was told was 11 knot wind. Very soon after embarking I jibed and turtled the boat. This morning I looked at marine data and found the actual wind was 15-22 knots. I was not skilled enough for this moderate breeze. Your suggestion to look at the water and photos to go with it was helpful. Thank you!
Leave a comment
You may also like, 17 sailboat types explained: how to recognize them.
Ever wondered what type of sailboat you're looking at? Identifying sailboats isn't hard, you just have to know what to look for. In this article, I'll help you.

What’s the Largest Boat One Person Can Operate?

How Far Can You Sail In One Day?
Yachting Monthly
- Digital edition

What can be learned from these 4 major accidents at sea?
- Rachael Sprot
- July 17, 2024
Accident reports make sobering reading, but if we want to sail downwind safely, then it pays to learn from gybes gone wrong, says Rachael Sprot

There are few incidents on board more destructive than a crash gybe. The power unleashed when the wind catches the wrong side of the mainsail is hard to overstate, and the speed with which it occurs makes evasive action impossible in the moment.
There have been several tragic accidents involving crash gybes in the last 20 years which have been analysed by the MAIB and other authorities and the reports are sobering to read.
Studying accident reports is standard practice in aviation, but it’s less common for sailors to study them. They are, however, an important resource for understanding the risks of being on the water, and how accidents happen and absorbing the findings can make us all better skippers. The MAIB’s remit is to analyse the causes of each incident without apportioning blame.
We’ve probably all had an unexpected gybe at some point, though not with such devastating consequences. So rather than hope we’re immune to the same errors, perhaps it’s safer to assume we’re not and take a closer look at the reports to identify common themes, and how to stay safe downwind.

Liquid Vortex was racing when an accidental gybe caused serious injury to the helm
Case study 1 – Liquid Vortex, 2011
In 2011 Beneteau 40.7, Liquid Vortex, was competing in the Myth of Malham Race when a crash gybe seriously injured one crew member. The race starts in the Solent and heads west, rounding the Eddystone lighthouse before finishing back in the Solent.
The boat was running downwind on the return leg in a West Force 6 when her spinnaker tore. The damaged sail was lowered, and the heavyweight spinnaker was prepared, but became wrapped during the hoist. The headsail wasn’t set at the time, and there was no preventer rigged.
The first mate went forward to resolve the issue while the skipper remained in the cockpit but struggled to sort out the wrap. Communication between the cockpit and foredeck was difficult over the noise of the flogging sail. Frustrated with how long the process was taking, the skipper decided to go forwards himself.
He left an inexperienced crew member on the helm, instructing her to steer 040°, which was approximately a beam reach. He’d noticed an approaching fishing boat, but didn’t think it would be a problem. However, the helm and another crew member in the cockpit became increasingly concerned with their converging courses and asked the skipper for instructions. He shouted back to pass ahead of it, gestured to port, and told them not to gybe but the helm turned to starboard instead and gybed unexpectedly.
The traveller on the First 40.7 is just in front of the helm and during the gybe the mainsheet swung aft, striking the helm and knocking her to the cockpit floor, where she lay unresponsive. Another crew member took over the wheel and unintentionally gybed back again. A Mayday was issued and the casualty was evacuated by helicopter, during which the winchman fell overboard and had to be picked up by hi-line from the sea.

The injured crew was moved from behind the wheel to the main cockpit prior to medevac. Photo: Dorset Media Service
MAIB analysis
The report concludes that: ‘Communication between the skipper on the foredeck and the helmswoman in the cockpit was difficult’ and that ‘the helmswoman’s uncertainty about the action the skipper wanted her to take could have been avoided had the skipper remained in, or returned to, the cockpit until the fishing vessel had passed and was clear.’
The MAIB report also found that the skipper was competitive and ‘drove his boat and his crew hard’. Given the presence of novice crew, many of whom were suffering from lack of sleep and seasickness, as well as relatively demanding conditions, ‘a more cautious and encouraging approach was warranted’, the MAIB report said.

CV21 suffered a fatal accidental gybe. Photo: onEdition 2015
Case study 2 – CV21
During the first leg of the 2015 Clipper Round the World Race, CV21, one of a fleet of 12 identical Clipper 70s, suffered a fatal crash gybe 120 miles west of Portugal.
In the lead up to the incident, the boat was on a broad reach with NNE winds of 20 knots and a moderate sea state. They had the full mainsail, Yankee 1 and preventer rigged. The watches changed at 2200 and, according to the report, the oncoming watch leader commented that the boat seemed a ‘bit lively’. The off-going watch leader ‘disagreed and stated that there had been no problem running downwind during his watch’.
By 2330 the wind had increased and was gusting 30 knots. One of the most novice helms was at the wheel. The watch leader and skipper (who was below) agreed to put in a reef. At this point the watch leader left the helm station where he’d been supervising the steering, and crossed over the traveller, which is just forward of the helm, to brief the crew. He remained clipped on aft of the traveller, but was sitting forwards of it in an area which was known as a danger zone when the boat gybed without warning.
The report states that: ‘The helmsman was unable to regain control of the yacht’s heading before a second gybe returned the boom back to port’ and ‘a crew member saw that the boom preventer was flying free’. After the double gybe the watch leader was found lying motionless in the cockpit lying across the traveller and tragically never regained consciousness. The vessel diverted to Portugal and a postmortem revealed that he had died from a broken neck.
Article continues below…

How to recover from a violent gybe at sea?
It is the roughest sea Simon has ever experienced. He and his four crew are sailing eastwards on his classic…

Dealing with orca attacks and how to navigate ‘Orca Alley’
There is a new buzzword amongst cruisers heading in and out of the Mediterranean through the Straits of Gibraltar… orcas!…
The MAIB analysis stated that prior to the incident, ‘the apparent wind speed of 15.7 knots was approaching the 16-knots limit recommended by the sailmaker for the Yankee 1 headsail. As the wind speed continued to increase, the helmsman found it increasingly difficult to maintain the yacht’s heading, occasionally veering up to 50° off course.’ They stated that ‘it would have been wise for… [the watch leader]… to replace the helmsman with a more experienced crew member’, but that his ‘decision to reef… was timely.’
Of the watch leader’s position close to the traveller they found that the race training and safety briefs had covered this hazard in detail and it was not known why the watch leader was there. They suggested that perhaps ‘he was preoccupied considering the reefing evolution and the pre-reefing brief he was about to give his team, and so forgot about the zone.’ The skipper did not come on deck for the reef briefing, and whilst this decision was ‘understandable… it resulted in the deck being left unsupervised by him at a time of heightened risk’.
On the failure of the preventer, subsequent tests discovered that it had parted at a partial splice of the Dyneema strop on the foredeck, ‘which might have been exacerbated by uneven loading of the splice, resulting in fewer fibres bearing the load’. They also found that ‘The manufacturer’s data sheet for the D2 Racing rope supplied to the Clipper 70s did not contain information on the loss of strength caused by splices, hitches or knots,’ and that ‘wider promulgation of the limitations of HMPE [known as Dyneema] rope would be beneficial’ for the industry.

Buccaneer of Upnor, an Elan 333 similar to the one pictured here, was on passage from Weymouth to Poole when a broach was followed by an uncontrolled gybe
Case study 3 – Buccaneer of Upnor
It isn’t always downwind sailing where crash gybes occur. According to an MAIB accident summary of an incident in August 2007, the Elan 333 Buccaneer of Upnor was en route from Weymouth to Poole when she crash-gybed off St Alban’s Ledge from a beam reach. The conditions were Northerly, Force 5-6, gusting Force 7.
According to the MAIB’s accident summary, the skipper had been supervising a novice helm for an hour on a close-reach course. Despite having two reefs and the No. 1 jib set, ‘the helmsman experienced difficulty in keeping the boat on the course, and the mate had to frequently “spill” wind from the overpowered sail by slackening the mainsheet’, the summary states.
When she needed to go below, the skipper instructed the helm to change course to a beam reach, which took them slightly further off St Alban’s Head and the mate remained on deck. Whilst she was below a gust struck and the boat broached. The novice helm put on full rudder to counter it. ‘After a short time,’ the report continues, ‘the gust subsided, but, with the helm still hard over the yacht quickly came round to starboard and continued into a rapid and uncontrolled gybe.’
The traveller on the Elan 333 is at the front of the cockpit, just aft of the companionway. During the gybe the mate, who had been sitting just behind the traveller, was caught in the slack mainsheet and thrown against the coach roof and fatally injured. He was evacuated by helicopter, but died the next day.
The MAIB advised the skipper of the need to ‘comprehensively assess the capabilities of each crew member to competently undertake specific tasks in the prevailing weather conditions, particularly when the skipper is absent from the deck.’
They also said that the skipper should ‘ensure that when transferring temporary charge of the deck and navigation that the passage plan is properly understood and adequate precautions are taken to supervise inexperienced crew and maintain overall control of the deck.’

Platino’s crew await rescue after the uncontrolled boom brought down the rig
Case study 4 – Platino
Based on Maritime New Zealand report Platino, a privately owned 66ft sloop built in 1997, had undergone a major refit in 2015. After three months of cruising in New Zealand, the two owners and three additional crew set off on a passage to Fiji, over 1,000 miles away. One of the owners, referred to as the skipper in the report, had 60-70,000 miles of experience and the other crew were all seasoned offshore sailors.
The passage started in light winds, but by day three they had 30-35 knots from the south with a confused sea. Fiji lies almost due north of Auckland, so they came onto a broad reach, set the preventer, reduced sail and the autohelm was performing well in the conditions. Suddenly, the boat crash-gybed with the boom following through, before crash gybing back again. The boat was out of control and preventer had failed.
The helm station was aft of the centre cockpit and the traveller lying between the two. No one was by the helm at the time of the incident, but it’s thought that one of the crew members was trying to reach it when the second gybe occurred. He seems to have been thrown to the side deck by the mainsheet and probably died instantly from his injuries.

Three remaining crew were rescued from Platino by the container ship Southern Lily. Photo: Maritime NZ
Worsening situation
The traveller failed, leaving the boom completely unrestrained, with the mainsheet and traveller car still attached. The report stated: ‘The motion of the boom was now only restricted by the boom hitting the shrouds on either side of the mast.’ The rest of the crew were then called on deck.
‘Soon after arriving on deck,’ the report continues, ‘the first crewmember to arrive called out to the skipper to duck, which she did before glimpsing something going overboard on the port side. The skipper then saw the crewmember in the water some distance from the yacht with his arm raised as the yacht continued on out of control.’ Tragically, the crew member who was overboard was never recovered.
One of the owners made it to the helm station but struggled to gain control of the yacht. He just managed to hold the boat head to wind for long enough to furl most of the mainsail. The mainsheet and traveller car, which were still attached to the 678kg boom and mainsail, were described as ‘acting like a wrecking ball’, smashing the helm console which included the hydraulic furling controls before the mainsail could be completely stowed. The cockpit table and bimini were also ripped off, and wheel bent, which made it more difficult to regain control of the yacht.
The crew were unable to secure the boom and were convinced that its motion would bring down the rig, which it did several hours later. The three survivors were rescued the following afternoon, more than 24 hours after the incident.
The yacht was later recovered and investigations revealed that the header tank for the hydraulic fluid on the rudder drive unit was almost empty, and a slow leak was the likely cause of the steerage problem which had initiated the gybes.

The padeye sheared off and the line itself parted
The investigations also discovered that the preventer had failed in two places: the line parted, and the deck fitting that it was attached to had sheared off. On the failure of the mainsheet traveller, the report concluded that the design and installation of the traveller system exceeded the recommended specifications, but that ‘it would be unreasonable to expect that the traveller arrangement would definitely hold when subjected to one or more completely uncontrolled gybes’.
Platino accident report
Whilst the loads on a 60-footer are exponentially larger than those on a 40-footer, the Platino report gives valuable insight into the technicalities of preventer design. It explains that the angle between the preventer and the boom is the key to reducing the load on the preventer.
Hypothetically, if you could rig a preventer at 90° to the boom, this would mean that the load on the preventer would be equal to that of the force acting on the boom (a 1:1 ratio).
However, it’s not possible to rig a preventer at this angle, and the best that could have been achieved on Platino was a 27° angle if the preventer had been rigged to the bow. This would increase the load on the preventer by a factor of 2.4. Platino’s preventer had not been rigged to the bow, but to a block on the toe rail just aft of the shrouds. The angle between the preventer and the boom was only 6° which increased the load on the preventer by a factor of 10.
A computer simulation found that static loads on the preventer, when rigged to the bow in 35 knots of wind, would have been 1,100kg. Rigged as it was, this was increased to 4,600kg. With an additional 10 knots of wind, so 45 knots, these loads would increase to 1,700kg and 7,000kg respectively. Whilst the figures derived from a computer simulation may not represent all the real-world factors such as shock-loading, and the downward angle from boom to deck, they do explain why it’s important to take your preventer line as far forward as possible.

Preventer arrangement aboard the yacht Platino
Platino’s preventer consisted of two parts: a pennant attached to a strong point on the boom, and a long extending line. It was the extending line which parted. Whilst the pennant was specifically for use as a preventer, the extending line was an old line which had been re-purposed. Even new, it would have been considerably weaker than then pennant. The pennant and the extending line were connected using bowlines. This is identified as the likely point of failure – a bowline can reduce the strength of a line by up to 70%.
Platino’s preventer also failed on the deck fitting. The bolts holding the padeye for the block onto the toe rail sheared off. The report found that this padeye had not been intended to be part of the preventer system and was not strong enough for this purpose.
The report also included figures from Harken, showing that a block deflecting a line by 30º will experience 52% of the force on the line, while at 60º this is 100% (the same load) and at 180º this is 200%, or double the load. With Platino’s preventer rigged to the shrouds, this would increase the load on the deck fitting and block to nearly 9 tonnes.
Lessons learned from accidents at sea
These reports make detailed investigations into the causes of each accident and are well worth reading. Each incident is different, and there are a combination of factors including interactions between crew members, the weather, and unforeseen gear failure which contribute to each one. As well as the individual conclusions drawn in the reports there are some lessons we can draw from looking at the incidents as a whole.

On most cruising yachts, the boom is high enough not to be a major hazard, compared to the falls of the mainsheet during a gybe. Photo: Rachael Sprot
1 Mainsheet hazard
It’s a misconception that the boom is the main hazard of downwind sailing. Whilst being struck by the boom during a crash gybe on a yacht would probably be fatal, on most modern cruisers it’s well above head height.
It is the metres of slack in the mainsheet which is more likely to injure people. This is not always appreciated by novice crew, who may position themselves near the traveller, not realising the potential for the mainsheet to swing through this area. Crew need to keep clear of the danger zone, and crew can assist each other by speaking out when someone is in an unsafe position. Identifying a safe line, such as forward of the primary winches, makes it easier for crew to follow.
2 Helm experience
In the first three incidents the helmsperson was inexperienced. Downwind sailing, especially with any kind of wave or swell conditions, is challenging and novice sailors cannot be left unattended.
Even an experienced helm may struggle on a new boat, or in new environments, such as making the transition to ocean sailing.
If in doubt, the sail plan and course can be adjusted to better match crew competence.

Performance orientated yachts, such as this Beneteau First 40.7 similar to Liquid Vortex, have the mainsheet on a full-width traveller just ahead of the mainsheet. Photo: Yachting World
3 Cockpit layout
It’s noticeable that none of these incidents occurred on a yacht with a coachroof-mounted mainsheet. The location of the traveller in or aft of the cockpit considerably increases the risk of an injury to crew in the event of a crash gybe. Many modern yachts used in charter fleets and sailing schools now have such centre mainsheets.
However, many performance cruisers, racing yachts and older boats often don’t, and extreme vigilance is required when sailing them. Sailors who have predominantly sailed yachts with centre-mainsheet yachts may not be so familiar with the risks of the traveller and mainsheet, and will need additional briefings.
4 Distraction
In the case of Liquid Vortex and CV21, there was activity going on outside the cockpit: attempting to unwrap the spinnaker in the case of Liquid Vortex, and the pre-reef briefing in the case of CV21.
Whilst helm distraction is not explicitly mentioned in either report, in my experience any other event occurring on deck can draw the helm’s attention away from the task in hand and needs to be recognised as a risk factor. Autopilots won’t get distracted, but they may also struggle in strong winds or large sea states.

Angles of deflection around turning blocks
5 Double gybe
In three of these incidents there was more than one gybe reported. In the immediate shock of a crash gybe the helm may not have regained control of the vessel, or they may instinctively return to the original course. Whatever the reason, the risk of a second crash gybe needs to be recognised by those on deck. If there’s a preventer on, and it holds, then quickly gybing back again is the best way to recover the situation.
During a crash gybe where the boom follows through it is much safer to stabilise the boat on the new gybe whilst checking for injuries and damage before attempting a controlled gybe back again.
6 Sail plan
Winds over Force 5 were present in all of the accidents. CV21 was making 11 knots SOG prior to the accident, so the apparent wind would have been much less than the true wind. Whilst this it isn’t mentioned in the reports, the difference between true and apparent wind can lull us into a false sense of security.
Reefing early and reducing the power of the mainsail reduces the loads on the preventer in the case of a crash gybe and gives it the best chance of working. Dropping the main entirely and running under headsail alone is an option which is often favoured by short-handed, novice or cruising crews.

Being over-powered is one of the most likely causes of either a broach or an accidental gybe. Photo: David Harding
7 Being over-powered
Being over-powered is also a risk factor for losing control of the boat. If the boat is continually broaching, a novice helm will often over-steer. As was the case in the incident aboard Buccaneer of Upnor, when a gust subsides and the vessel starts to respond to the rudder, the helm needs to straighten up quickly.
In gusty conditions an extra reef may slow the boat down in the lulls, but it should mean that things are more controlled in the gusts.
8 Early warning signs
Train your crew to recognise the early warning signs of a crash gybe: the helm feeling lighter; the vessel coming upright and perhaps heeling the wrong way; and the headsail collapsing. Let them know the safe way to turn when in doubt. Turning into the wind too much is noisy and annoying, but turning away from the wind too much is dangerous. Let them err on the side of caution and if they can’t safely sail the course you want, then change the helm, the sail plan, or the route.
9 Dropping the mainsail downwind
Whilst dropping the mainsail to eliminate the consequences of a crash gybe is a good idea, it’s difficult once a large following sea has developed, and these are the exact conditions under which you would want to drop it in. Rounding up enough to drop the mainsail could be dangerous in certain conditions. Coming up onto a beam reach with the headsail sheeted in hard might be enough to back-wind the mainsail and push it off the shrouds, but the sea state might not allow this.
Dropping the mainsail downwind is possible on smaller yachts, but you need to physically drag the luff down as the sail will press against the shrouds. On larger yachts it’s extremely difficult to do unless you have downhauls ready-rigged on the reefing points. So it might be that on longer offshore passages you’re committed to having the mainsail up.
Rules to remember
- Brief the crew on the hazard of the mainsheet and traveller
- Use experienced helms during any manoeuvre, including the briefing
- Identify and enforce ‘Danger Zone’
- Supervise novice helms
- Sail safer angles (such as 120° instead of 150° apparent) when other activities are taking place
- Reef early even though the apparent wind strength may be low
- Drop the mainsail and proceed under headsail alone
- Set a preventer with strong lines and well-thought-through layout
Enjoyed reading this?
A subscription to Yachting Monthly magazine costs around 40% less than the cover price, so you can save money compared to buying single issues .
Print and digital editions are available through Magazines Direct – where you can also find the latest deals .
YM is packed with information to help you get the most from your time on the water.
- Take your seamanship to the next level with tips, advice and skills from our experts
- Impartial in-depth reviews of the latest yachts and equipment
- Cruising guides to help you reach those dream destinations
Follow us on Facebook , Twitter and Instagram.
- Grand Rapids/Muskegon
- Saginaw/Bay City
- All Michigan
2 unresponsive in Lake Michigan after capsized sailboat found, search continues
- Updated: Jul. 16, 2024, 9:26 a.m.
- | Published: Jul. 15, 2024, 3:19 p.m.

U.S. Coast Guard and partner agencies are searching for an adult and two children from an overdue 18-foot sailing vessel that originally departed from Green Island in Green Bay, Wisconsin, at approximately 4 p.m. on July 13. U.S. Coast Guard
- Justine Lofton | [email protected]
UPDATE: Bodies of 2 children recovered from Lake Michigan after capsized sailboat found
Two people were found unresponsive in Lake Michigan today hours after a capsized sailboat was recovered, officials said. They were miles from where the boat was found.
The search continues for a third person who was aboard the vessel, according to the U.S. Coast Guard Great Lakes Sector .
Bill Salnik, 32, of Little Suamico, Wis., and his children, ages 3 and 5, were last heard from around 4 p.m. Saturday when they departed from Green Island in Lake Michigan’s Green Bay. They were expected to return to a marina near Oconto, Wis., but never arrived.
RELATED: Air search underway for missing dad, 2 young children after capsized sailboat found in Lake Michigan
Salnik’s truck and trailer were found at the boat launch. His phone was going straight to voicemail.
Officials were notified that they were missing just before 5 p.m. Sunday and a search began.
The capsized 18-foot Gulf Coast Sailboat was found capsized at 6:22 a.m. today just south of Chambers Island. It was towed to shore.
No one was found near the vessel. The search continued.
USCG announced at 2:42 p.m. that two individuals had been found and recovered about three nautical miles away from the recovery site of the vessel.
Search efforts continue on the water and from the air for the third missing person.
Officials did not specify who has been found and who remains missing.

Most Popular Stories by Justine Lofton
- Skip the entry line: This Lake Michigan state park has miles of beach spots
- Bodies of 2 children recovered from Lake Michigan after capsized sailboat found
- Air search underway for missing dad, 2 young children after capsized sailboat found in Lake Michigan
If you purchase a product or register for an account through a link on our site, we may receive compensation. By using this site, you consent to our User Agreement and agree that your clicks, interactions, and personal information may be collected, recorded, and/or stored by us and social media and other third-party partners in accordance with our Privacy Policy.
- Search Please fill out this field.
- Manage Your Subscription
- Give a Gift Subscription
- Newsletters
- Sweepstakes
:max_bytes(150000):strip_icc():format(webp)/adrianne-curry-antm-cycle1-ebd0307590464bc68b6ef972576cfc12.jpg "sailboat 5 knots")
- Human Interest
- Real People
- Real People Tragedy
Bodies of Children, 3 and 5 Years Old, Recovered, Dad Still Missing After Sailboat Capsizes in Wisconsin
The children's bodies were found more than 48 hours after their boat set sail
The bodies of a 5-year-old daughter and a 3-year-old son were recovered on Monday, July 15, following a search and rescue mission for a missing sailboat near Chambers Island, Wis., according to the Door County Sheriff’s Office . The search for their father continues.
Bill Salnick, 32, and his children, 5 and 3, went missing around 1 p.m. on Saturday, July 13. Although police withheld the names of the children in their initial statement, they were identified as Charlotte and Josh by a GoFundMe created by Salnick's mother, Tina.
The 18-foot Gulf Coast sailboat, My Lady Blue, they were sailing in was found around 6:20 a.m., just south of Chambers Island in Gibraltar, Wis., the sheriff's office said. The children's bodies were discovered at around 11:20 a.m., "one mile south of where the boat had been found."
Oconto County Sheriff's Offic
The family left the Oconto boat launch on My Lady Blue around 10 a.m. Saturday. The search for Salnick and his children began after the Oconto County Sheriff’s Office was notified that an overdue boater had left the Oconto Harbor, per the OCSO’s Facebook statement . Oconto County is west of Door County and across from Green Bay.
The United States Coast Guard (USCG), Wisconsin Department of Natural Resources, City of Oconto Police Department, Oconto County Emergency Management, Marinette County Sheriff’s Office and Dispatch Center and Oconto Fire & Rescue assisted with OCSO’s search.
Beginning Sunday, the USCG searched the Bay of Green Bay and expanded into Door County's jurisdictional waters. The Door County Sheriff’s Office, Door County Emergency Services and Town of Gibraltar Fire Department then joined the search.
The search for Salnick will continue on land, water and air on Tuesday morning.
Never miss a story — sign up for PEOPLE's free daily newsletter to stay up-to-date on the best of what PEOPLE has to offer, from celebrity news to compelling human interest stories.
Representatives for Door County Sheriff’s Office and the Oconto County Sheriff’s Office did not immediately respond to PEOPLE’s request for more information.
Related Articles
Chicago to Mackinac sailboat race: Storm snaps masts, tosses sailor into Lake Michigan
A fast-moving summer storm Saturday night on Lake Michigan left carnage in its path after three huge sailboats snapped masts and a fourth boat had to rescue a man after he fell overboard, all in the middle of the night under total darkness during the first day of the Chicago to Mackinac race .
“It was about 11:30 Eastern Time and we outpaced a couple storms. The team was getting ready … when a squall hit us. The wind picked up from about 18 knots to over 30 knots and shifted 80 degrees,” Skip Dieball, 53, of Wilmette, Illinois, a tactician racing on the 52-foot Usual Suspects, said on Sunday. “Sometimes in the daytime, you can see some of the shifts coming, the wind pattern on the water. But it was so dark we couldn’t see anything. We told each other we would prepare early. We were, and it just came really fast.”
Disaster was averted after Madcap, a Santa Cruz 52 owned and skippered by John Hopkins, responded to a man overboard report from Callisto, a J/125 owned and skippered by Jim Murray. Both boats resumed racing the 333-statute-mile (289-nautical-mile) race without injury.
In addition to Usual Suspects, owned by Eric Wynsma, masts broke on the 65-foot Sagamore owned by Laura and Tone Martin, along with the 45-foot Sapphire, owned by Robert Radway. No injuries were reported, according to Laura Muma, communications director for the Chicago to Mackinac race.
Despite being on high alert to take down sails, the demasting events were intense.
‘Loud as the loudest thunder’
As soon as the mast snapped, Dieball said the crew started doing a head count to be certain all 13 sailors were still onboard. The rig could have come down on the crew if they had been in their normal stations, but they were scattered. While the mast “broke violently,” Dieball said, “it did not come down violently.”
The race boat, with its custom carbon fiber mast, strong and light but brittle, is designed for high-performance racing and often used in America’s Cup races.
When the mast broke, it sounded like a “crack of thunder” immediately overhead, Dieball said. “It’s as loud as the loudest thunder.”
When the mast settled, the crew had to rapidly assess next steps. The biggest fear is that the broken mast will bang against the boat and puncture a hole, Dieball said. A mast on a boat that size can be 60 or 70 feet tall, he said.
“Part of your safety equipment is having cutting devices that get the mast away from the boat. The mast had broken in three different spots and it was time to start cutting things away,” Dieball said. “Carbon fiber, in many ways, is sharper than steel. We had to make sure no one was in a spot where one of the pieces would actually cut them.”
So sailors took out cutting tools and knives they’re required to carry as part of the racing protocol — and sliced away rigging as fast as possible, letting material sink into the water.
‘Survival mode’
Skipper Eric Wynsma, a real estate developer from Grand Rapids, had three of his grown kids racing, too. This was his 25th Chicago to Mackinac race.
“We were just in survival mode,” Dieball said, cutting away for about 30 minutes. “After the (storm) cell went through, the wind died off. So it wasn’t like we were battling elements. We were into the race about nine hours, finishing about a third of the course, and we returned to Muskegon.”
After stabilizing the situation, the Usual Suspects crew contacted the U.S. Coast Guard and reported debris in the water. The race boat didn’t need assistance once the rigging was cut away, Dieball said. They made certain nothing was wrapped around the propeller and Usual Suspects spent the next three hours motoring back, arriving about 5 a.m.
No one was freaking out, Dieball said. “It was all business.”
The costly damage prevents Usual Suspects from racing the Bayview Mackinac race from Port Huron to Mackinac, which starts Saturday.
Fast Tango fights DeTour
Tim Prophit , of St. Clair Shores, owner and skipper of the 40-foot Fast Tango, didn’t get slammed by the storm, but his nine-member crew prepared by making sail changes and reefing the main sail for better control.
“All of a sudden, the waves felt different, a different pattern, a different height. And the temps dropped,” he said Sunday while racing. “We were paying very close attention to the weather.”
Fast Tango won its class and placed second overall in the Chicago to Mackinac race last year, and was the overall winner in the Port Huron to Mackinac race.
This year, Fast Tango is battling the 34-foot DeTour, owned by Chuck Stormes, of Grosse Pointe Farms, no stranger to winning class and overall trophies.
Christy Storms said early Sunday afternoon she couldn’t look at the tracker to see how her husband was doing. It made her crazy. She didn’t know there had been a storm, she said, thank God, or she would have been worried sick.
“This is the first year I’ve been trying to not stalk him,” she said. “It’s tough looking every minute. It just makes me crazy.”
Family members are known to sleep with their phones under their pillows, call and text each other every hour through the night until the race is finished.In years past, Christy Storms said, “it was like crack. It just make me so anxious.”
So, she went online, noticed he was doing great, took a snapshot of the tracker, put her phone down and went to bed with their 11-year-old dog Striker.
Early Monday, Prophit confirmed that Fast Tango won first in class against 11 competitors. They crossed the finish line in 41 hours, 59 minutes, 47 seconds.
Chaos on other boats, too
Following the storm, 15- to 20-knot southerly winds continued to propel the 247-boat fleet north, Muma said in the race update.
While mast loss made headlines with sailing reporters, other boats had serious issues that went unreported. And they kept going, hoping for the best.
Mark DenUyl, of Marysville, Michigan, owner and skipper of the 34.5-foot Good Lookin’, watched his carbon fiber bowsprit snap in half during the high winds right about 11:30 p.m. Saturday. Now it’s held together with electrical tape and sail tape.
Crew member Brennan Churchill, 22, texted his dad at home in Kimball, Michigan, with an update on the damaged equipment used to extend the sail, so it captures more wind.
“He knew better than to tell his mother,” Tracy Heany Churchill said Sunday. “He knows I go into freakout mode.”
Ron Churchill always sails with his son, who won his first Mackinac race at age 15, but Ron couldn’t leave work as a senior operations manager for a natural gas storage facility to do both the Chicago and Port Huron races to Mackinac.
“I feel like I’m lost right now. I just feel like I’m supposed to be there,” Ron Churchill said Sunday.
Brennan Churchill described the boat tipping so far to one side that the crew was in waist-deep water, his father said. “Everybody stayed on the boat. Water was washing over them.”
The sudden gust of wind created such force that it likely flexed and snapped, he said. As a result of the damage, the crew held steady until daylight to try and figure out what to do, Churchill said. “They did a good job with just staying composed and keeping the boat moving well.”
On Monday morning, Good Lookin’ crossed the finish line in third in class against a dozen other J/105 boats despite damage to critical equipment.
Cara DenUyl and her 19-year-old daughter, Riley, woke up at 5:30 a.m. Monday to watch online the Good Lookin’ finish. “It was a nail-biter. It was close between second and third. They were in second place at 2 a.m. Sunday, when that storm hit. Then they fell back all the way to seventh place. At the time, we didn’t know the storm had hit. Somehow they got everything fixed enough to keep going, thankfully. I feel relief that they made the podium.”
‘Breathtaking’ speed
With storms come great wind. Or, in sailor speak, great air.
Winn Soldani, race chair of the Chicago to Mackinac race, said this weekend’s storms brought “epic” conditions that weather models predicted, which is important for safety.
“We’re watching boats going 20 knots, or about 23 mph, and it’s breathtaking,” Soldani told Shifting Gears from the finish line near the Mission Point hotel on Mackinac Island on Sunday.
“When the squalls hit, the wind changed direction very rapidly, from out of the south to out of the west, at 33 to 35 mph,” he said. “Some of these sails are the size of tennis courts. They’re huge. So this changes pressure on the mast.”
That’s what causes masts to snap, Soldani said. Strict safety protocols protect the 2,200 sailors racing this year, and that’s why they’re required to wear special tracking devices on their bodies at all times.
Storm winds create record-setting conditions
As a result of the strong winds, this race broke the speed record.
The 80-foot Maverick finished in 22 hours, 24 minutes, 23 seconds, breaking a record set 22 years ago by 66 minutes, 11 seconds.
Sanford Burris, of Kirtland, Ohio, sailed with his sons and friends on the carbon fiber Andrews 80 they have spent the past three years upgrading, according to Muma. The 20-person crew included Rodney Keenan, founder of Evolution Sails.
“The team celebrated briefly as the Maverick team crossed the race to Mackinac finish line between Mackinac Island and the Round Island lighthouse … and then kept on sailing,” said the Chicago to Mackinac news release.
Maverick is one of 25 sailboats registered for this year’s “Super Mac” race, a combination of the Chicago Mackinac and the Bayview Mackinac races, which means they will continue into Lake Huron, heading south to Port Huron, for a total of 565 statute miles (495 nautical miles).
More: Star Line Mackinac Island Ferry Co. sells to Florida billionaire
Phoebe Wall Howard, a Free Press auto reporter for nearly seven years, now writes a column on car culture, consumer trends and life that will appear periodically on Freep.com and in print. Those columns and others will appear on her Substack at https://phoebewallhoward.substack.com/about Contact her at [email protected].

- CLASSIFIEDS
- NEWSLETTERS
- SUBMIT NEWS

British Classic Week 2024 - Day 2

Related Articles
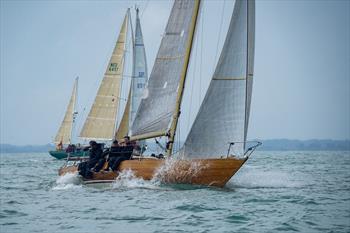
World champion surfer says he is lucky to be alive after being run over by a boat
HONOLULU ( KHNL /Gray News) - A well-known Maui waterman is recovering after being injured in the waters off Maui’s North Shore.
Zane Schweitzer, 30, says he was out training for a stand-up paddling competition last Tuesday when the accident happened.
According to Schweitzer, he came upon a group of dolphins that were riding on the same swell as him and he took advantage of the rare and beautiful moment and jumped off his board to look below the surface.
However, his escort boat had also turned around during this moment and was suddenly headed back toward him.
“They probably also noticed the dolphin pod,” he said. “I only had time to lift my head and put my hands in front of my face before the boat hit me.”
Schweitzer said he suffered several hairline fractures and cuts from the propeller blade on his face and back.
The prop and the engine got me on my back, and the lower part of the body,” he said.
While in the hospital, Schweitzer missed attending the ESPY awards in Los Angeles, where fellow Maui surfers were honored for helping their community after the Lahaina wildfire disaster. He also missed the Paddle Imua contest.
The champion surfer says his rehab will take about two months, but he is grateful to be alive.
“At the end, I have nothing but love and forgiveness for all parties involved, including the boat operator,” Schweitzer said.
He’s now sharing his story, hoping to help others avoid preventable mistakes.
“It’s not always the 100-foot waves or the gale-force winds that are the biggest dangers in the water,” he said. “It’s the choices we make and the people we surround ourselves with, and we have to be really cautious.”
Schweitzer has received more than 1,000 well-wishes online. He wants to thank everyone and says he plans to get back in the water as soon as possible.
“As watermen, we always have to find a lesson to walk away from. I consider this situation a win in that I was fortunate to walk away from it,” he said.
Copyright 2024 KHNL via Gray Local Media, Inc. All rights reserved.

Father may have been distracted by PlayStation when toddler died in hot car

SLED investigating officer-involved shooting in West Ashley

Coroner IDs woman killed in West Ashley motorcycle crash

Police make DUI arrest after 2 vehicles overturn in West Ashley crash

Deputies investigate Charleston Co. pursuit that ended in driver’s death

Marine units recover body from Waccamaw River during search for missing man

Coroner identifies elderly man killed in Dorchester County crash

‘It’s baffling’: SC teachers call for changes to contract process
Latest news.

Isle of Palms plans to spend $1 million in beach renourishment on inlet rebuilding

Dorchester Co. increases citizen call center volunteers

Charleston nightclub shut down by city for unlawful business operations

VIDEO: Dorchester Co. increases citizen call center volunteers

RAW VIDEO: Rep. Nancy Mace speaks at Republican National Convention

VIDEO: Charleston nightclub shut down by city for unlawful business operations

Summerville man sentenced for possessing hundreds of child porn images

Judge denies motions to dismiss, alter charges against Charleston hit-and-run suspects

A Bronze Age-style ship just sailed through the Persian Gulf 4,000 years after it was designed
Sign up for CNN’s Wonder Theory science newsletter. Explore the universe with news on fascinating discoveries, scientific advancements and more .
Writings on an ancient clay tablet have allowed experts to reconstruct a Bronze Age ship made of reeds and sail it on a maiden voyage off the coast of Abu Dhabi, United Arab Emirates.
The vessel, known as a Magan boat, spans 59 feet (18 meters) in length and was assembled by a team of 20 specialists using techniques that date back to 2100 BC, when the Persian Gulf became part of global maritime trade across the ancient world.
Magan was once the name for a region that now encompasses the UAE and Oman. Magan boats were large and strong enough to enable the exchange of goods such as copper, textiles and semiprecious stones 4,000 years ago between societies living in Mesopotamia and the Indus Valley in what is now Iraq, Pakistan and India, respectively.
And now, archaeologists, anthropologists, engineers, scientists and digital humanities experts have proven that ancient shipbuilding techniques can result in a seaworthy vessel. It is the world’s largest reconstruction of a Bronze Age Magan boat, according to the team.
“We gained a much deeper knowledge of the materials used to build such boats to better understand the strengths and weaknesses of these revolutionary craft,” said Eric Staples, associate professor within the college of humanities and social sciences at Zayed University in Abu Dhabi, in a statement.
“We also gained a much deeper appreciation for the ingenuity and courage of the ancient shipbuilders and seafarers of the Bronze Age that built and sailed these vessels in the Bronze Age, connecting the first civilizations of the world in the process.”
The project to design, construct and sail the ship began in 2021 as a collaboration between the Zayed National Museum, New York University Abu Dhabi and Zayed University. The research project’s goals were to uncover ancient craftsmanship techniques, determine the connections between Bronze Age societies and better understand the role Abu Dhabi once played in Bronze Age trade.
Assembling an ancient vessel
Recent archaeological discoveries have shown that the island of Umm an-Nar, located off the coast of Abu Dhabi and once the largest ancient port in the region, played a key role in trade thousands of years ago.
Finds such as stone axes, copper fish hooks, grinding stones and pierced stone disks to weigh fishing nets, along with imported pottery vessels from Mesopotamia and South Asia, point to trade that occurred over long distances.
Researchers were also intrigued by a tablet on display at the British Museum, which came from the ancient Sumerian city of Girsu in what’s now Iraq. The tablet is essentially an invoice or dockyard order, written in Sumerian language, requesting large quantities of supplies needed to build the “boats of Magan.”
The list included palm fiber, goat hair, reeds, four types of wood, leather, palm leaf matting and palm rib decking, linseed oil, sesame oil, animal fat and a mineral called bitumen. The team behind the reconstruction used ancient illustrations of boats for reference and assembled a boat with the capacity to carry 36 tons (32,659 kilograms).
Like decoding an old recipe, the team put all the information from the list and their reference materials together to draw up a plan.
Shipwrights well-versed in historical replicas helped build the boat using hand tools without relying on modern advances or techniques. They constructed the ship’s outer hull using 15 tons (13,607 kilograms) of locally sourced reeds, which were soaked and stripped of their leaves before being crushed and tied in long bundles with rope made from palm fiber.
The shipbuilders then lashed dozens of bundles to wood frames, coating them in bitumen to help with waterproofing. Samples of bitumen also had been found on Umm an-Nar. Researchers came up with over 100 bitumen recipes to get the waterproofing technique just right.
The team also tested the strength of the ropes and reed bundles to determine how large they should be and carried out water immersion experiments to see how heavy the hull would become once it absorbed water.
The team was overjoyed by how well the ship fared when it finally took to the sea on March 2, said Robert B. Jackson, photographer and health and safety officer.
“For the first time in 4,000 years, a reed, wood, and bitumen merchant ship was sailing the waters of the Gulf,” Jackson said in a statement.
A historic crossing
The ship’s sail is made of goat hair and weighs 280 pounds (127 kilograms), which required more than 20 people to lift the sail and rigging to make up for the fact that pulleys didn’t exist during the Bronze Age.
“It has been a long and exciting journey from discovering ancient fragments of Magan boats on the island of Umm an-Nar to the iconic moment the boat’s goat hair sail was raised and she set sail from the coast of Abu Dhabi, traversing the same route these monumental vessels would have travelled 4,000 years ago towards the open sea and the coastline of India,” said Dr. Peter Magee, director of Zayed National Museum, in a statement.
Sea trials are designed to test the strength and limits of vessels. After passing five days of trials, the ship sailed toward Saadiyat Island off the coast of Abu Dhabi and the open sea on March 2 and 3. The boat covered 50 nautical miles (92.6 kilometers) and reached speeds of up to 6.4 miles per hour (5.6 knots).
Champion Emirati sailor Marwan Abdullah Al-Marzouqi was one of the ship’s captains during its sea trials. His family has been connected with the UAE’s maritime heritage for generations.
“When we first towed the boat out from the jetty, we were very careful,” Marzouqi said in a statement. “I was very aware it was made from only reeds, ropes and wood — there are no nails, no screws, no metal at all — and I was afraid of damaging her. But as we got under way, I soon realised that this was a strong boat. I was surprised by how this big boat, weighed down with a heavy ballast, moved so smoothly on the sea.”
The next voyage
Capt. Abdallah Alremaithi called the experience of sailing and navigating aboard the Magan boat “a journey through time” that made the challenges of ancient seafaring a reality, including how much effort it would have taken to sail such ships across the ocean.
Researcher Ayesha Almansoori, one of five women who sailed on the ship, called the final docking a “poignant moment” as the unique experience came to an end after years of bringing the vessel to life.
The project, which the pandemic initially delayed, faced multiple hurdles, said project manager Tayla Clelland, including the hunt for authentic materials and efforts to assemble them without any modern advancements.
Now that the ship has completed its sea trials and maiden voyage, it will be displayed at the Zayed National Museum, the UAE’s new national museum being constructed on Saadiyat Island.
The museum will include insights into the Persian Gulf’s maritime history and the cultural connections it enabled, and the ship and its journey “represents thousands of years of Emirati invention and exploration,” said Mohamed Khalifa Al Mubarak, chairman of the Department of Culture and Tourism in Abu Dhabi.
“I felt as though we were breathing life into history, bridging the gap between the distant past and the present,” Clelland said in a statement. “Seeing the Magan Boat sail on the water for the first time actually took my breath away and brought tears to my eyes.”
Correction: A previous version of this article misstated what bitumen is.
For more CNN news and newsletters create an account at CNN.com

COMMENTS
Emily breaks down the 5 knots we used aboard our antique sailboat, including a couple that most sailors have never heard of. Learn why we chose these ones, a...
The most useful knot aboard a sailboat is the bowline. It forms a fixed noose at the end of a line that cannot run or slip and is commonly used, for example, to secure sheets to the clew of a headsail.
Unleash your inner sailor with Bill Ibsen's guide to 9 essential knots. From bights to bitter ends, master the art of knot tying.
Learn how and when to use these five important sailing knots. Watch videos on how to tie the cleat hitch, figure 8 and more.
Square Knot (or Reef Knot) This is about the most basic knot, and one of the most useful. The square knot is for connecting the bitter end of two lines together and is quick to tie and easy to remove. One common use is tying reef lines around a slab reefed sail, hence the second name for it. For anything you need to through a quick loop around ...
How to tie, and knowing when to use the right knot is the key to successful knot tying! Our 5 most common used sailing knots and how we use them. We offer Co...
Learn how to tie the top 5 essential knots for sailing and boating. Learn to tie a cleat hitch knot, clove hitch and Figure-8 Stopper knots!
Here are 5 basic sailing knots that every sailor must know. These sailing knots are essential for beginners to learn, and every ol' salt uses one or more of these knots every day on a sailboat. They'll save your sails, ensure a good mooring, and might even save a life. So what are the most essential sailing knots every sailor must know?
Master the art of sailing knots with our comprehensive guide. Learn essential knots, step-by-step instructions, and tips for becoming a skilled sailor. Get started now!
Boating Knots. The selection of Boating Knots is based on many years of sailing combined with feedback and advice from several helpful captains around the world.
Knowing the different types of sailing knots, learning how to properly tie them, and how to use them effectively are some of the most priceless skills that every sailor should acquire.
There are as many sailing knots as there are stars in the night sky. ASA's Knots Made Easy videos illustrate how to tie knots (bowline, reef knot, figure eight) & scenarios where each knot is useful when sailing onboard a sailboat.
The best list of the most important boating and sailing knots. Complete with images, descriptions, and instructions!
A good knot is a secure one, with excellent holding power. It should also come untied quickly so that the line can be used. There are many knots used in sailing, but these six common, easy-to-tie, and important sailing knots will handle most, if not all, of your needs. Learn the knots well because an improperly tied knot is useless or worse.
Boating safely requires essential skills, including docking, securing safety lines, or hoisting sails if you plan to operate a sailboat. To successfully dock a boat, you need to know how to tie knots that keep your boat secured and untie easily when it's time to launch again.
Our quick guide to 5 basic boating knots every boater should know how to tie.
Every boat owner needs to know how to perform some important tasks, like docking a boat, tying up a boat, and anchoring a boat. All of these endeavors and many other common boating procedures share one thing in common: they involve handling lines. And just about any time line-handling is involved, knot tying may be, too. Here are the five most commonly used boating knots.
This chapter reviews the basic knots on a sailboat and shows you how to tie them. On most boats, you can find a bowline, a figure-eight knot, a square knot, and maybe a couple of half hitches somewhere.
Boating knots are essential skills for anyone venturing on the water, whether you're steering a small dinghy or commanding a large sailboat. The ability to tie reliable knots ensures safety, efficiency, and the effective management of your vessel under various conditions. There are five fundamental knots that every boater and sailor should master: the Bowline, Cleat Hitch, Clove Hitch, Half ...
Basic types of sailing knots, best nautical rope knots, how to tie nautical knots with simple diagrams, common knots to know for sailing and their uses
The ideal wind speeds for sailing are: most comfortable sailing: 5 - 12 knots. absolute beginners: under 10 knots - anything under 10 knots prevents capsizing. for more serious training: 15 - 20 knots. for heavy offshore boats: 20 - 25 knots - anything under 12 and the boat doesn't even come to life. 25 knots and up is considered rough for any ...
Knowing how to tie proper knots is not only a point of pride for most sailors but also a key safety measure. The good news is that you don't need to memorize hundreds of knot...
Tell the truth — how many different knots do you use boating? For most boaters, the answer is two or maybe three, counting a cleat hitch, which is the actual name of the knot used to attach a line to a cleat. The fact is that most of us know and use more fishing knots than we do boating knots. And we get by just fine that way.
6 Sail plan. Winds over Force 5 were present in all of the accidents. CV21 was making 11 knots SOG prior to the accident, so the apparent wind would have been much less than the true wind. Whilst this it isn't mentioned in the reports, the difference between true and apparent wind can lull us into a false sense of security.
Two people were found unresponsive in Lake Michigan today hours after a capsized sailboat was recovered, officials said. They were miles from where the boat was found.
Two young children's bodies were recovered in Door County, Wisconsin on Monday, June 15 after their family sailboat went missing on Saturday. Their father, Bill Salnick, 32, is still missing.
Chicago to Mackinac sailboat race: Storm snaps masts, tosses sailor into Lake Michigan ... The wind picked up from about 18 knots to over 30 knots and shifted 80 degrees," Skip Dieball, 53, of ...
Day 2 of British Classic Week began with ominous grey clouds, 1.5m+ swell, and 25+ knots. Race Officer Peter Saxton made the decision to adapt the scheduled Around the Island Race into long passage races in the comparative shelter of the Solent.
The champion surfer says his rehab will take about two months, but he is grateful to be alive. "At the end, I have nothing but love and forgiveness for all parties involved, including the boat operator," Schweitzer said.
The boat covered 50 nautical miles (92.6 kilometers) and reached speeds of up to 6.4 miles per hour (5.6 knots). Champion Emirati sailor Marwan Abdullah Al-Marzouqi was one of the ship's ...