No products in the cart.
Sailing Ellidah is supported by our readers. Buying through our links may earn us an affiliate commission at no extra cost to you.

The Standing Rigging On A Sailboat Explained
The standing rigging on a sailboat is a system of stainless steel wires that holds the mast upright and supports the spars.
In this guide, I’ll explain the basics of a sailboat’s hardware and rigging, how it works, and why it is a fundamental and vital part of the vessel. We’ll look at the different parts of the rig, where they are located, and their function.
We will also peek at a couple of different types of rigs and their variations to determine their differences. In the end, I will explain some additional terms and answer some practical questions I often get asked.
But first off, it is essential to understand what standing rigging is and its purpose on a sailboat.
The purpose of the standing rigging
Like I said in the beginning, the standing rigging on a sailboat is a system of stainless steel wires that holds the mast upright and supports the spars. When sailing, the rig helps transfer wind forces from the sails to the boat’s structure. This is critical for maintaining the stability and performance of the vessel.
The rig can also consist of other materials, such as synthetic lines or steel rods, yet its purpose is the same. But more on that later.
Since the rig supports the mast, you’ll need to ensure that it is always in appropriate condition before taking your boat out to sea. Let me give you an example from a recent experience.
Dismasting horrors
I had a company inspect the entire rig on my sailboat while preparing for an Atlantic crossing. The rigger didn’t find any issues, but I decided to replace the rig anyway because of its unknown age. I wanted to do the job myself so I could learn how it is done correctly.
Not long after, we left Gibraltar and sailed through rough weather for eight days before arriving in Las Palmas. We were safe and sound and didn’t experience any issues. Unfortunately, several other boats arriving before us had suffered rig failures. They lost their masts and sails—a sorrowful sight but also a reminder of how vital the rigging is on a sailboat.
The most common types of rigging on a sailboat
The most commonly used rig type on modern sailing boats is the fore-and-aft Bermuda Sloop rig with one mast and just one headsail. Closely follows the Cutter rig and the Ketch rig. They all have a relatively simple rigging layout. Still, there are several variations and differences in how they are set up.
A sloop has a single mast, and the Ketch has one main mast and an additional shorter mizzen mast further aft. A Cutter rig is similar to the Bermuda Sloop with an additional cutter forestay, allowing it to fly two overlapping headsails.
You can learn more about the differences and the different types of sails they use in this guide. For now, we’ll focus on the Bermuda rig.
The difference between standing rigging and running rigging
Sometimes things can get confusing as some of our nautical terms are used for multiple items depending on the context. Let me clarify just briefly:
The rig or rigging on a sailboat is a common term for two parts:
- The standing rigging consists of wires supporting the mast on a sailboat and reinforcing the spars from the force of the sails when sailing.
- The running rigging consists of the halyards, sheets, and lines we use to hoist, lower, operate, and control the sails on a sailboat.
Check out my guide on running rigging here !
The difference between a fractional and a masthead rig
A Bermuda rig is split into two groups. The Masthead rig and the Fractional rig.
The Masthead rig has a forestay running from the bow to the top of the mast, and the spreaders point 90 degrees to the sides. A boat with a masthead rig typically carries a bigger overlapping headsail ( Genoa) and a smaller mainsail. Very typical on the Sloop, Ketch, and Cutter rigs.
A Fractional rig has forestays running from the bow to 1/4 – 1/8 from the top of the mast, and the spreaders are swept backward. A boat with a fractional rig also has the mast farther forward than a masthead rig, a bigger mainsail, and a smaller headsail, usually a Jib. Very typical on more performance-oriented sailboats.
There are exceptions in regards to the type of headsail, though. Many performance cruisers use a Genoa instead of a Jib , making the difference smaller.
Some people also fit an inner forestay, or a babystay, to allow flying a smaller staysail.
Explaining the parts and hardware of the standing rigging
The rigging on a sailing vessel relies on stays and shrouds in addition to many hardware parts to secure the mast properly. And we also have nautical terms for each of them. Since a system relies on every aspect of it to be in equally good condition, we want to familiarize ourselves with each part and understand its function.
Forestay and Backstay
The forestay is a wire that runs from the bow to the top of the mast. Some boats, like the Cutter rig, can have several additional inner forestays in different configurations.
The backstay is the wire that runs from the back of the boat to the top of the mast. Backstays have a tensioner, often hydraulic, to increase the tension when sailing upwind. Some rigs, like the Cutter, have running backstays and sometimes checkstays or runners, to support the rig.
The primary purpose of the forestay and backstay is to prevent the mast from moving fore and aft. The tensioner on the backstay also allows us to trim and tune the rig to get a better shape of the sails.
The shrouds are the wires or lines used on modern sailboats and yachts to support the mast from sideways motion.
There are usually four shrouds on each side of the vessel. They are connected to the side of the mast and run down to turnbuckles attached through toggles to the chainplates bolted on the deck.
- Cap shrouds run from the top of the mast to the deck, passing through the tips of the upper spreaders.
- Intermediate shrouds run from the lower part of the mast to the deck, passing through the lower set of spreaders.
- Lower shrouds are connected to the mast under the first spreader and run down to the deck – one fore and one aft on each side of the boat.
This configuration is called continuous rigging. We won’t go into the discontinuous rigging used on bigger boats in this guide, but if you are interested, you can read more about it here .
Shroud materials
Shrouds are usually made of 1 x 19 stainless steel wire. These wires are strong and relatively easy to install but are prone to stretch and corrosion to a certain degree. Another option is using stainless steel rods.
Rod rigging
Rod rigging has a stretch coefficient lower than wire but is more expensive and can be intricate to install. Alternatively, synthetic rigging is becoming more popular as it weighs less than wire and rods.
Synthetic rigging
Fibers like Dyneema and other aramids are lightweight and provide ultra-high tensile strength. However, they are expensive and much more vulnerable to chafing and UV damage than other options. In my opinion, they are best suited for racing and regatta-oriented sailboats.
Wire rigging
I recommend sticking to the classic 316-graded stainless steel wire rigging for cruising sailboats. It is also the most reasonable of the options. If you find yourself in trouble far from home, you are more likely to find replacement wire than another complex rigging type.
Relevant terms on sailboat rigging and hardware
The spreaders are the fins or wings that space the shrouds away from the mast. Most sailboats have at least one set, but some also have two or three. Once a vessel has more than three pairs of spreaders, we are probably talking about a big sailing yacht.
A turnbuckle is the fitting that connects the shrouds to the toggle and chainplate on the deck. These are adjustable, allowing you to tension the rig.
A chainplate is a metal plate bolted to a strong point on the deck or side of the hull. It is usually reinforced with a backing plate underneath to withstand the tension from the shrouds.
The term mast head should be distinct from the term masthead rigging. Out of context, the mast head is the top of the mast.
A toggle is a hardware fitting to connect the turnbuckles on the shrouds and the chainplate.
How tight should the standing rigging be?
It is essential to periodically check the tension of the standing rigging and make adjustments to ensure it is appropriately set. If the rig is too loose, it allows the mast to sway excessively, making the boat perform poorly.
You also risk applying a snatch load during a tack or a gybe which can damage the rig. On the other hand, if the standing rigging is too tight, it can strain the rig and the hull and lead to structural failure.
The standing rigging should be tightened enough to prevent the mast from bending sideways under any point of sail. If you can move the mast by pulling the cap shrouds by hand, the rigging is too loose and should be tensioned. Once the cap shrouds are tightened, follow up with the intermediates and finish with the lower shrouds. It is critical to tension the rig evenly on both sides.
The next you want to do is to take the boat out for a trip. Ensure that the mast isn’t bending over to the leeward side when you are sailing. A little movement in the leeward shrouds is normal, but they shouldn’t swing around. If the mast bends to the leeward side under load, the windward shrouds need to be tightened. Check the shrouds while sailing on both starboard and port tack.
Once the mast is in a column at any point of sail, your rigging should be tight and ready for action.
If you feel uncomfortable adjusting your rig, get a professional rigger to inspect and reset it.
How often should the standing rigging be replaced on a sailboat?
I asked the rigger who produced my new rig for Ellidah about how long I could expect my new rig to last, and he replied with the following:
The standing rigging should be replaced after 10 – 15 years, depending on how hard and often the boat has sailed. If it is well maintained and the vessel has sailed conservatively, it will probably last more than 20 years. However, corrosion or cracked strands indicate that the rig or parts are due for replacement regardless of age.
If you plan on doing extended offshore sailing and don’t know the age of your rig, I recommend replacing it even if it looks fine. This can be done without removing the mast from the boat while it is still in the water.
How much does it cost to replace the standing rigging?
The cost of replacing the standing rigging will vary greatly depending on the size of your boat and the location you get the job done. For my 41 feet sloop, I did most of the installation myself and paid approximately $4700 for the entire rig replacement.
Can Dyneema be used for standing rigging?
Dyneema is a durable synthetic fiber that can be used for standing rigging. Its low weight, and high tensile strength makes it especially popular amongst racers. Many cruisers also carry Dyneema onboard as spare parts for failing rigging.
How long does dyneema standing rigging last?
Dyneema rigging can outlast wire rigging if it doesn’t chafe on anything sharp. There are reports of Dyneema rigging lasting as long as 15 years, but manufacturers like Colligo claim their PVC shrink-wrapped lines should last 8 to 10 years. You can read more here .
Final words
Congratulations! By now, you should have a much better understanding of standing rigging on a sailboat. We’ve covered its purpose and its importance for performance and safety. While many types of rigs and variations exist, the hardware and concepts are often similar. Now it’s time to put your newfound knowledge into practice and set sail!
Or, if you’re not ready just yet, I recommend heading over to my following guide to learn more about running rigging on a sailboat.
Sharing is caring!
Skipper, Electrician and ROV Pilot
Robin is the founder and owner of Sailing Ellidah and has been living on his sailboat since 2019. He is currently on a journey to sail around the world and is passionate about writing his story and helpful content to inspire others who share his interest in sailing.
Very well written. Common sense layout with just enough photos and sketches. I enjoyed reading this article.
Thank you for the kind words.
Leave a Reply Cancel reply
Your email address will not be published. Required fields are marked *
Better Sailing

What is Sailboat Rigging?
The domain of rigging is an essential matter for the safety and good performance of your sailboat. Nowadays, the type of rigging is still evolving. Generally, rigging is depending on the type of sail used or the number of masts. As a basic rule, the replacement of the standing rig should be done every 10 years, except for multihulls or regattas, and rod or composite fiber rigging. A good set of rigging is of great importance in order to ensure navigation without causing any damage. A useful tip is to perform often thorough checks of the state of the rigging of your sailboat. Like this, you will prevent any possible damages from happening. So, let’s examine what exactly is sailboat rigging.
Standing and Running Rigging
Standing rigging supports your sailboat’s mast. The standing rigging consists of all the stainless steel wires that are used to support the mast. Moreover, standing rigging includes the rods, wires, and fixed lines that support the masts or bowsprit on a sailing vessel. In addition, all these reinforce the spars against wind loads transferred from the sails. On the other hand, running rigging is the rigging for controlling and shaping the sails on a sailboat. Running rigging consists of the main and jib sheet, the boom vang, the downhaul, and the jib halyard.
The subdivision of running rigging concerns the jeers, lifts, and halyards (halyards). This supporting equipment raises or lowers the sails and also controls the lower corners of the sails, i.e. the tacks and sheets. Over the centuries and up until nowadays, the history of sailboats rigging is still developing. What we’ve learned by now is that the combination of square and fore-and-aft sails in a full-rigged ship creates a highly complex, and mutually reliant set of components.
Wire Rigging
Wire rigging is the most common form of standing rigging on sailboats today. Furthermore, the style of the wire used is made of stainless steel, which is also a common wire style. What is advantageous with wire is that it’s quite affordable, especially when using swage fittings. The wire has also a long life expectancy, about 10 to 20 years, depending on use and the region you’re sailing to. However, wire rigging is more elastic than rod and synthetic rigging, thus it offers the lowest performance.
Rod Rigging
The rod rigging composition is of high-quality materials that provide low stretching. Moreover, it has a very long lifespan and great breaking strength, much more than that of its wire counterpart. Its life expectancy is attributed to the design, which is a mono strand, as well as to its composition that makes it very corrosion resistant.
Synthetic Rigging
Synthetic rigging is a new type of rigging and just like a rod, has minimum breaking strength. Nowadays, synthetic rigging offers low stretch performance features (that may vary depending on construction type), which are quite good for sailboats, among others. However, synthetic rigging will not last as long as the metal components. Most of the time, metal wire and rod are far better than synthetic rigging.
Based on the two rig types which are square-rigged and fore-and-aft, let’s divide the fore-and-aft rigs into three groups:
- Lateen Rig has a three-sided mainsail on a long yard.
- Bermuda rig which has a three-sided mainsail.
- Gaff rig is the head of the mainsail and has a four-sided mainsail.

Parts of a Sailboat Rigging and Terminology
Cruising sailboats will usually have their mast supported by 1 x 19 stainless steel wire. However, there are some racing sailboats that may choose rod rigging. Why? That’s because rod rigging has a stretch coefficient that is some 20% less than wire. The downside is that it’s more difficult to install and adjust, as well as less flexible with a shorter life span. So, let’s move on and see the parts of the sailboat’s rigging and their terminology:
- Forestay and Backstay : Forestay and backstay support the mast fore and aft. The forestay keeps the mast from falling backward. It attaches at the top of the mast. The backstay is important for the sail’s control because it directly affects the headsail and mainsail.
- Cap Shrouds and Lower Shrouds : These parts hold the mast steady athwartship. The shrouds are attached to the masthead and via chainplates to the hull. Moreover, forward and aft lower shrouds provide further support. The lower shrouds are always connected to the mast, just under the first spreader, and at the other end to the hull.
- Spreaders : In general, spreaders keep the shrouds away from the mast. What is of high importance, in terms of stability, is their length and fore-and-aft angle. The rigs of cruising boats may have up to three pairs of spreaders, depending on a number of factors such as the sailboat’s size and type. Keep in mind that the more spreaders a sailboat has then the lighter the mast section can be. Last but not least, the spreaders must be robust in order to withstand the compression loads of the shrouds.
- Masts and Booms : Masts are tall spars that carry the sails, navigate the sailboat, and control its position. Sailboat booms are horizontal spars to which the foot of a sail is bent. The booms attach to the lower part of the mast. There are some sailboats with unstayed masts, like the junk rig and catboat rigs. They have no standing rigging at all, and neither stays to support them. For example, a Bermuda rig has a single mast and just one headsail, thus a relatively simple rigging layout. On the other hand, schooners or ketches have a really complex rigging, i.e. with multi-spreader rigs. Apparently, the mast on a sailboat is an important component.
- Chainplates, Toggles, and Turnbuckles : These important components of sailboat rigging attach the shrouds to the hull. The chainplate is a metal plate that fastens to a strong point in the hull. Toggles are comprised of stainless steel fittings that absorb non-linear loads, located between the shrouds and the chainplate. Turnbuckles (or rigging screws) are also stainless steel materials that allow the shroud tension to adjust better.
- Parts of Running Rigging : As mentioned above, running rigging has to do about shaping, supporting, and stabilizing the sails on a sailing boat. Therefore, the necessary materials for running rigging are numerous and need further explanation. Some of these materials are: The topping lifts, the halyards, the outhauls and downhauls, the boom vangs, the sheets, and more.
Sailboat Rigging – Summary
So, what is sailboat rigging? Sailboat rigging concerns the wires, lines, and ropes that hold the rig and control the sails. To be more accurate, this means the tensioned stays and shrouds that support the mast. Rigging has to do about the booms, masts, yards, sails, stays, and cordage. Same way with cars, sailboats also have an engine, but in the form of sails. This is the standing and running rigging. When we refer to standing rigging this means that the stays and shrouds are supported by the mast. On the other hand, running rigging refers to rope halyards, sheets, and other control lines. Depending on the type of your sailboat, this sail-engine might be old, new, or maybe somewhere in between.

Peter is the editor of Better Sailing. He has sailed for countless hours and has maintained his own boats and sailboats for years. After years of trial and error, he decided to start this website to share the knowledge.
Related Posts

Sailing with Friends: Tie Knots, Navigate the Seas and Create Unforgettable Memories

Atlantic vs Pacific: Which is More Dangerous for Sailing?

Lagoon Catamaran Review: Are Lagoon Catamarans Good?

Best Inboard Boat Engine Brands
- Buyer's Guide
- Destinations
- Maintenance
- Sailing Info
Hit enter to search or ESC to close.

Beginner’s Guide: How To Rig A Sailboat – Step By Step Tutorial
Alex Morgan
Rigging a sailboat is a crucial process that ensures the proper setup and functioning of a sailboat’s various components. Understanding the process and components involved in rigging is essential for any sailor or boat enthusiast. In this article, we will provide a comprehensive guide on how to rig a sailboat.
Introduction to Rigging a Sailboat
Rigging a sailboat refers to the process of setting up the components that enable the sailboat to navigate through the water using wind power. This includes assembling and positioning various parts such as the mast, boom, standing rigging, running rigging, and sails.
Understanding the Components of a Sailboat Rigging
Before diving into the rigging process, it is important to have a good understanding of the key components involved. These components include:
The mast is the tall vertical spar that provides vertical support to the sails and holds them in place.
The boom is the horizontal spar that runs along the bottom edge of the sail and helps control the shape and position of the sail.
- Standing Rigging:
Standing rigging consists of the wires and cables that support and stabilize the mast, keeping it upright.
- Running Rigging:
Running rigging refers to the lines and ropes used to control the sails, such as halyards, sheets, and control lines.
Preparing to Rig a Sailboat
Before rigging a sailboat, there are a few important steps to take. These include:
- Checking the Weather Conditions:
It is crucial to assess the weather conditions before rigging a sailboat. Unfavorable weather, such as high winds or storms, can make rigging unsafe.
- Gathering the Necessary Tools and Equipment:
Make sure to have all the necessary tools and equipment readily available before starting the rigging process. This may include wrenches, hammers, tape, and other common tools.
- Inspecting the Rigging Components:
In the upcoming sections of this article, we will provide a step-by-step guide on how to rig a sailboat, as well as important safety considerations and tips to keep in mind. By following these guidelines, you will be able to rig your sailboat correctly and safely, allowing for a smooth and enjoyable sailing experience.
Key takeaway:
- Rigging a sailboat maximizes efficiency: Proper rigging allows for optimized sailing performance, ensuring the boat moves smoothly through the water.
- Understanding sailboat rigging components: Familiarity with the various parts of a sailboat rigging, such as the mast, boom, and standing and running riggings, is essential for effective rigging setup.
- Importance of safety in sailboat rigging: Ensuring safety is crucial during the rigging process, including wearing a personal flotation device, securing loose ends and lines, and being mindful of overhead power lines.
Get ready to set sail and dive into the fascinating world of sailboat rigging! We’ll embark on a journey to understand the various components that make up a sailboat’s rigging. From the majestic mast to the nimble boom , and the intricate standing rigging to the dynamic running rigging , we’ll explore the crucial elements that ensure smooth sailing. Not forgetting the magnificent sail, which catches the wind and propels us forward. So grab your sea legs and let’s uncover the secrets of sailboat rigging together.
Understanding the mast is crucial when rigging a sailboat. Here are the key components and steps to consider:
1. The mast supports the sails and rigging of the sailboat. It is made of aluminum or carbon fiber .
2. Before stepping the mast , ensure that the area is clear and the boat is stable. Have all necessary tools and equipment ready.
3. Inspect the mast for damage or wear. Check for corrosion , loose fittings , and cracks . Address any issues before proceeding.
4. To step the mast , carefully lift it into an upright position and insert the base into the mast step on the deck of the sailboat.
5. Secure the mast using the appropriate rigging and fasteners . Attach the standing rigging , such as shrouds and stays , to the mast and the boat’s hull .
Fact: The mast of a sailboat is designed to withstand wind resistance and the tension of the rigging for stability and safe sailing.
The boom is an essential part of sailboat rigging. It is a horizontal spar that stretches from the mast to the aft of the boat. Constructed with durable yet lightweight materials like aluminum or carbon fiber, the boom provides crucial support and has control over the shape and position of the sail. It is connected to the mast through a boom gooseneck , allowing it to pivot. One end of the boom is attached to the mainsail, while the other end is equipped with a boom vang or kicker, which manages the tension and angle of the boom. When the sail is raised, the boom is also lifted and positioned horizontally by using the topping lift or lazy jacks.
An incident serves as a warning that emphasizes the significance of properly securing the boom. In strong winds, an improperly fastened boom swung across the deck, resulting in damage to the boat and creating a safety hazard. This incident highlights the importance of correctly installing and securely fastening all rigging components, including the boom, to prevent accidents and damage.
3. Standing Rigging
When rigging a sailboat, the standing rigging plays a vital role in providing stability and support to the mast . It consists of several key components, including the mast itself, along with the shrouds , forestay , backstay , and intermediate shrouds .
The mast, a vertical pole , acts as the primary support structure for the sails and the standing rigging. Connected to the top of the mast are the shrouds , which are cables or wires that extend to the sides of the boat, providing essential lateral support .
The forestay is another vital piece of the standing rigging. It is a cable or wire that runs from the top of the mast to the bow of the boat, ensuring forward support . Similarly, the backstay , also a cable or wire, runs from the mast’s top to the stern of the boat, providing important backward support .
To further enhance the rig’s stability , intermediate shrouds are installed. These additional cables or wires are positioned between the main shrouds, as well as the forestay or backstay. They offer extra support , strengthening the standing rigging system.
Regular inspections of the standing rigging are essential to detect any signs of wear, such as fraying or corrosion . It is crucial to ensure that all connections within the rig are tight and secure, to uphold its integrity. Should any issues be identified, immediate attention must be given to prevent accidents or damage to the boat. Prioritizing safety is of utmost importance when rigging a sailboat, thereby necessitating proper maintenance of the standing rigging. This ensures a safe and enjoyable sailing experience.
Note: <p> tags have been kept intact.
4. Running Rigging
Running Rigging
When rigging a sailboat, the running rigging is essential for controlling the sails and adjusting their position. It is important to consider several aspects when dealing with the running rigging.
1. Choose the right rope: The running rigging typically consists of ropes with varying properties such as strength, stretch, and durability. Weather conditions and sailboat size should be considered when selecting the appropriate rope.
2. Inspect and maintain the running rigging: Regularly check for signs of wear, fraying, or damage. To ensure safety and efficiency, replace worn-out ropes.
3. Learn essential knot tying techniques: Having knowledge of knots like the bowline, cleat hitch, and reef knot is crucial for securing the running rigging and adjusting sails.
4. Understand different controls: The running rigging includes controls such as halyards, sheets, and control lines. Familiarize yourself with their functions and proper usage to effectively control sail position and tension.
5. Practice proper sail trimming: Adjusting the tension of the running rigging significantly affects sailboat performance. Mastering sail trimming techniques will help optimize sail shape and maximize speed.
By considering these factors and mastering running rigging techniques, you can enhance your sailing experience and ensure the safe operation of your sailboat.
The sail is the central component of sailboat rigging as it effectively harnesses the power of the wind to propel the boat.
When considering the sail, there are several key aspects to keep in mind:
– Material: Sails are typically constructed from durable and lightweight materials such as Dacron or polyester. These materials provide strength and resistance to various weather conditions.
– Shape: The shape of the sail plays a critical role in its overall performance. A well-shaped sail should have a smooth and aerodynamic profile, which allows for maximum efficiency in capturing wind power.
– Size: The size of the sail is determined by its sail area, which is measured in square feet or square meters. Larger sails have the ability to generate more power, but they require greater skill and experience to handle effectively.
– Reefing: Reefing is the process of reducing the sail’s size to adapt to strong winds. Sails equipped with reefing points allow sailors to decrease the sail area, providing better control in challenging weather conditions.
– Types: There are various types of sails, each specifically designed for different purposes. Common sail types include mainsails, jibs, genoas, spinnakers, and storm sails. Each type possesses its own unique characteristics and is utilized under specific wind conditions.
Understanding the sail and its characteristics is vital for sailors, as it directly influences the boat’s speed, maneuverability, and overall safety on the water.
Getting ready to rig a sailboat requires careful preparation and attention to detail. In this section, we’ll dive into the essential steps you need to take before setting sail. From checking the weather conditions to gathering the necessary tools and equipment, and inspecting the rigging components, we’ll ensure that you’re fully equipped to navigate the open waters with confidence. So, let’s get started on our journey to successfully rigging a sailboat!
1. Checking the Weather Conditions
Checking the weather conditions is crucial before rigging a sailboat for a safe and enjoyable sailing experience. Monitoring the wind speed is important in order to assess the ideal sailing conditions . By checking the wind speed forecast , you can determine if the wind is strong or light . Strong winds can make sailboat control difficult, while very light winds can result in slow progress.
Another important factor to consider is the wind direction . Assessing the wind direction is crucial for route planning and sail adjustment. Favorable wind direction helps propel the sailboat efficiently, making your sailing experience more enjoyable.
In addition to wind speed and direction, it is also important to consider weather patterns . Keep an eye out for impending storms or heavy rain. It is best to avoid sailing in severe weather conditions that may pose a safety risk. Safety should always be a top priority when venturing out on a sailboat.
Another aspect to consider is visibility . Ensure good visibility by checking for fog, haze, or any other conditions that may hinder navigation. Clear visibility is important for being aware of other boats and potential obstacles that may come your way.
Be aware of the local conditions . Take into account factors such as sea breezes, coastal influences, or tidal currents. These local factors greatly affect sailboat performance and safety. By considering all of these elements, you can have a successful and enjoyable sailing experience.
Here’s a true story to emphasize the importance of checking the weather conditions. One sunny afternoon, a group of friends decided to go sailing. Before heading out, they took the time to check the weather conditions. They noticed that the wind speed was expected to be around 10 knots, which was perfect for their sailboat. The wind direction was coming from the northwest, allowing for a pleasant upwind journey. With clear visibility and no approaching storms, they set out confidently, enjoying a smooth and exhilarating sail. This positive experience was made possible by their careful attention to checking the weather conditions beforehand.
2. Gathering the Necessary Tools and Equipment
To efficiently gather all of the necessary tools and equipment for rigging a sailboat, follow these simple steps:
- First and foremost, carefully inspect your toolbox to ensure that you have all of the basic tools such as wrenches, screwdrivers, and pliers.
- Make sure to check if you have a tape measure or ruler available as they are essential for precise measurements of ropes or cables.
- Don’t forget to include a sharp knife or rope cutter in your arsenal as they will come in handy for cutting ropes or cables to the desired lengths.
- Gather all the required rigging hardware including shackles, pulleys, cleats, and turnbuckles.
- It is always prudent to check for spare ropes or cables in case replacements are needed during the rigging process.
- If needed, consider having a sailing knife or marlinspike tool for splicing ropes or cables.
- For rigging a larger sailboat, it is crucial to have a mast crane or hoist to assist with stepping the mast.
- Ensure that you have a ladder or some other means of reaching higher parts of the sailboat, such as the top of the mast.
Once, during the preparation of rigging my sailboat, I had a moment of realization when I discovered that I had forgotten to bring a screwdriver . This unfortunate predicament occurred while I was in a remote location with no nearby stores. Being resourceful, I improvised by utilizing a multipurpose tool with a small knife blade, which served as a makeshift screwdriver. Although it was not the ideal solution, it allowed me to accomplish the task. Since that incident, I have learned the importance of double-checking my toolbox before commencing any rigging endeavor. This practice ensures that I have all of the necessary tools and equipment, preventing any unexpected surprises along the way.
3. Inspecting the Rigging Components
Inspecting the rigging components is essential for rigging a sailboat safely. Here is a step-by-step guide on inspecting the rigging components:
1. Visually inspect the mast, boom, and standing rigging for damage, such as corrosion, cracks, or loose fittings.
2. Check the tension of the standing rigging using a tension gauge. It should be within the recommended range from the manufacturer.
3. Examine the turnbuckles, clevis pins, and shackles for wear or deformation. Replace any damaged or worn-out hardware.
4. Inspect the running rigging, including halyards and sheets, for fraying, signs of wear, or weak spots. Replace any worn-out lines.
5. Check the sail for tears, wear, or missing hardware such as grommets or luff tape.
6. Pay attention to the connections between the standing rigging and the mast. Ensure secure connections without any loose or missing cotter pins or rigging screws.
7. Inspect all fittings, such as mast steps, spreader brackets, and tangs, to ensure they are securely fastened and in good condition.
8. Conduct a sea trial to assess the rigging’s performance and make necessary adjustments.
Regularly inspecting the rigging components is crucial for maintaining the sailboat’s rigging system’s integrity, ensuring safe sailing conditions, and preventing accidents or failures at sea.
Once, I went sailing on a friend’s boat without inspecting the rigging components beforehand. While at sea, a sudden gust of wind caused one of the shrouds to snap. Fortunately, no one was hurt, but we had to cut the sail loose and carefully return to the marina. This incident taught me the importance of inspecting the rigging components before sailing to avoid unforeseen dangers.
Step-by-Step Guide on How to Rig a Sailboat
Get ready to set sail with our step-by-step guide on rigging a sailboat ! We’ll take you through the process from start to finish, covering everything from stepping the mast to setting up the running rigging . Learn the essential techniques and tips for each sub-section, including attaching the standing rigging and installing the boom and sails . Whether you’re a seasoned sailor or a beginner, this guide will have you ready to navigate the open waters with confidence .
1. Stepping the Mast
To step the mast of a sailboat, follow these steps:
1. Prepare the mast: Position the mast near the base of the boat.
2. Attach the base plate: Securely fasten the base plate to the designated area on the boat.
3. Insert the mast step: Lower the mast step into the base plate and align it with the holes or slots.
4. Secure the mast step: Use fastening screws or bolts to fix the mast step in place.
5. Raise the mast: Lift the mast upright with the help of one or more crew members.
6. Align the mast: Adjust the mast so that it is straight and aligned with the boat’s centerline.
7. Attach the shrouds: Connect the shrouds to the upper section of the mast, ensuring proper tension.
8. Secure the forestay: Attach the forestay to the bow of the boat, ensuring it is securely fastened.
9. Final adjustments: Check the tension of the shrouds and forestay, making any necessary rigging adjustments.
Following these steps ensures that the mast is properly stepped and securely in place, allowing for a safe and efficient rigging process. Always prioritize safety precautions and follow manufacturer guidelines for your specific sailboat model.
2. Attaching the Standing Rigging
To attach the standing rigging on a sailboat, commence by preparing the essential tools and equipment, including wire cutters, crimping tools, and turnbuckles.
Next, carefully inspect the standing rigging components for any indications of wear or damage.
After inspection, fasten the bottom ends of the shrouds and stays to the chainplates on the deck.
Then, securely affix the top ends of the shrouds and stays to the mast using adjustable turnbuckles .
To ensure proper tension, adjust the turnbuckles accordingly until the mast is upright and centered.
Utilize a tension gauge to measure the tension in the standing rigging, aiming for around 15-20% of the breaking strength of the rigging wire.
Double-check all connections and fittings to verify their security and proper tightness.
It is crucial to regularly inspect the standing rigging for any signs of wear or fatigue and make any necessary adjustments or replacements.
By diligently following these steps, you can effectively attach the standing rigging on your sailboat, ensuring its stability and safety while on the water.
3. Installing the Boom and Sails
To successfully complete the installation of the boom and sails on a sailboat, follow these steps:
1. Begin by securely attaching the boom to the mast. Slide it into the gooseneck fitting and ensure it is firmly fastened using a boom vang or another appropriate mechanism.
2. Next, attach the main sail to the boom. Slide the luff of the sail into the mast track and securely fix it in place using sail slides or cars.
3. Connect the mainsheet to the boom. One end should be attached to the boom while the other end is connected to a block or cleat on the boat.
4. Proceed to attach the jib or genoa. Make sure to securely attach the hanks or furler line to the forestay to ensure stability.
5. Connect the jib sheets. One end of each jib sheet should be attached to the clew of the jib or genoa, while the other end is connected to a block or winch on the boat.
6. Before setting sail, it is essential to thoroughly inspect all lines and connections. Ensure that they are properly tensioned and that all connections are securely fastened.
During my own experience of installing the boom and sails on my sailboat, I unexpectedly encountered a strong gust of wind. As a result, the boom began swinging uncontrollably, requiring me to quickly secure it to prevent any damage. This particular incident served as a vital reminder of the significance of properly attaching and securing the boom, as well as the importance of being prepared for unforeseen weather conditions while rigging a sailboat.
4. Setting Up the Running Rigging
Setting up the running rigging on a sailboat involves several important steps. First, attach the halyard securely to the head of the sail. Then, connect the sheets to the clew of the sail. If necessary, make sure to secure the reefing lines . Attach the outhaul line to the clew of the sail and connect the downhaul line to the tack of the sail. It is crucial to ensure that all lines are properly cleated and organized. Take a moment to double-check the tension and alignment of each line. If you are using a roller furling system, carefully wrap the line around the furling drum and securely fasten it. Perform a thorough visual inspection of the running rigging to check for any signs of wear or damage. Properly setting up the running rigging is essential for safe and efficient sailing. It allows for precise control of the sail’s position and shape, ultimately optimizing the boat’s performance on the water.
Safety Considerations and Tips
When it comes to rigging a sailboat, safety should always be our top priority. In this section, we’ll explore essential safety considerations and share some valuable tips to ensure smooth sailing. From the importance of wearing a personal flotation device to securing loose ends and lines, and being cautious around overhead power lines, we’ll equip you with the knowledge and awareness needed for a safe and enjoyable sailing experience. So, let’s set sail and dive into the world of safety on the water!
1. Always Wear a Personal Flotation Device
When rigging a sailboat, it is crucial to prioritize safety and always wear a personal flotation device ( PFD ). Follow these steps to properly use a PFD:
- Select the appropriate Coast Guard-approved PFD that fits your size and weight.
- Put on the PFD correctly by placing your arms through the armholes and securing all the straps for a snug fit .
- Adjust the PFD for comfort , ensuring it is neither too tight nor too loose, allowing freedom of movement and adequate buoyancy .
- Regularly inspect the PFD for any signs of wear or damage, such as tears or broken straps, and replace any damaged PFDs immediately .
- Always wear your PFD when on or near the water, even if you are a strong swimmer .
By always wearing a personal flotation device and following these steps, you will ensure your safety and reduce the risk of accidents while rigging a sailboat. Remember, prioritize safety when enjoying water activities.
2. Secure Loose Ends and Lines
Inspect lines and ropes for frayed or damaged areas. Secure loose ends and lines with knots or appropriate cleats or clamps. Ensure all lines are properly tensioned to prevent loosening during sailing. Double-check all connections and attachments for security. Use additional safety measures like extra knots or stopper knots to prevent line slippage.
To ensure a safe sailing experience , it is crucial to secure loose ends and lines properly . Neglecting this important step can lead to accidents or damage to the sailboat. By inspecting, securing, and tensioning lines , you can have peace of mind knowing that everything is in place. Replace or repair any compromised lines or ropes promptly. Securing loose ends and lines allows for worry-free sailing trips .
3. Be Mindful of Overhead Power Lines
When rigging a sailboat, it is crucial to be mindful of overhead power lines for safety. It is important to survey the area for power lines before rigging the sailboat. Maintain a safe distance of at least 10 feet from power lines. It is crucial to avoid hoisting tall masts or long antenna systems near power lines to prevent contact. Lower the mast and tall structures when passing under a power line to minimize the risk of contact. It is also essential to be cautious in areas where power lines run over the water and steer clear to prevent accidents.
A true story emphasizes the importance of being mindful of overhead power lines. In this case, a group of sailors disregarded safety precautions and their sailboat’s mast made contact with a low-hanging power line, resulting in a dangerous electrical shock. Fortunately, no serious injuries occurred, but it serves as a stark reminder of the need to be aware of power lines while rigging a sailboat.
Some Facts About How To Rig A Sailboat:
- ✅ Small sailboat rigging projects can improve sailing performance and save money. (Source: stingysailor.com)
- ✅ Rigging guides are available for small sailboats, providing instructions and tips for rigging. (Source: westcoastsailing.net)
- ✅ Running rigging includes lines used to control and trim the sails, such as halyards and sheets. (Source: sailingellidah.com)
- ✅ Hardware used in sailboat rigging includes winches, blocks, and furling systems. (Source: sailingellidah.com)
- ✅ A step-by-step guide can help beginners rig a small sailboat for sailing. (Source: tripsavvy.com)
Frequently Asked Questions
1. how do i rig a small sailboat.
To rig a small sailboat, follow these steps: – Install or check the rudder, ensuring it is firmly attached. – Attach or check the tiller, the long steering arm mounted to the rudder. – Attach the jib halyard by connecting the halyard shackle to the head of the sail and the grommet in the tack to the bottom of the forestay. – Hank on the jib by attaching the hanks of the sail to the forestay one at a time. – Run the jib sheets by tying or shackling them to the clew of the sail and running them back to the cockpit. – Attach the mainsail by spreading it out and attaching the halyard shackle to the head of the sail. – Secure the tack, clew, and foot of the mainsail to the boom using various lines and mechanisms. – Insert the mainsail slugs into the mast groove, gradually raising the mainsail as the slugs are inserted. – Cleat the main halyard and lower the centerboard into the water. – Raise the jib by pulling down on the jib halyard and cleating it on the other side of the mast. – Tighten the mainsheet and one jibsheet to adjust the sails and start moving forward.
2. What are the different types of sailboat rigs?
Sailboat rigs can be classified into three main types: – Sloop rig: This rig has a single mast with a mainsail and a headsail, typically a jib or genoa. – Cutter rig: This rig has two headsails, a smaller jib or staysail closer to the mast, and a larger headsail, usually a genoa, forward of it, alongside a mainsail. – Ketch rig: This rig has two masts, with the main mast taller than the mizzen mast. It usually has a mainsail, headsail, and a mizzen sail. Each rig has distinct characteristics and is suitable for different sailing conditions and preferences.
3. What are the essential parts of a sailboat?
The essential parts of a sailboat include: – Mast: The tall vertical spar that supports the sails. – Boom: The horizontal spar connected to the mast, which extends outward and supports the foot of the mainsail. – Rudder: The underwater appendage that steers the boat. – Centerboard or keel: A retractable or fixed fin-like structure that provides stability and prevents sideways drift. – Sails: The fabric structures that capture the wind’s energy to propel the boat. – Running rigging: The lines or ropes used to control the sails and sailing equipment. – Standing rigging: The wires and cables that support the mast and reinforce the spars. These are the basic components necessary for the functioning of a sailboat.
4. What is a spinnaker halyard?
A spinnaker halyard is a line used to hoist and control a spinnaker sail. The spinnaker is a large, lightweight sail that is used for downwind sailing or reaching in moderate to strong winds. The halyard attaches to the head of the spinnaker and is used to raise it to the top of the mast. Once hoisted, the spinnaker halyard can be adjusted to control the tension and shape of the sail.
5. Why is it important to maintain and replace worn running rigging?
It is important to maintain and replace worn running rigging for several reasons: – Safety: Worn or damaged rigging can compromise the integrity and stability of the boat, posing a safety risk to both crew and vessel. – Performance: Worn rigging can affect the efficiency and performance of the sails, diminishing the boat’s speed and maneuverability. – Reliability: Aging or worn rigging is more prone to failure, which can lead to unexpected problems and breakdowns. Regular inspection and replacement of worn running rigging is essential to ensure the safe and efficient operation of a sailboat.
6. Where can I find sailboat rigging books or guides?
There are several sources where you can find sailboat rigging books or guides: – Online: Websites such as West Coast Sailing and Stingy Sailor offer downloadable rigging guides for different sailboat models. – Bookstores: Many bookstores carry a wide selection of boating and sailing books, including those specifically focused on sailboat rigging. – Sailing schools and clubs: Local sailing schools or yacht clubs often have resources available for learning about sailboat rigging. – Manufacturers: Some sailboat manufacturers, like Hobie Cat and RS Sailing, provide rigging guides for their specific sailboat models. Consulting these resources can provide valuable information and instructions for rigging your sailboat properly.
About the author

Leave a Reply Cancel reply
Your email address will not be published. Required fields are marked *
Save my name, email, and website in this browser for the next time I comment.
Latest posts

The history of sailing – from ancient times to modern adventures
History of Sailing Sailing is a time-honored tradition that has evolved over millennia, from its humble beginnings as a means of transportation to a beloved modern-day recreational activity. The history of sailing is a fascinating journey that spans cultures and centuries, rich in innovation and adventure. In this article, we’ll explore the remarkable evolution of…

Sailing Solo: Adventures and Challenges of Single-Handed Sailing
Solo Sailing Sailing has always been a pursuit of freedom, adventure, and self-discovery. While sailing with a crew is a fantastic experience, there’s a unique allure to sailing solo – just you, the wind, and the open sea. Single-handed sailing, as it’s often called, is a journey of self-reliance, resilience, and the ultimate test of…

Sustainable Sailing: Eco-Friendly Practices on the boat
Eco Friendly Sailing Sailing is an exhilarating and timeless way to explore the beauty of the open water, but it’s important to remember that our oceans and environment need our protection. Sustainable sailing, which involves eco-friendly practices and mindful decision-making, allows sailors to enjoy their adventures while minimizing their impact on the environment. In this…
Standing Rigging (or ‘Name That Stay’)
Published by rigworks on november 19, 2019.
Question: When your riggers talk about standing rigging, they often use terms I don’t recognize. Can you break it down for me?
From the Rigger: Let’s play ‘Name that Stay’…

Forestay (1 or HS) – The forestay, or headstay, connects the mast to the front (bow) of the boat and keeps your mast from falling aft.
- Your forestay can be full length (masthead to deck) or fractional (1/8 to 1/4 from the top of the mast to the deck).
- Inner forestays, including staysail stays, solent stays and baby stays, connect to the mast below the main forestay and to the deck aft of the main forestay. Inner forestays allow you to hoist small inner headsails and/or provide additional stability to your rig.
Backstay (2 or BS) – The backstay runs from the mast to the back of the boat (transom) and is often adjustable to control forestay tension and the shape of the sails.
- A backstay can be either continuous (direct from mast to transom) or it may split in the lower section (7) with “legs” that ‘V’ out to the edges of the transom.
- Backstays often have hydraulic or manual tensioners built into them to increase forestay tension and bend the mast, which flattens your mainsail.
- Running backstays can be removable, adjustable, and provide additional support and tuning usually on fractional rigs. They run to the outer edges of the transom and are adjusted with each tack. The windward running back is in tension and the leeward is eased so as not to interfere with the boom and sails.
- Checkstays, useful on fractional rigs with bendy masts, are attached well below the backstay and provide aft tension to the mid panels of the mast to reduce mast bend and provide stabilization to reduce the mast from pumping.
Shrouds – Shrouds support the mast from side to side. Shrouds are either continuous or discontinuous .
Continuous rigging, common in production sailboats, means that each shroud (except the lowers) is a continuous piece of material that connects to the mast at some point, passes through the spreaders without terminating, and continues to the deck. There may be a number of continuous shrouds on your boat ( see Figure 1 ).
- Cap shrouds (3) , sometimes called uppers, extend from masthead to the chainplates at the deck.
- Intermediate shrouds (4) extend from mid-mast panel to deck.
- Lower shrouds extend from below the spreader-base to the chainplates. Fore- (5) and Aft-Lowers (6) connect to the deck either forward or aft of the cap shroud.
Discontinuous rigging, common on high performance sailboats, is a series of shorter lengths that terminate in tip cups at each spreader. The diameter of the wire/rod can be reduced in the upper sections where loads are lighter, reducing overall weight. These independent sections are referred to as V# and D# ( see Figure 2 ). For example, V1 is the lowest vertical shroud that extends from the deck to the outer tip of the first spreader. D1 is the lowest diagonal shroud that extends from the deck to the mast at the base of the first spreader. The highest section that extends from the upper spreader to the mast head may be labeled either V# or D#.
A sailboat’s standing rigging is generally built from wire rope, rod, or occasionally a super-strong synthetic fibered rope such as Dyneema ® , carbon fiber, kevlar or PBO.
- 1×19 316 grade stainless steel Wire Rope (1 group of 19 wires, very stiff with low stretch) is standard on most sailboats. Wire rope is sized/priced by its diameter which varies from boat to boat, 3/16” through 1/2″ being the most common range.
- 1×19 Compact Strand or Dyform wire, a more expensive alternative, is used to increase strength, reduce stretch, and minimize diameter on high performance boats such as catamarans. It is also the best alternative when replacing rod with wire.
- Rod rigging offers lower stretch, longer life expectancy, and higher breaking strength than wire. Unlike wire rope, rod is defined by its breaking strength, usually ranging from -10 to -40 (approx. 10k to 40k breaking strength), rather than diameter. So, for example, we refer to 7/16” wire (diameter) vs. -10 Rod (breaking strength).
- Composite Rigging is a popular option for racing boats. It offers comparable breaking strengths to wire and rod with a significant reduction in weight and often lower stretch.
Are your eyes crossing yet? This is probably enough for now, but stay tuned for our next ‘Ask the Rigger’. We will continue this discussion with some of the fittings/connections/hardware associated with your standing rigging.
Related Posts
Ask the Rigger
Do your masthead sheaves need replacing.
Question: My halyard is binding. What’s up? From the Rigger: Most boat owners do not climb their masts regularly, but our riggers spend a lot of time up there. And they often find badly damaged Read more…
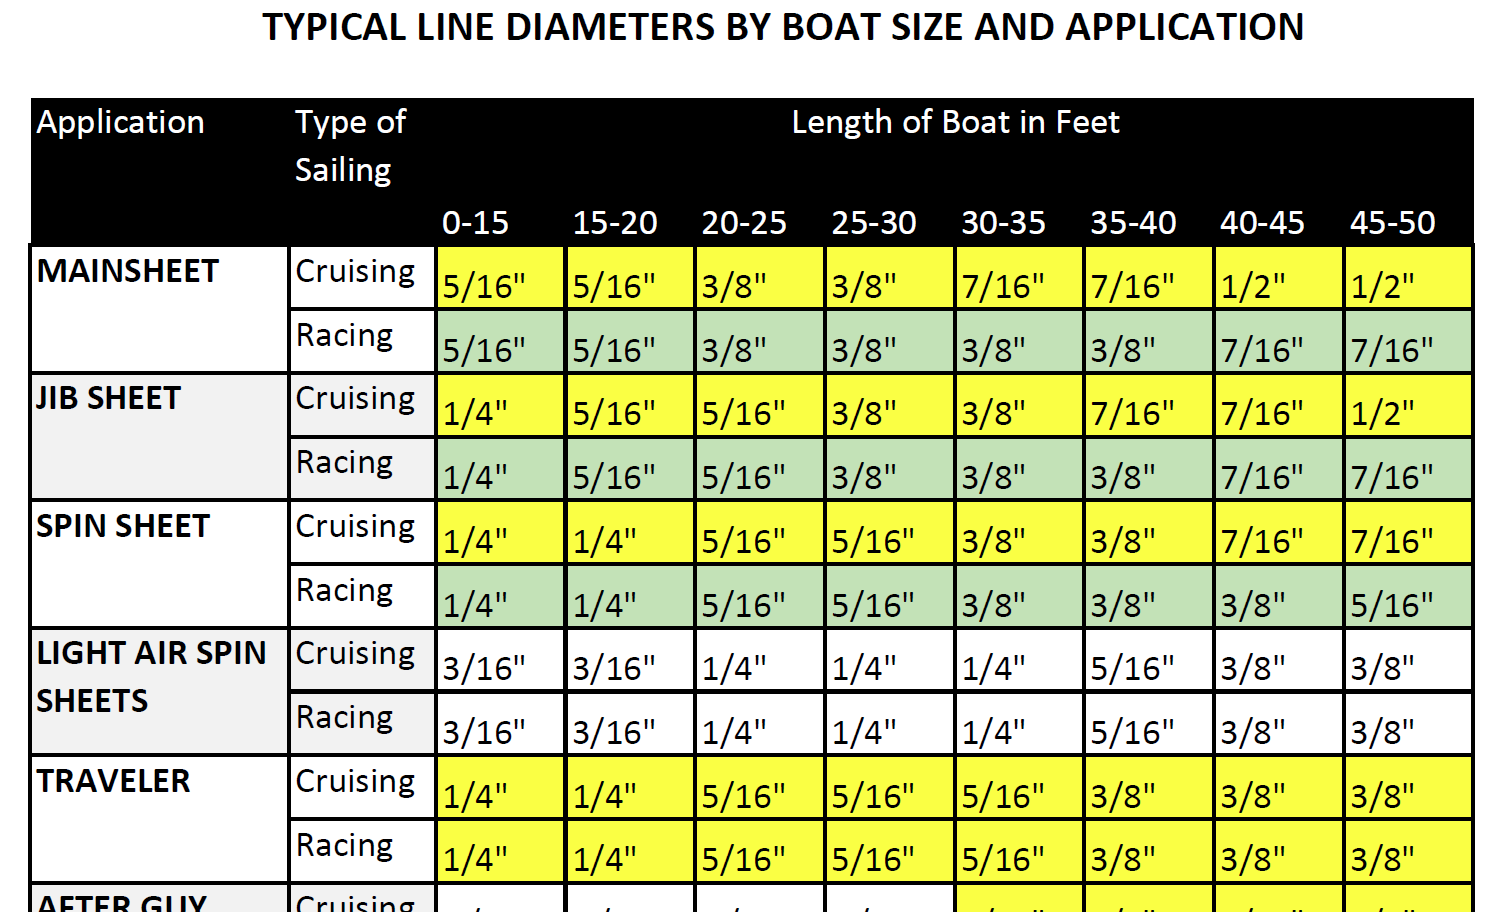
Selecting Rope – Length, Diameter, Type
Question: Do you have guidelines for selecting halyards, sheets, etc. for my sailboat? From the Rigger: First, if your old rope served its purpose but needs replacing, we recommend duplicating it as closely as possible Read more…
Spinlock Deckvest Maintenance
Question: What can I do to ensure that my Spinlock Deckvest is well-maintained and ready for the upcoming season? From the Rigger: We are so glad you asked! Deckvests need to be maintained so that Read more…
Sailboat Parts Explained: Illustrated Guide (with Diagrams)
When you first get into sailing, there are a lot of sailboat parts to learn. Scouting for a good guide to all the parts, I couldn't find any, so I wrote one myself.
Below, I'll go over each different sailboat part. And I mean each and every one of them. I'll walk you through them one by one, and explain each part's function. I've also made sure to add good illustrations and clear diagrams.
This article is a great reference for beginners and experienced sailors alike. It's a great starting point, but also a great reference manual. Let's kick off with a quick general overview of the different sailboat parts.
General Overview
The different segments
You can divide up a sailboat in four general segments. These segments are arbitrary (I made them up) but it will help us to understand the parts more quickly. Some are super straightforward and some have a bit more ninja names.
Something like that. You can see the different segments highlighted in this diagram below:

The hull is what most people would consider 'the boat'. It's the part that provides buoyancy and carries everything else: sails, masts, rigging, and so on. Without the hull, there would be no boat. The hull can be divided into different parts: deck, keel, cabin, waterline, bilge, bow, stern, rudder, and many more.
I'll show you those specific parts later on. First, let's move on to the mast.

Sailboats Explained
The mast is the long, standing pole holding the sails. It is typically placed just off-center of a sailboat (a little bit to the front) and gives the sailboat its characteristic shape. The mast is crucial for any sailboat: without a mast, any sailboat would become just a regular boat.
I think this segment speaks mostly for itself. Most modern sailboats you see will have two sails up, but they can carry a variety of other specialty sails. And there are all kinds of sail plans out there, which determine the amount and shape of sails that are used.
The Rigging
This is probably the most complex category of all of them.
Rigging is the means with which the sails are attached to the mast. The rigging consists of all kinds of lines, cables, spars, and hardware. It's the segment with the most different parts.
The most important parts
If you learn anything from this article, here are the most important parts of any sailboat. You will find all of these parts in some shape or form on almost any sailboat.

Okay, we now have a good starting point and a good basic understanding of the different sailboat parts. It's time for the good stuff. We're going to dive into each segment in detail.
Below, I'll go over them one by one, pointing out its different parts on a diagram, listing them with a brief explanation, and showing you examples as well.
After reading this article, you'll recognize every single sailboat part and know them by name. And if you forget one, you're free to look it up in this guide.

On this page:
The hull is the heart of the boat. It's what carries everything: the mast, the sails, the rigging, the passengers. The hull is what provides the sailboat with its buoyancy, allowing it to stay afloat.
Sailboats mostly use displacement hulls, which is a shape that displaces water when moving through it. They are generally very round and use buoyancy to support its own weight. These two characteristics make sure it is a smooth ride.
There are different hull shapes that work and handle differently. If you want to learn more about them, here's the Illustrated Guide to Boat Hull Types (with 11 Examples ). But for now, all we need to know is that the hull is the rounded, floating part of any sailboat.
Instead of simply calling the different sides of a hull front, back, left and right , we use different names in sailing. Let's take a look at them.

The bow is the front part of the hull. It's simply the nautical word for 'front'. It's the pointy bit that cuts through the water. The shape of the bow determines partially how the boat handles.
The stern is the back part of the hull. It's simply the nautical word for 'back'. The shape of the stern partially determines the stability and speed of the boat. With motorboats, the stern lies deep inside the water, and the hull is flatter aft. Aft also means back. This allows it to plane, increasing the hull speed. For sailboats, stability is much more important, so the hull is rounded throughout, increasing its buoyancy and hydrodynamic properties.
The transom is the backplate of the boat's hull. It's the most aft (rear) part of the boat.
Port is the left side of a sailboat.
Starboard is the right side of a sailboat
The bilges are the part where the bottom and the sides of the hull meet. On sailboats, these are typically very round, which helps with hydrodynamics. On powerboats, they tend to have an angle.
The waterline is the point where the boat's hull meets the water. Generally, boat owners paint the waterline and use antifouling paint below it, to protect it from marine growth.
The deck is the top part of the boat's hull. In a way, it's the cap of the boat, and it holds the deck hardware and rigging.
Displacement hulls are very round and smooth, which makes them very efficient and comfortable. But it also makes them very easy to capsize: think of a canoe, for example.
The keel is a large fin that offsets the tendency to capsize by providing counterbalance. Typically, the keel carries ballast in the tip, creating a counterweight to the wind's force on the sails.
The rudder is the horizontal plate at the back of the boat that is used to steer by setting a course and maintaining it. It is connected to the helm or tiller.
Tiller or Helm
- The helm is simply the nautical term for the wheel.
- The tiller is simply the nautical term for the steering stick.
The tiller or helm is attached to the rudder and is used to steer the boat. Most smaller sailboats (below 30') have a tiller, most larger sailboats use a helm. Large ocean-going vessels tend to have two helms.
The cockpit is the recessed part in the deck where the helmsman sits or stands. It tends to have some benches. It houses the outside navigation and systems interfaces, like the compass, chartplotter, and so on. It also houses the mainsheet traveler and winches for the jib. Most boats are set up so that the entire vessel can be operated from the cockpit (hence the name). More on those different parts later.
Most larger boats have some sort of roofed part, which is called the cabin. The cabin is used as a shelter, and on cruising sailboats you'll find the galley for cooking, a bed, bath room, and so on.
The mast is the pole on a sailboat that holds the sails. Sailboats can have one or multiple masts, depending on the mast configuration. Most sailboats have only one or two masts. Three masts or more is less common.
The boom is the horizontal pole on the mast, that holds the mainsail in place.
The sails seem simple, but actually consist of many moving parts. The parts I list below work for most modern sailboats - I mean 90% of them. However, there are all sorts of specialty sails that are not included here, to keep things concise.

The mainsail is the largest sail on the largest mast. Most sailboats use a sloop rigging (just one mast with one bermuda mainsail). In that case, the main is easy to recognize. With other rig types, it gets more difficult, since there can be multiple tall masts and large sails.
If you want to take a look at the different sail plans and rig types that are out there, I suggest reading my previous guide on how to recognize any sailboat here (opens in new tab).
Sail sides:
- Leech - Leech is the name for the back side of the sail, running from the top to the bottom.
- Luff - Luff is the name for the front side of the sail, running from the top to the bottom.
- Foot - Foot is the name for the lower side of the sail, where it meets the boom.
Sail corners:
- Clew - The clew is the lower aft (back) corner of the mainsail, where the leech is connected to the foot. The clew is attached to the boom.
- Tack - The tack is the lower front corner of the mainsail
- Head - The head is the top corner of the mainsail
Battens are horizontal sail reinforcers that flatten and stiffen the sail.
Telltales are small strings that show you whether your sail trim is correct. You'll find telltales on both your jib and mainsail.
The jib is the standard sized headsail on a Bermuda Sloop rig (which is the sail plan most modern sailboats use).
As I mentioned: there are all kinds, types, and shapes of sails. For an overview of the most common sail types, check out my Guide on Sail Types here (with photos).
The rigging is what is used to attach your sails and mast to your boat. Rigging, in other words, mostly consists of all kinds of lines. Lines are just another word for ropes. Come to think of it, sailors really find all kinds of ways to complicate the word rope ...
Two types of rigging
There are two types of rigging: running and standing rigging. The difference between the two is very simple.
- The running rigging is the rigging on a sailboat that's used to operate the sails. For example, the halyard, which is used to lower and heave the mainsail.
- The standing rigging is the rigging that is used to support the mast and sail plan.
Standing Rigging

Here are the different parts that belong to the standing rigging:
- Forestay or Headstay - Line or cable that supports the mast and is attached to the bow of the boat. This is often a steel cable.
- Backstay - Line or cable that supports the mast and is attached to the stern of the boat. This is often a steel cable.
- Sidestay or Shroud - Line or cable that supports the mast from the sides of the boat. Most sailboats use at least two sidestays (one on each side).
- Spreader - The sidestays are spaced to steer clear from the mast using spreaders.
Running Rigging: different words for rope
Ropes play a big part in sailing, and especially in control over the sails. In sailboat jargon, we call ropes 'lines'. But there are some lines with a specific function that have a different name. I think this makes it easier to communicate with your crew: you don't have to define which line you mean. Instead, you simply shout 'mainsheet!'. Yeah, that works.
Running rigging consists of the lines, sheets, and hardware that are used to control, raise, lower, shape and manipulate the sails on a sailboat. Rigging varies for different rig types, but since most sailboats are use a sloop rig, nearly all sailboats use the following running rigging:

- Halyards -'Halyard' is simply the nautical name for lines or ropes that are used to raise and lower the mainsail. The halyard is attached to the top of the mainsail sheet, or the gaffer, which is a top spar that attaches to the mainsail. You'll find halyards on both the mainsail and jib.
- Sheets - 'Sheet' is simply the nautical term for lines or ropes that are used to set the angle of the sail.
- Mainsheet - The line, or sheet, that is used to set the angle of the mainsail. The mainsheet is attached to the Mainsheet traveler. More on that under hardware.
- Jib Sheet - The jib mostly comes with two sheets: one on each side of the mast. This prevents you from having to loosen your sheet, throwing it around the other side of the mast, and tightening it. The jib sheets are often controlled using winches (more on that under hardware).
- Cleats are small on-deck hooks that can be used to tie down sheets and lines after trimming them.
- Reefing lines - Lines that run through the mainsail, used to put a reef in the main.
- The Boom Topping Lift is a line that is attached to the aft (back) end of the boom and runs to the top of the mast. It supports the boom whenever you take down the mainsail.
- The Boom Vang is a line that places downward tension on the boom.
There are some more tensioning lines, but I'll leave them for now. I could probably do an entire guide on the different sheets on a sailboat. Who knows, perhaps I'll write it.
This is a new segment, that I didn't mention before. It's a bit of an odd duck, so I threw all sorts of stuff into this category. But they are just as important as all the other parts. Your hardware consists of cleats, winches, traveler and so on. If you don't know what all of this means, no worries: neither did I. Below, you'll find a complete overview of the different parts.
Deck Hardware

Just a brief mention of the different deck hardware parts:
- Pulpits are fenced platforms on the sailboat's stern and bow, which is why they are called the bow pulpit and stern pulpit here. They typically have a solid steel framing for safety.
- Stanchons are the standing poles supporting the lifeline , which combined for a sort of fencing around the sailboat's deck. On most sailboats, steel and steel cables are used for the stanchons and lifelines.
Mainsheet Traveler
The mainsheet traveler is a rail in the cockpit that is used to control the mainsheet. It helps to lock the mainsheet in place, fixing the mainsails angle to the wind.
If you're interested in learning more about how to use the mainsheet traveler, Matej has written a great list of tips for using your mainsheet traveler the right way . It's a good starting point for beginners.
Winches are mechanical or electronic spools that are used to easily trim lines and sheets. Most sailboats use winches to control the jib sheets. Modern large sailing yachts use electronic winches for nearly all lines. This makes it incredibly easy to trim your lines.
You'll find the compass typically in the cockpit. It's the most old-skool navigation tool out there, but I'm convinced it's also one of the most reliable. In any way, it definitely is the most solid backup navigator you can get for the money.
Want to learn how to use a compass quickly and reliably? It's easy. Just read my step-by-step beginner guide on How To Use a Compass (opens in new tab .
Chartplotter
Most sailboats nowadays use, besides a compass and a map, a chartplotter. Chartplotters are GPS devices that show a map and a course. It's very similar to your normal car navigation.
Outboard motor
Most sailboats have some sort of motor to help out when there's just the slightest breeze. These engines aren't very big or powerful, and most sailboats up to 32' use an outboard motor. You'll find these at the back of the boat.
Most sailboats carry 1 - 3 anchors: one bow anchor (the main one) and two stern anchors. The last two are optional and are mostly used by bluewater cruisers.
I hope this was helpful, and that you've gained a good understanding of the different parts involved in sailing. I wanted to write a good walk-through instead of overwhelming you with lists and lists of nautical terms. I hope I've succeeded. If so, I appreciate any comments and tips below.
I've tried to be as comprehensive as possible, without getting into the real nitty gritty. That would make for a gigantic article. However, if you feel I've left something out that really should be in here, please let me know in the comments below, so I can update the article.
I own a small 20 foot yacht called a Red witch made locally back in the 70s here in Western Australia i found your article great and enjoyed reading it i know it will be a great help for me in my future leaning to sail regards John.
David Gardner
İ think this is a good explanation of the difference between a ”rope” and a ”line”:
Rope is unemployed cordage. In other words, when it is in a coil and has not been assigned a job, it is just a rope.
On the other hand, when you prepare a rope for a specific task, it becomes employed and is a line. The line is labeled by the job it performs; for example, anchor line, dock line, fender line, etc.
Hey Mr. Buckles
I am taking on new crew to race with me on my Flying Scot (19ft dingy). I find your Sailboat Parts Explained to be clear and concise. I believe it will help my new crew learn the language that we use on the boat quickly without being overwhelmed.
PS: my grandparents were from Friesland and emigrated to America.
Thank you Shawn for the well written, clear and easy to digest introductory article. Just after reading this first article I feel excited and ready to set sails and go!! LOL!! Cheers! Daniel.
steve Balog
well done, chap
Great intro. However, the overview diagram misidentifies the cockpit location. The cockpit is located aft of the helm. Your diagram points to a location to the fore of the helm.
William Thompson-Ambrose
An excellent introduction to the basic anatomy and function of the sailboat. Anyone who wants to start sailing should consider the above article before stepping aboard! Thank-you
James Huskisson
Thanks for you efforts mate. We’ve all got to start somewhere. Thanks for sharing. Hoping to my first yacht. 25ft Holland. Would love to cross the Bass Strait one day to Tasmania. 👌 Cheers mate
Alan Alexander Percy
thankyou ijust aquired my first sailboat at 66yrs of age its down at pelican point a beautifull place in virginia usa my sailboat is a redwing 30 if you are ever in the area i wouldnt mind your guidance and superior knowledge of how to sail but iam sure your fantastic article will help my sailboat is wings 30 ft
Thanks for quick refresher course. Having sailed in California for 20+ years I now live in Spain where I have to take a spanish exam for a sailboat license. Problem is, it’s only in spanish. So a lot to learn for an old guy like me.
Very comprehensive, thank you
Your article really brought all the pieces together for me today. I have been adventuring my first sailing voyage for 2 months from the Carolinas and am now in Eleuthera waiting on weather to make the Exumas!!! Great job and thanks
Helen Ballard
I’ve at last found something of an adventure to have in sailing, so I’m starting at the basics, I have done a little sailing but need more despite being over 60 life in the old dog etc, thanks for your information 😊
Barbara Scott
I don’t have a sailboat, neither do l plan to literally take to the waters. But for mental exercise, l have decided to take to sailing in my Bermuda sloop, learning what it takes to become a good sailor and run a tight ship, even if it’s just imaginary. Thank you for helping me on my journey to countless adventures and misadventures, just to keep it out of the doldrums! (I’m a 69 year old African American female who have rediscovered why l enjoyed reading The Adventures of Robert Louis Stevenson as well as his captivating description of sea, wind, sailboat,and sailor).
Great article and very good information source for a beginner like me. But I didn’t find out what I had hoped to, which is, what are all those noisy bits of kit on top of the mast? I know the one with the arrow is a weather vane, but the rest? Many thanks, Jay.
Louis Cohen
The main halyard is attached to the head of the mainsail, not the to the mainsheet. In the USA, we say gaff, not gaffer. The gaff often has its own halyard separate from the main halyard.
Other than that it’s a nice article with good diagrams.
A Girl Who Has an Open Sail Dream
Wow! That was a lot of great detail! Thank you, this is going to help me a lot on my project!
Hi, good info, do u know a book that explains all the systems on a candc 27,
Leave a comment
You may also like, guide to understanding sail rig types (with pictures).
There are a lot of different sail rig types and it can be difficult to remember what's what. So I've come up with a system. Let me explain it in this article.

The Ultimate Guide to Sail Types and Rigs (with Pictures)

The Illustrated Guide To Boat Hull Types (11 Examples)

How To Live On a Boat For Free: How I'd Do It

How To Live on a Sailboat: Consider These 5 Things
Running Rigging on a Sailboat: Essential Components and Maintenance Tips
by Emma Sullivan | Aug 8, 2023 | Sailboat Maintenance

Short answer running rigging on a sailboat:
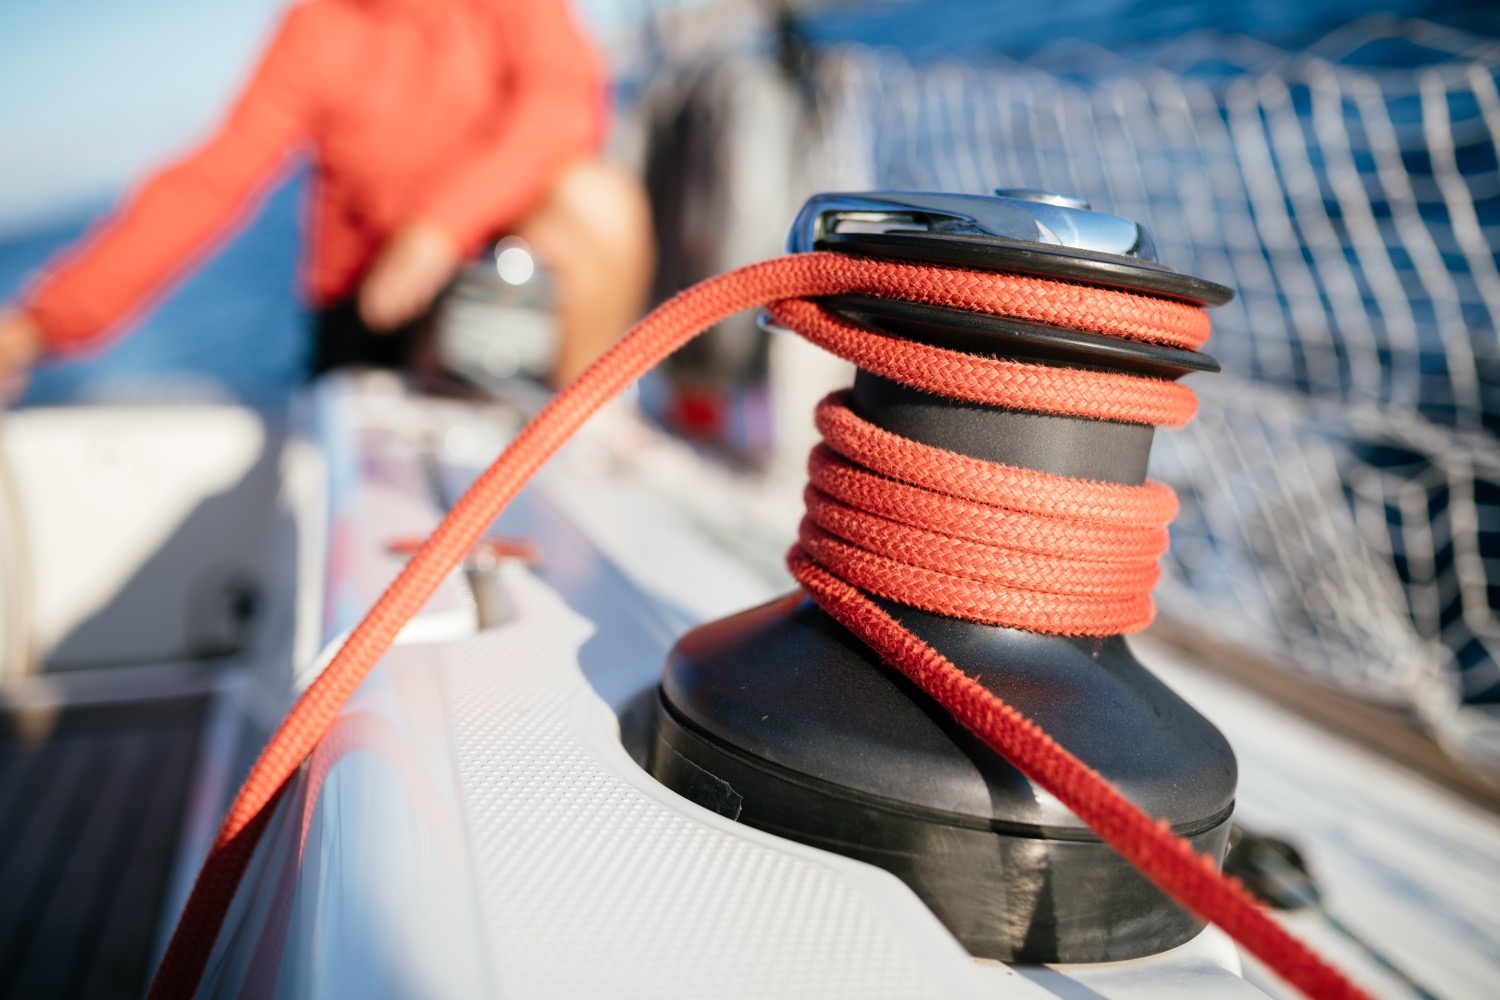
Running rigging refers to the ropes and lines used for controlling the sails and other movable parts on a sailboat. It includes halyards, sheets, braces, and control lines. Properly rigged running rigging is essential for efficient sail handling and maneuvering of the boat.
Understanding Running Rigging on a Sailboat: How to Get Started
Title: Deciphering the Intricacies of Running Rigging on a Sailboat: An Enlightened Journey Begins!
Introduction: Ah, the allure of sailing! Picture yourself gracefully gliding across sun-kissed waters, propelled solely by the power of the wind . If you’re new to this mesmerizing world, it’s crucial to understand every aspect – including running rigging. Fear not, fellow adventurer! This comprehensive guide will unravel the mysteries surrounding running rigging and equip you with valuable knowledge to embark upon your own nautical odyssey.
1. The Foundations: What is Running Rigging? Running rigging encompasses all the ropes and lines aboard a sailboat that are used to control sails and their systems. Think of it as a symphony conductor guiding each instrument precisely when they are needed. Understanding its components requires delving into various key elements.
2. The Halyards: Hoisting Your Sails with Elegance Halyards form an integral part of running rigging by facilitating the raising and lowering of sails effortlessly. These vital maneuvering aids connect from the masthead down to specific positions where they secure each sail precisely at one end while granting sailors control at their opposite extremity.
3. Sheets & Controls: Directing Your Power Source Next up in our deconstruction are sheets and controls – essential components for controlling sails’ angles based on wind direction. By cunningly pulling or easing these lines, you can swiftly adjust your sails’ positioning according to weather shifts, resulting in optimal performance .
4. Cleats & Winches: From Taming Lines to Seizing Moments Even Hercules would yield to cleats and winches when taming robust ropes! Cleats serve as steadfast anchors onto which lines can be temporarily secured, providing necessary stability during navigation’s turbulent moments. Winches, on the other hand, offer mechanical assistance by efficiently winding or unwinding lines using a drum mechanism – a sailor’s secret weapon for effortlessly controlling lines under high tension.
5. Blocks & Pulleys: The Silent Workhorses Up Above Blocks and pulleys, hidden amongst the chaos of running rigging, serve as silent heroes deserving recognition. These nifty devices allow lines to redirect their path efficiently, minimizing friction while maximizing mechanical advantage. Imagine them as your trusty allies, ensuring smooth adjustments without burdening you with unnecessary strain.
6. Mainsail Furling Systems: Embracing Elegance in Simplicity To master running rigging effectively, one must grasp the concept of mainsail furling systems. These mechanisms enable swift and straightforward reefing or unfurling of the mainsail using dedicated ropes or electrically-powered systems. By harnessing this technology correctly, you’ll unlock newfound ease in sailing endeavors.
Conclusion: Congratulations! You’ve delved into the intricate world of running rigging on a sailboat and emerged more enlightened than ever before. As you embark upon your maritime journey armed with this invaluable knowledge, remember that practice leads to mastery. Understanding how these distinct elements harmonize will transform you into a maestro, skillfully orchestrating every aspect of your sailing adventure with grace and finesse. Bon voyage!
A Step-by-Step Guide to Setting Up Running Rigging on a Sailboat
Title: Sailing with Confidence: A Masterclass on Setting Up Running Rigging
Introduction:
Embarking on the open sea , feeling the wind against your face as you glide through the water, there’s no greater thrill than sailing. However, to truly harness the power of the wind and have a seamless experience, it is essential to understand how to set up your running rigging. In this comprehensive guide, we will take you through each step of this crucial process, equipping you with the knowledge and confidence necessary for smooth sailing adventures.
1. Assessing Your Needs: The Foundation for Success
Before diving into the nitty-gritty details of setting up your running rigging, it’s important to assess your specific needs according to your sailboat’s design and intended use. Factors such as boat size, mast height, and sail types play a significant role in determining which rigging configurations will work best for you.
2. Selecting Materials: Optimal Performance, Durability & Safety
Choosing suitable materials for running rigging is paramount to ensure reliable performance while maintaining the safety of both crew and vessel. From strong yet lightweight synthetic fibers like Dyneema or Spectra to traditional options such as polyester or nylon, understanding their properties and appropriate applications is essential in making informed decisions.
3. Understanding Key Terminology: Speaking Sailors’ Language
Like any specialized field, sailing has its own set of terminology that can feel overwhelming at first. Fear not! We’ll guide you through key terms such as halyards (hoisting lines), sheets (lines controlling sails), reefing lines (to reduce sail area), allowing you to converse confidently with fellow sailors.
4. Anchoring Your Mast: Secure Your Foundation
The process begins by firmly anchoring your mast at its base using a fitting called a mast step or deck collar. This immovable foundation provides stability throughout various sailing conditions while reducing unnecessary strain on all related rigging components .
5. Hoisting the Sails: Halyards & Their Art
To set sail, a crucial step involves hoisting your sails with precision. Correctly attaching halyards to the designated points on the mast and sail, while ensuring proper tension and alignment, will enable you to control raising, lowering, and reefing the sails with ease—an art form in itself.
6. Harnessing the Wind’s Power: Sheets & Trimming
Once your sails are aloft, skillful manipulation of sheets becomes paramount. Understanding how to trim them properly allows you to harness the wind’s power effectively while achieving maximum speed and maneuverability—a true dance between sailor and nature.
7. Streamlining Movement: Fairleads & Blocks
Efficiency is key when it comes to running rigging. By employing fairleads (pulleys) strategically placed around your vessel and appropriately using blocks (pulley combinations), you can minimize friction within your system, allowing for fluid movement with less effort during sail adjustments.
8. Reducing Sail Area: Reefing Lines at the Ready
As conditions change or storms approach, being able to reduce sail area swiftly is essential for safety purposes. Learning how to utilize reefing lines effectively enables you to adapt your sails according to environmental demands without sacrificing control or stability.
9. Fine-Tuning Your Set-Up: Tension & Balance
The final touch lies in adjusting tension throughout your running rigging system to achieve optimal balance and performance. Maintaining proper tension prevents undesirable effects like excessive wrinkles on sails or slack lines that compromise efficiency—fine-tuning that separates amateurs from seasoned sailors.
10. Everyday Maintenance: Caring For Your Rigging
Just as a well-maintained engine ensures peak performance, regularly caring for your running rigging also guarantees smooth operation over time. Simple tasks such as rinsing off saltwater residue or inspecting for wear and tear go a long way in prolonging the life of your rigging and ensuring a safe voyage.
Conclusion:
With this step-by-step guide, you are now equipped with the knowledge needed to set up running rigging on your sailboat like a seasoned sailor. By understanding the essential components, choosing suitable materials, and mastering the techniques necessary for trimming and maintenance, you’ll confidently navigate the open seas while experiencing the true joy of sailing . Bon voyage!
Frequently Asked Questions about Running Rigging on a Sailboat Demystified
Welcome to the world of sailing! If you’re a beginner or even if you’ve been sailing for a while, running rigging can often seem like a complex and confusing topic. But fear not! In this blog post, we are here to demystify all your frequently asked questions about running rigging on a sailboat.
Q: What is running rigging? A: Running rigging refers to all the lines and ropes that control and adjust the sails on a sailboat. It includes halyards, sheets, reefing lines, downhauls, and any other line used to set or trim sails .
Q: Why is running rigging important? A: Running rigging plays a crucial role in controlling the shape and position of the sails, allowing the boat to harness wind power efficiently . Properly adjusted running rigging enables better sail control, improved performance, and increased safety on board.
Q: How many types of running rigging are there? A: There are several types of running rigging found on most sailboats. Some common ones are halyards (used to lift or lower the sails), sheets (used to control the tension and angle of the sails), outhauls (used to adjust the foot of the mainsail), furling lines (used for rolling up or unfurling headsails), and vang systems (used for controlling boom height).
Q: What materials are used in running rigging? A: Traditionally, natural fibers like hemp or manila were used for ropes. However, modern sailboats mostly use synthetic fibers such as polyester or Dyneema due to their durability, low stretching properties, and resistance to UV degradation.
Q: How do I choose the right running rigging for my boat? A: The choice of running rigging depends on various factors such as boat size/type, sailing conditions, intended use, personal preference, and budget. It’s always advisable to consult with a reputable rigging professional who can assess your specific requirements and recommend the appropriate type and diameter of ropes for your boat .
Q: How often should I replace my running rigging? A: The lifespan of running rigging depends on various factors including usage, exposure to sunlight, and regular maintenance. As a general rule of thumb, inspect your running rigging regularly for signs of wear and tear. If you notice any fraying, excessive stretching, or damage, it’s essential to replace the affected lines promptly.
Q: Can I maintain my own running rigging? A: Yes! Regular maintenance is key to prolonging the life of your running rigging. Simple tasks like washing with fresh water after use, removing dirt or salt residue, and storing the lines properly can significantly extend their lifespan. However, if you’re unsure about any specific maintenance tasks or need assistance with more complex issues, it’s best to seek advice from a professional rigger.
Q: Are there any advanced techniques related to running rigging? A: Absolutely! Advanced sailing techniques often involve various adjustments using different lines simultaneously. For example, using barberhaulers to control genoa sheeting angles or implementing cunningham systems for mainsail shape adjustments. These techniques require practice and knowledge but can greatly enhance sail efficiency and boat performance.
Now that we’ve demystified some frequently asked questions about running rigging on a sailboat, we hope you feel more confident in understanding this vital aspect of sailing. Remember that every boat is unique, so investing time in learning about and maintaining your specific running rigging system will undoubtedly pay off in smoother sailing experiences ahead!
Choosing the Right Materials for Your Sailboat’s Running Rigging
When it comes to your sailboat’s running rigging, choosing the right materials can make all the difference in ensuring optimal performance and longevity. But with a plethora of options available, it can be a daunting task. Fear not, for we are here to guide you through this decision-making process, providing you with a detailed professional, witty and clever explanation.
First and foremost, let’s clarify what we mean by “running rigging.” In sailing terms, this refers to all the lines (ropes) used to control the sails and their adjustments while underway. These lines include halyards (used for raising and lowering the sails), sheets (controls the angle and trim of the sails), and various other control lines like reefing lines or vang lines. Each requires specific characteristics based on its purpose.
When considering materials for running rigging, durability is paramount. You want something that can withstand constant exposure to UV rays, saltwater, friction wear, and general wear and tear. One material that stands out in terms of resilience is Dyneema®. This high-performance synthetic fiber boasts an incredible strength-to-weight ratio similar to steel but without the weight or corrosion concerns. Paired with excellent resistance to UV degradation and abrasion resistance properties, Dyneema® offers a long-lasting solution for your running rigging needs.
But hold on! While Dyneema® may seem like an obvious choice, there are other factors to consider as well. For instance, ease of handling plays a significant role in determining which material is right for you. Some sailors prefer traditional materials like polyester or nylon due to their familiar feel and ease of tying knots. However, these materials tend to stretch more under load compared to Dyneema®, which can affect sail shape and overall performance .
To address this issue without compromising on durability or ease of handling completely, manufacturers have developed hybrid rope constructions where different fibers are combined strategically within a single line. For example, a Dyneema® core can be paired with a polyester or Technora cover, harnessing the best of both worlds. This combination provides the strength and low stretch characteristics of Dyneema® while maintaining that traditional feel when handling.
Now, let’s sprinkle in some wit and cleverness as we delve into the importance of reliability. When out on the open seas, you don’t want to be caught off guard by a line failure because you chose an unreliable material. Imagine your excitement as the wind picks up, preparing for an exhilarating sail, only to have your sailing dreams dashed due to a snapped halyard! Trust me; it’s not an experience you’ll find amusing, nor will your crew appreciate your comedic skills at such moments. So, don’t skimp on quality.
To ensure reliability and avoid any unplanned comedy acts on board, investing in well-respected brands known for their commitment to excellence is key. Reputable manufacturers like New England Ropes or Marlow Ropes are popular choices among sailors worldwide. Their rigorous testing processes and innovative designs guarantee performance reliability no matter what Mother Nature throws your way.
We hope this detailed professional, witty and clever explanation has shed some light on choosing the right materials for your sailboat’s running rigging. Remember to consider durability, ease of handling, and reliability when making your decision. And if you’re still unsure or need further assistance—don’t hesitate to reach out to fellow sailors or consult with professionals who can offer personalized advice tailored to your unique sailing style. Happy rigging!
Essential Tips for Properly Maintaining and Inspecting Running Rigging on a Sailboat
As any experienced sailor knows, properly maintaining and inspecting the running rigging on a sailboat is crucial for optimal performance and safety on the water. The running rigging refers to all the lines or ropes that control the sails, such as halyards, sheets, and control lines. Neglecting this essential aspect of sailboat ownership can lead to inefficiencies in sailing, potential equipment failures, or even dangerous situations while out at sea. So, whether you’re a seasoned sailor or just starting out, here are some essential tips to keep your running rigging in top shape.
1. Regular Inspection: The first step in proper maintenance is conducting regular inspections of your running rigging. Look for signs of wear and tear such as fraying, chafing, or any weakening spots in the ropes. Pay close attention to areas where lines are frequently under tension or make contact with other hardware, as these are typically high-stress areas prone to damage.
2. Cleaning: It’s vital to keep your running rigging clean and free from contaminants like dirt, saltwater residue, or mildew buildup that can affect their performance over time. Use a mild soap and water solution along with a soft brush to scrub away any grime.
3. Protect from UV Damage: Exposure to sunlight can accelerate the wear and degradation of your ropes due to UV radiation. Consider covering them with protective sleeves or using UV-resistant coatings specifically designed for sailing applications.
4. Lubrication: Keeping your running rigging well-lubricated ensures smooth operation and prolongs their lifespan. Apply a suitable marine-grade lubricant to reduce friction between moving parts like pulleys and cleats but be cautious not to apply excessive amounts that could attract dirt or create messy situations.
5. Check Fittings & Hardware: A comprehensive inspection should include examining all fittings and hardware associated with your running rigging – blocks, shackles, cam cleats – to ensure they are in proper working order. Tighten any loose fittings and replace any worn or damaged hardware promptly.
6. Replace Worn-out Lines: As with anything made of rope, running rigging will eventually reach the end of its serviceable life. Don’t wait for lines to fail before replacing them. Look out for signs like significant diameter reduction, loss of flexibility, or extensive wear and tear. Replacing worn-out lines early can save you from potential accidents or interruptions during your sailing adventures .
7. Proper Storage: When not in use, it’s essential to store your running rigging properly to avoid unnecessary damage or deterioration. Coil the lines neatly and hang them in a cool, dry place where they are protected from direct sunlight and extreme temperatures.
By following these essential tips for maintaining and inspecting your sailboat’s running rigging, you’ll be able to enjoy smooth sailing while ensuring your safety out on the water. Regular inspections, cleaning, UV protection, lubrication, checking fittings and hardware, timely replacements when necessary, and proper storage – all these factors contribute to keeping your running rigging in top shape for optimal performance on every voyage.
Remember that sailboat ownership is an ongoing learning process – stay curious and educate yourself further through reputable sources such as books or online forums dedicated to sailing techniques and equipment maintenance. Happy sailing!
Upgrading Your Sailboat’s Running Rigging: What You Need to Know
When it comes to sailing, few things are as important as the running rigging of your sailboat. From controlling your sails to maneuvering through tricky waters, the quality and functionality of your running rigging can make all the difference in your sailing experience. In this blog post, we will explore everything you need to know about upgrading your sailboat’s running rigging.
Why Upgrade?
Before diving into the details of upgrading your running rigging, let’s discuss why it is necessary in the first place. Over time, the wear and tear on a sailboat’s running rigging can lead to compromised performance and safety concerns. As such, periodic upgrades become essential to ensure optimal functionality and reliability on the water .
Choosing Material
One of the most critical decisions when upgrading your running rigging is choosing the right material. Traditionally, sailboats have used materials like polyester or Dacron for their ropes. While these options are cost-effective and suitable for casual sailors, advanced materials like Dyneema or Spectra offer superior strength-to-weight ratio and lower stretch capabilities.
Furthermore, these modern fibers provide exceptional durability against UV degradation and abrasion resistance – perfect for longer ocean passages or demanding racing environments. Investing in high-quality lines may be more expensive upfront but pays off by enhancing both safety and performance while extending the overall lifespan of your rigging system.
Understanding Line Construction
Now that we’ve covered material options let’s move onto line construction. When choosing new lines for your running rigging upgrade, understanding their construction plays a vital role in achieving desired results.
Double braid construction is one popular option known for its balance between stretch resistance and knotability. It consists of a core surrounded by a braided outer cover – providing both strength and flexibility when handling heavier loads.
Alternatively, single braid construction offers improved flexibility by using only one continuous rope with a braided or twisted cover. This design is perfect for smaller sailboats, giving you lighter and more manageable lines while sacrificing some load-bearing capacity.
Finding the Perfect Fit
Upgrading your running rigging goes beyond simply replacing old lines with new ones; finding the perfect fit for your specific needs is crucial. Before making any purchases, take time to assess how you use your sailboat and what characteristics matter most to you.
Consider factors like line diameter, breaking strength, elongation under load, and grip comfort when evaluating potential options. While durability is essential, striking the right balance between strength and weight can significantly enhance your sailing experience .
Installation 101
Now that you’ve selected the ideal running rigging components let’s talk about installation. Proper installation ensures optimal functionality and reduces potential snags or accidents on the water.
Start by studying your sailboat’s existing rigging setup and create a detailed plan to avoid confusion during installation. If possible, consult with experts or refer to manufacturer guidelines for best practices.
Lastly, pay careful attention to tensioning techniques when installing your new lines – correct tension prevents slack that may hinder overall performance during navigation.
Maintaining Your Upgrade
Once completed, maintaining your newly upgraded running rigging becomes an essential part of owning a sailboat. Regular inspection of ropes for wear and tear is necessary since even high-quality materials require upkeep.
Additionally, proper storage away from UV rays and harsh weather conditions can further extend the life of your upgraded running rigging. By following maintenance guidelines provided by manufacturers and incorporating routine checks in pre-sail preparations, you can ensure continued reliability throughout every journey.
Upgrading your sailboat’s running rigging is a worthwhile investment that guarantees enhanced safety and performance while providing endless possibilities on the water. Choosing suitable materials based on usage patterns, understanding line construction principles, finding the perfect fit for specific needs, meticulous installation processes, and regular maintenance are key elements in achieving desired results.
So, take the plunge and upgrade your running rigging today – it’s time to elevate your sailing experience to new heights!
Recent Posts

- Sailboat Gear and Equipment
- Sailboat Lifestyle
- Sailboat Maintenance
- Sailboat Racing
- Sailboat Tips and Tricks
- Sailboat Types
- Sailing Adventures
- Sailing Destinations
- Sailing Safety
- Sailing Techniques
Service Locator
- Angler Endorsement
- Boat Towing Coverage
- Mechanical Breakdown
- Insurance Requirements in Mexico
- Agreed Hull Value
- Actual Cash Value
- Liability Only
- Insurance Payment Options
- Claims Information
- Towing Service Agreement
- Membership Plans
- Boat Show Tickets
- BoatUS Boats For Sale
- Membership Payment Options
- Consumer Affairs
- Boat Documentation Requirements
- Installation Instructions
- Shipping & Handling Information
- Contact Boat Lettering
- End User Agreement
- Frequently Asked Questions
- Vessel Documentation
- BoatUS Foundation
- Government Affairs
- Powercruisers
- Buying & Selling Advice
- Maintenance
- Tow Vehicles
- Make & Create
- Makeovers & Refitting
- Accessories
- Electronics
- Skills, Tips, Tools
- Spring Preparation
- Winterization
- Boaters’ Rights
- Environment & Clean Water
- Boat Safety
- Navigational Hazards
- Personal Safety
- Batteries & Onboard Power
- Motors, Engines, Propulsion
- Books & Movies
- Communication & Etiquette
- Contests & Sweepstakes
- Colleges & Tech Schools
- Food, Drink, Entertainment
- New To Boating
- Travel & Destinations
- Watersports
- Anchors & Anchoring
- Boat Handling
- ← Maintenance
Tuning A Sailboat Rig
Advertisement
If your sailboat seems slower, follow our how-to on tuning your rig for optimal performance.

Photo: Bigstock
Spring is a time of prepping your boat for the coming season. While powerboaters fine-tune their engines, sailors should consider fine-tuning their rigs. Doing it yourself may seem intimidating, but it shouldn't be. Anyone reasonably handy can do it in a few hours. The reward is easier and faster sailing throughout the coming season.
Let's start with the basics for new sailors. With a few exceptions, a sailboat mast is held up by a series of stainless-steel wires. But those wires also perform several other equally important functions. When a sailboat is at rest and there is no wind blowing, the stress on these wires is very light with almost all the load downward toward the keel. However, when the boat is sailing and heeled over in a fresh breeze, more stress is placed on the wires and they have to work harder to hold the mast upright and stop it from bending.
The wires that prevent the mast from moving from side to side are called shrouds, and the ones that prevent fore and aft movement are called stays. The larger and taller the mast, the greater the load, and the number of shrouds and stays required. On a typical cruiser, say up to about 35 feet, there will generally be one forestay, one backstay, and two shrouds on each side.
To get the best performance from your boat and sails, the rigging needs to be set up correctly — often called "tuning the rig." The rig should be tuned with the boat in the water on a day with little to no wind. You'll also want to be away from wakes and other boats that can rock your boat. To start, the turnbuckles for the stays and shrouds should be hand-tight only. This is sufficient to hold up the rig but places no strain on anything — yet. Lay on your back on the boat's foredeck and sight up the front of the mast. It should be perfectly straight with no bends or kinks. Next, tighten the lower shrouds — these are the ones that do not go all the way to the top of the mast and often attach to the mast at the base of the crosstrees (the two horizontal spars at the upper ends of the topmasts).
You'll need a large screwdriver to rotate the turnbuckle, and a wrench to hold the shroud fitting and prevent it turning as you tighten. Give a couple of complete turns on either side. Have a helper release the main halyard and keep a little tension while you pull down the end that normally attaches to the mainsail until it just touches the top of the toerail adjacent to the chain plate. Have your helper cleat off the halyard, then swing the halyard over the boom and check the measurement on the other side. They should be the same. If not, adjust the turnbuckles until they the measurement is equal on port and starboard.

Adjusting and tuning a sailboat rig will often bring benefits such as easier handling and better performance.
Next do the same for the cap shrouds, these are the ones that go to the top of the mast, but note that due to the length of the shrouds, it is easy to bend the mast to either port or starboard. With the shrouds adjusted, sight up the mast one more time to ensure that it is still straight.
Next comes the fore and aft adjustment, which is made with the backstay and forestay. Masts should be plumb or lie back slightly. It should never rake forward. A good starting point is to tighten up the forestay and backstay a little over hand-tight. Use the main halyard as a plumb bob. Cleat off the halyard so the free end is just clear of the top of the boom and let it hang. If the shackle on the end of the halyard hits the mast, the mast is likely too far forward, so slacken off the forestay and tighten the backstay. Adjust a little at a time until the end of the halyard hangs free — 4 or 5 inches is a good starting point.
You'll need to install cotter pins into the turnbuckles to prevent them loosening over time, but before doing that, take the boat for a sail when the wind is blowing about 10 knots and see how everything works. With the boat on a beam reach, note the tightness of the windward shrouds. If they appear slack, they will need to be adjusted up. If the boat is hard on the tiller or wheel and tries to turn into wind, the mast has too much aft rake, so you'll want to slacken the backstay and tighten up on the forestay a little. If the bow wants to turn away from the wind, the mast is too far forward, so you'll need to move the mast back a little.
If you are at all unsure about tackling this task, play it safe and smart — seek out the services of a qualified rigger who has access to rig tension gauges and other specialized tools.
Related Articles
The truth about ceramic coatings for boats.
Our editor investigates the marketing claims of consumer-grade ceramic coatings.
Fine-Tune Your Side Scan Fishfinder
Take your side-scanning fishfinder off auto mode, and you’ll be spotting your prey from afar in no time
DIY Boat Foam Decking
Closed-cell foam flooring helps make boating more comfortable. Here’s how to install it on your vessel
Click to explore related articles
Contributing Editor, BoatUS Magazine
A marine surveyor and holder of RYA Yachtmaster Ocean certification, BoatUS Magazine contributing editor Mark Corke is one of our DIY gurus, creating easy-to-follow how-to articles and videos. Mark has built five boats himself (both power and sail), has been an experienced editor at several top boating magazines (including former associate editor of BoatUS Magazine), worked for the BBC, written four DIY books, skippered two round-the-world yachts, and holds the Guinness World Record for the fastest there-and-back crossing of the English Channel — in a kayak! He and his wife have a Grand Banks 32.
BoatUS Magazine Is A Benefit Of BoatUS Membership
Membership Benefits Include:
Subscription to the print version of BoatUS Magazine
4% back on purchases from West Marine stores or online at WestMarine.com
Discounts on fuel, transient slips, repairs and more at over 1,200 businesses
Deals on cruises, charters, car rentals, hotel stays and more…
All for only $25/year!
We use cookies to enhance your visit to our website and to improve your experience. By continuing to use our website, you’re agreeing to our cookie policy.
What Is Rigging?
Rigging has been an essential part of preparing vessels for travel since the invention of the first sailboat. The word is both a noun and a verb, meaning “clothing” or “to clothe” in old Anglo-Saxon. Sailors must put all the ship’s components in place before setting sail. It doesn’t matter if they’re operating a small recreational boat or a massive commercial vessel.
For today’s container ships, rigging revolves around loading and securing essential equipment and cargo, while rigging for classic sailboats deals with the sails. Here’s more on the rigging process of modern and traditional ships.

Rigging Modern Ships
The rigging of modern container ships involves loading and securing equipment and cargo before transport. Every vessel has a unique rigging plan that shipyard workers or “riggers” must follow with utmost precision.
A rigging plan is basically a blueprint for lifting and securing heavy loads onto the ship. This blueprint includes the positions, sizes and safe working loads (SWL) of the deck eye plates, runners, guys, twist locks, wedges, chocks, beams, preventers and shackles. Many of these parts are found on traditional sailing ships and play the same role of keeping equipment steady.
Most commercial ships today have all the equipment they need already on board. As such, shipping companies try to avoid unrigging the equipment to improve their shipping efficiency and save more time between voyages. However, they still require rigging when loading fresh cargo or if something needs to be repaired or replaced.
The shackles — also known as “gyves” — are the key pieces of the rigging puzzle. They are responsible for connecting the crane or forklift to the load, which means they must be durable. Industrial shackles used for shipping, manufacturing and other industrial applications are made exclusively of steel , whether galvanized, alloy, carbon or stainless.
Cranes and front-loading and side-loading forklifts are the primary machines used to load cargo, but sometimes specialized machinery is required. Riggers might have to use top handlers, side handlers, straddle carriers, reach stackers or radial telescopic shiploaders. The bigger the ship, the more vehicles are usually required.
As the riggers load the equipment on board, they may have to redistribute the weight so the ship doesn’t lean too far in any direction. One common example of weight redistribution is trimming, in which the riggers shift around dry bulk cargo to help the vessel remain balanced. They may also use different stacking techniques when loading containers on top of each other.
The final step in the rigging process is inspecting the newly repaired or added parts. Inspectors may put the components through nondestructive testing to ensure they meet industry standards and the vessel’s specifications. The crew must also confirm that every piece of cargo or equipment not directly attached to the ship is secure.
Rigging Traditional Sailing Ships
While rigging is a verb when referring to modern cargo and container ships, it becomes a noun when referencing traditional sailing ships. A vessel’s rigging consists of the ropes, cables, and chains that support and control the masts and sails. Preparing these parts for a long voyage involves various tasks depending on the vessel’s size and shape.
For older square-rigged boats, the sails are rigged from side to side. For newer boats, the sails are rigged from front to back — also known as fore-and-aft. Ships with fore-and-aft rigs quickly became the most common option once sailors realized the triangular sails could point higher into the wind and offered more maneuverability.
One or two experienced people can easily assemble a sailboat’s rigging for personal use. The first task is to install the rudder, which is the steering apparatus that attaches to the stern. The next attachment is the tiller, a long, thin steering arm that connects to the rudder for better control.
With the rudder and tiller in place, it’s time to focus on the sails. Unlike modern cargo ships that can keep all their equipment on board, sailboats must have their sails removed after each voyage to avoid getting damaged. Putting the sails back on the boat is called “bending on” because the crew must bend them into place.
The next item that gets attached is the jib halyard shackle, which connects to the top corner of the sail or the head. The grommet attaches to the front bottom corner of the sail, also known as the tack. The grommet and tack are then shackled to the fitting at the bottom of a piece of standing rigging called the forestay.
The next step’s difficulty largely depends on the wind. If it’s a calm day, one person can easily attach the jib halyard to the forestay. This step is called “hanking” because you need to clip the hanks — the spring-loaded iron rings that keep the sales in place — onto the forestay. There must not be any twists or creases in the sail as it slowly gets raised into position.
When all the hanks are attached to the forestay, the jib sheets are secured to the sail’s clew. All these preparations are required before rigging the mainsail. The mainsail connects to the main halyard, which is almost the same as attaching the jib halyard. The main halyard also serves as a topping lift on smaller sailboats to keep the mast’s boom in place.

The mainsail gets secured to the boom at three points — the luff, clew and foot. The luff is the leading edge, the clew is the front lower corner and the foot is the bottom edge. For some boats, the foot doesn’t attach to the boom and instead gets drawn tightly so it doesn’t move. These boats are called loose-footed sailboats.
Finally, the mainsail is attached to the mast with a bolt rope or “slugs” that are evenly spaced on the luff. Continue raising the mainsail and inserting each slug. When the mainsail is all the way up, pulling on the halyard creates more tension in the luff and keeps the sail in place. Then, the halyard gets tied to the cleat hitch so everything is secure.
As evidenced by the complex terminology and detailed steps, rigging a full-size sailboat for commercial use is a lot of work. Plus, the crew must account for the ship’s unique sail structure. Sailboats can have multiple types of rigging that require special steps for assembly. Here’s a detailed breakdown.
- Standing Rigging
Standing rigging refers to the lines, wires and rods that remain in a fixed position. These components are almost always located between the mast and main deck. Their tension helps the mast stay in place and prevents it from swaying. Standing rigging used to be made of tar-coated rope, but today, it’s made of steel cables.
- Running Rigging
Running rigging includes the cordage that controls the sails’ positioning. The halyards raise the sails and regulate their tension, while the outhaul, downhaul and clew regulate the sail’s shape. Sheets and braces control the sail’s orientation to the wind. Manilla rope was historically the material of choice, but now ropes with synthetic fibers are more common.
- Sloop Rigging
Sloop rigging consists of a single mast with a triangular mainsail and jib. It’s a common arrangement on sailboats from small dinghies to large commercial cruisers. Beginner sailors often choose boats with slope rigging because of their simple layout. It dates back to the 1600s when European sailors perfected the design.
- Cutter Rigging
Cutting rigging has a similar layout to sloop rigging, but it has an additional headsail that provides extra control over speed and direction. The headsail is smaller than the mainsail and jib so one person can control it if necessary. It’s a great choice for longer voyages and journeying through heavy winds.
- Ketch Rigging
Ketch rigging consists of two masts instead of one, which is common on larger sailboats. The main mast is standard size, but the mizzen mast near the rudder is smaller. Both are triangular in shape. Ketch rigging is highly versatile because the sail connected to the mizzen mast can be taken down if necessary.
- Yawl Rigging
Yawl rigging is similar to ketch rigging, but the mizzen mast is closer to the bow for more control. The slight change in mast location offers more control over the boat’s direction in heavy winds. Again, the mizzen mast’s sail doesn’t have to be used. The crew can always lower it and effectively return to a sloop rigging design without missing a beat.
There are many other outdated or little-used rigging types, including lateen, gaff, junk, gunter, settee and crab claw rigging. These configurations are no longer popular for one of two reasons. Either they utilized square sails instead of triangular sails or they relied on freestanding masts, which are unstable without extra standing rigging.
Rigging Comes in Many Forms
Rigging comes in many forms. It means something entirely different for modern cargo ships and traditional sailboats. For engine-powered vessels, rigging refers to the loading and securing of equipment. For sailing ships, rigging refers to the various ropes, cables and other devices that connect the masts and sails. In both cases, many subcategories and technical terms are underneath the surface.
Frequently Asked Questions
What does rigging mean.
Rigging can mean several things depending on the vessel in question. For modern engine-powered ships, rigging simply means loading and securing equipment or cargo. For traditional sailboats, rigging means the various components that connect the sail and mast and allow the boat to navigate.
What is the rigging process of a cargo ship?
Rigging a cargo ship includes a plan that maps out all the ship’s components that hold equipment or cargo in place. Shipyard workers, or riggers, load the equipment to the plan’s exact specifications and utilize different storage or weight distribution methods. The final step is an inspection, which may include nondestructive testing for compliance.
What is the rigging process of a sailboat?
The rigging process of a sailboat has many more steps. For a simple vessel, the crew has to install or connect the rudder, tiller, jib and mainsail. Each part requires careful precision because the sails can’t be twisted, creased or unstable.
Which sails are best for rigging?
Historically, square sails were the most popular ones to rig on ships. However, triangular sails have become the dominant shape because they can catch the wind at a higher point, giving the crew more control over the vessel.
What are the different types of rigging?
There are many different types of rigging. For starters, every sailboat has standing and running rigging. Standing remains stationary, while running moves around and controls the positions of the sails. Other common types include sloop, cutter, ketch and yawl.
- Recent Posts

- Marine Satellite Internet: How Ships Keep Connected – July 10, 2024
- What to Wear on a Boat – June 24, 2024
- What Happens if a Ship Loses Power? – June 17, 2024
About the author
Jack is a freelance writer and lover of the ocean. He seeks to see as much of the world as he can and shares descriptions of his knowledge and experiences through his writing. His works can be found on Modded, Marine Log, The Institute of Supply Chain Management and more, or you can contact him via LinkedIn.
Leave a Reply Cancel reply
Your email address will not be published. Required fields are marked *
Save my name, email, and website in this browser for the next time I comment.
Latest posts

Marine Satellite Internet: How Ships Keep Connected
Some boaters take leisurely trips to the lake while others venture into the ocean, far removed from the rest of civilization. Thankfully, marine satellite internet helps ships stay connected.

What to Wear on a Boat
Sailing on a ship requires extensive preparation. In addition to understanding its components and how to operate it, people must also know what to wear on a boat.

What Happens if a Ship Loses Power?
A power outage is among the worst issues for maritime professionals. What happens if a ship loses power?
- Find A School
- Certifications
- North U Sail Trim
- Inside Sailing with Peter Isler
- Docking Made Easy
- Study Quizzes
- Bite-sized Lessons
- Fun Quizzes
- Sailing Challenge
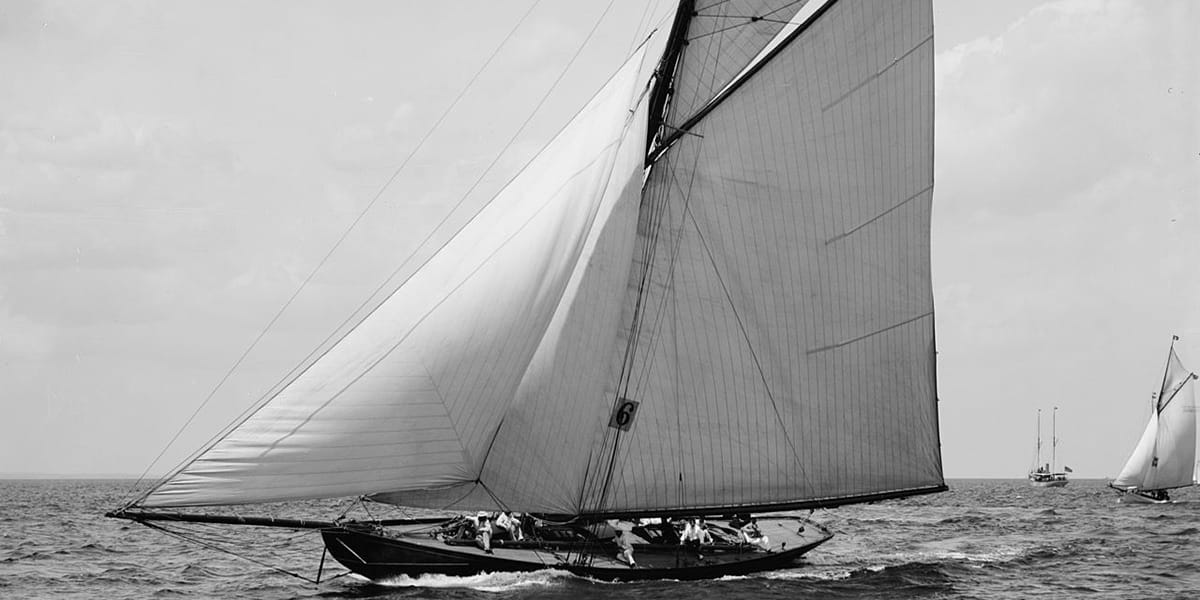
What’s in a Rig? The Gaff Rig
By: Pat Reynolds Sailboat Rigs , Sailboats
What’s in a Rig Series #6 – Gaff Rig
What’s a gaff rig? Well, first… what’s a gaff? A gaff is a spar, or a strong pole. A gaff rig employs a spar on the top of the sail and typically other sails can be set in conjunction with that mainsail with the gaff. Often, on the smaller, non tall ship, gaff rigs, there will be a small triangular sail that fits between the main and the mast like a puzzle piece – this is the topsail.
The gaff rig was the standard manner of rigging a sailboat a century ago and before. The thinking at that time had to do primarily with the ability to manage sail area. The sails weren’t made of the lightweight synthetics of today and there was solid logic involved in dividing the sail plan into pieces for the purposes of balancing and reefing in strong winds. Like today, sailors wanted horsepower via sail area and fractioned rigs allowed skippers to also manage it more easily.
These rigs weren’t so wonderful upwind, so when the bermuda rig was introduced, with their efficiency and simplicity, the gaff rig fell out of favor. Modern sloops dominated the scene and continue to do so, but during the 1960s, folks began to say, “actually gaff rigs are kind of cool,” and there was something of a resurgence based on a love for history and the beauty of the rig.
Today, gaff rigs are still around, sailed by sailors who love what they represent and some that swear by their sailing capabilities. Like the ketch rig, gaff rig lovers will say that the configuration produces less heel, a more comfortable sail, better balance and more choices for reefing in heavier winds. They might also speak of the practicality of being out at sea and having the ability to make repairs to a a part of the rig with plenty of rig still intact and operational.
However, the gaff rig’s greatest pull is probably its classic appearance. There is something so undeniably dignified and stalwart about a fully rigged, gaff-rigged sailboat making its way. They are living reminders of where technology was and the importance of solid craftsmanship that existed at that time. They exude beauty and carry with them a spirit that is unique and distinct.
What's in a Rig Series:

Related Posts:

- Learn To Sail
- Mobile Apps
- Online Courses
- Upcoming Courses
- Sailor Resources
- ASA Log Book
- Bite Sized Lessons
- Knots Made Easy
- Catamaran Challenge
- Sailing Vacations
- Sailing Cruises
- Charter Resources
- International Proficiency Certificate
- Find A Charter
- All Articles
- Sailing Tips
- Sailing Terms
- Destinations
- Environmental
- Initiatives
- Instructor Resources
- Become An Instructor
- Become An ASA School
- Member / Instructor Login
- Affiliate Login
- New Sailboats
- Sailboats 21-30ft
- Sailboats 31-35ft
- Sailboats 36-40ft
- Sailboats Over 40ft
- Sailboats Under 21feet
- used_sailboats
- Apps and Computer Programs
- Communications
- Fishfinders
- Handheld Electronics
- Plotters MFDS Rradar
- Wind, Speed & Depth Instruments
- Anchoring Mooring
- Running Rigging
- Sails Canvas
- Standing Rigging
- Diesel Engines
- Off Grid Energy
- Cleaning Waxing
- DIY Projects
- Repair, Tools & Materials
- Spare Parts
- Tools & Gadgets
- Cabin Comfort
- Ventilation
- Footwear Apparel
- Foul Weather Gear
- Mailport & PS Advisor
- Inside Practical Sailor Blog
- Activate My Web Access
- Reset Password
- Customer Service

- Free Newsletter
Maine Cat 41 Used Boat Review

CS 30 Used Boat Review

Hinckley 49 Used Boat Review

Island Packet 31 Used Boat Review

Best Crimpers and Strippers for Fixing Marine Electrical Connectors

Thinking Through a Solar Power Installation

How Does the Gulf Stream Influence our Weather?

Can You Run a Marine Air-Conditioner on Battery Power?

Need a New Headsail Furler? Here’s What’s Involved

Master the Sailing Basics: Never Stop Learning the Little Things

How to Mount Your Camera on Deck: Record Your Adventures with…

Un-Stepping the Mast for America’s Great Loop

Sinking? Check Your Stuffing Box

The Rain Catcher’s Guide

How to Change Your Engine Mounts

Keeping Water Clean and Fresh

Vinyl Boat Lettering DIY Application and Repair

Those Extras you Don’t Need But Love to Have

Three-Model BBQ Test

Alcohol Stoves— Swan Song or Rebirth?

Preparing Yourself for Solo Sailing

How to Select Crew for a Passage or Delivery

Preparing A Boat to Sail Solo

Re-sealing the Seams on Waterproof Fabrics

Chafe Protection for Dock Lines

Waxing and Polishing Your Boat

Reducing Engine Room Noise

Tricks and Tips to Forming Do-it-yourself Rigging Terminals

Marine Toilet Maintenance Tips
- Sails, Rigging & Deck Gear
Selden's 'complete package' approach to headsail furlers opens the door to the hands-on sailor.

You know it’s time to swap out your old headsail furler for a new model when the springtime hoist encounters excess friction and even hard stops on its way to the masthead. That balky headsail hoist last summer and a friction-laden furling line had us consulting websites for options. Practical Sailor has made several firm recommendations of Selden gear over the years, so a Selden Furlex rose to the top in our planning.
The last time we reviewed headsail furlers in this size (see PS August 2009 ) and price range we came to this conclusion: Among a field of quality products, Furlex stands out for its investment cast stainless hub and bearings. We named it a Best Choice and also lauded Selden for its all-you-need approach. This article is a follow up to that recommendation, focusing on installation.

We purchased a Selden 304 with a nine-inch furling drum to replace our original Plastimo seven-inch, now destined for the Smithsonian. According to Selden literature, our boat was right on the border between the 304 and the smaller 204. We rounded up.
What’s in the box?
It’s easy to underestimate what goes into a headsail furler until you see all the bits and pieces laid out and ready for assembly. According to Selden’s Scott Alexander, a Furlex system comes as a complete package right down to the replacement forestay, nuts and bolts for the turning stanchion blocks, a Sta-Lok terminal, furling line, even a pre-feeder. The unit arrives in one large square box, a flat box with the eight-millimeter forestay, and a sizeable packing tube for the headfoil sections and full-length plastic distance tubes inside them.
The distance tube runs the length inside the foil, preventing metal-on-metal contact with the headstay.
“We started using distance tubes from the beginning of the Furlex product line in 1986,” said Alexander. “Not only does it keep the stainless wire insulated, but also keeps the forestay located in the middle of the rotation. The distance tubes don’t take any load, and don’t require servicing.”
Manuals and videos for competing units tout the fact you can use your existing headstay with their roller-furlers, but they add the caveat you’ll probably be replacing your forestay anyway—and most sailors do, which means you should factor in a trip to the rigger for a new headstay when comparing the Selden to other systems.
The Furlex (and the Harken MkIV) boast two independent ball-bearing swivels at the tack. One swivel lags behind the other when the furling line is taken up, which flattens the rolled headsail around the narrow-profile, twin-groove extrusion. Twin swivels at the drum allows the tack to lag, allowing the middle, fullest section of the headsail to furl flat around a single uniform foil. We can attest that this results in a neatly compressed, wrinkle-free roll. Having two luff grooves on a cruising furler allows for the possibility of wing-and-wing downwind sailing and quick headsail changes while racing. The Selden 304 nine-inch drum can be easily removed, a nice feature for weight conscious racer-cruisers.

Selden touts its reliance on marine-grade stainless steel ball bearings in its turning components. This avoids the potential sun damage plastic ball bearings may be heir to, and the corrosion of high-carbon steel (see adjacent article, Bearing down on furling differences).

Can I do it myself?
The question remains: How much might we be able to do ourselves?
The answer is. . . quite a bit, but certainly not all. A true do-it-yourself install requires a good level of experience, a solid team and a set-up that includes a safe, expedient way to get to the masthead to detach the old furler and re-attach the new one.
The need to work aloft is often the biggest roadblock. You’ll be using your headsail halyard as a temporary fo restay, so you’ll need to haul the new furler up the masthead on a spinnaker halyard while the mainsail halyard is pressed into service for the bosun’s chair. If you don’t have a spinnaker halyard (we don’t) then you’ll need to figure out a way to go aloft.
Fortunately, Norwalk Cove Marine in Norwalk Connecticut, arranged for rigger Sean Hussey to give us a hand-and for $220 we booked their Genie articulating boomlift (a.k.a. “manlift”) for the day. Getting the boat close to the manlift is the key, so call around to find a similar solution near you. Norwalk Cove also gave us the run of their rigging shop, complete with 60-foot workbench pre-fitted with measuring tape and cutting tools at the ready.
Our install was not entirely do-it-yourself, but the Selden system encouraged a great deal of owner involvement. We installed the Furlex in record time with minimal fuss using basic hand tools: a hacksaw, adjustable wrenches, pen, calculator app, and a file. The Sta-Lok terminal was fitted with nothing more than a pair of adjustable wrenches and a Leatherman multi-tool. (See PS June 2015, Step by Step: Threaded Terminal Fittings .)
“When people ask me if they can install a Furlex themselves, I ask them if they’ve ever done a Sta-Lok terminal,” Alexander said. “That usually separates the true do-it-yourselfers from the wannabes.”
The Sta-Lok swage-less terminal has multiple hundreds of thousands of sea miles and is approved by riggers, boat makers, round-the-world racers, and Lloyds of London. Like the similarly designed Norseman terminal, it offers the benefit of disassembly and inspection well down the road. Unlike a swage fitting, mechanical terminals like a Sta-Lok can be assembled at the dock without a lot of elaborate machinery.
Perhaps the most unnerving part of working up a Sta-Lok terminal, after you slide on the units threaded male barrel, is unwrapping the wire strands from your shiny new forestay to expose the core. (And lets not forget the hives caused by that no-turning-back forestay cut.) A conical wedge is then slid over the core, a small former intended to crimp the wire strands is inserted into the female receiver and the pieces are ready to be threaded back together with a liberal application of liquid thread lock (included!).
We’re glossing over some of the subtleties—like the need to expose the core a few millimeters out the end of the wedge, ensuring no wire strands become lodged in the wedge’s compression gap, and the deceptively easy task of working the wire strands back around the core.
We learned that with some solid assistance from a knowledgeable rigger (and a You Tube video: https://bit.ly/2ks4Qdw ), one should fear no Sta-Lok. That accomplished, you’ll still have to be on your game when it comes to putting the rest of your new system together. (For a more in-depth look at Sta-Loks and other swageless terminals, see PS June 2015, Screw On Rigging Terminals ; PS April 2015, Mechanical Terminal Pull Test ; PS May 2015, Hidden Causes of Rig Failure ; and the Inside Practical Sailor Blog post Mechanical Rigging Terminals, to Seal or Not to Seal ?).
When we say complete . . .
…We really mean complete. Aside from the aforementioned parts and pieces, the Selden comes with all the terminals, foil sections, fasteners, joining sleeves and other elements right down to the braided furling line.
According to Alexander, “We include everything because we want to maintain the integrity of the system, with no parts that you didn’t know you had to buy.”
To specify the system that’s right for your boat you need to know the displacement, the length of the existing forestay and the pin size. We triangulated these parameters using Selden’s excellent user manual, which contains a very good worksheet to precisely establish where you’ll cut the provided 50-foot forestay. You’ll need to account for deductions like the extension legs for ground-tackle clearance. Selden’s website also has a righting moment calculator in kilo-Newtons per meter at 30-degrees of heel, which further refines the system that’s right for your boat. As mentioned, First Light was right on the cusp of a 304 or its smaller stablemate, so we over-specified for not much more money. The worry was that a nine-inch furling drum up in the pulpit might look a little horsey but it turned out fine, with plenty of clearance.
Measurements in the worksheet of this Swedish-built system are in millimeters, although the manual has both inches and feet. Metric avoids the 16ths, and 32nds, etc. Selden has a calculator to do all the math for you, yes this is only metric: http://www.seldenmast.com/en/services/calculators/furlex_calculator.html We also invited multiple parties to look over our math before arriving at the final cut, which we survived with just a dash of apoplexy. (Note to self: Next time make the final cut before lunch when all the calculations are fresh.) It’s also important to measure and cut the topmost foil section and internal distance tube. Again, the Selden worksheets and clear diagrams make this painless.
Our old Plastimo was held together with rivets, to which we were delighted to bid adieu. Selden relies on short joining sleeves that live inside the foils and bridge the gap between the foil sections. Aluminum connecting plates rest on the joining sleeves and slot into pre-drilled holes in the foils (see the related article, Measure Twice, Double-check Your Math for Perfect Fit. ). The Selden system offers a smart, clean design. The profile of the headfoil section is about 30-percent slimmer, reducing weight and windage aloft. The rivet-less system offers the advantage of a solid connection, but also keeps the foil sections a fraction apart to keep them from grinding against each other, especially downwind.
Assembly Precautions
Precautions include restraining the coiled forestay when it comes out of the box so it doesn’t flail around and cause injury; cleating, not shackling, the headsail halyard to a deck fitting forward when its used as a temporary forestay during the installation; maintaining a plus-10 degree angle between the halyard swivel and the sheavebox to avoid rig-threatening halyard wrap; spreading split pins adequately to secure clevis pins; and avoiding winching in the furling line, especially against a loaded sheet.
“Sometimes people tighten the halyard of a reefed headsail,” said Alexander. “This action doesn’t tighten the luff, but instead puts the load on the extrusion. Take a reefed sail, tighten the halyard, have some slack in the forestay and now add some big waves and you have a furling system that is taking the rig loads instead of the forestay.”
It helps to know what’s going on at your masthead. Will you have properly sized holes to accept your new toggle and clevis pin? Or a T-adapter (common on some fractional rigs)? Or a stemball? Still found on boats of a certain vintage. If its a stemball you’ll need an adapter. The extension link at the bottom of the system (to clear the anchor) was one of only two Selden pieces that needed to be ordered extra.
The MSRP of our Selden 304 was $4,875. It will fit masthead boats with displacements up to 18,000 pounds or fractional rigged boats up to 22,000 pounds. It includes a 5/16th wire (8mm), a bottom-end Sta-Lok terminal, an optional system-length adjuster, and everything else you’ll need including the torx bits.
What else is out there?
If you’re in the market for a replacement headsail furler you’ll have an abundance of choices that will fit your boat, your cruising style and your budget. Finding a system that’s right for you comes down to your own personal algorithm.
Racing or cruising? There are systems, like Furlex, that offer a removable drum so you can achieve a lower tack attachment typical of a racing headsail if you want to cruise the islands before Race Week. This is where the twin luff grooves come in handy.
Boat less than 30-feet LOA? You might want to consider the less expensive options from CDI, Alado, Reef Furl and Spin Tec with integral halyards and no upper swivel. (See PS September 2009, Headsail Furlers Sans Swivels .) You can use your original forestay for most of these applications, but we don’t consider that a huge advantage because most aftermarket installations will beg for a replacement anyway.
For bigger boats? Nobody doesn’t like Harken, and this proud American company will offer years of cruising and racing enjoyment. We have recommended the Harken MkIV in previous reports, and the more recent ESP line is intended for a lighter shade of cruising. In either case, you’ll have to order a replacement forestay if you decide installing a new furler is a good time to make a change. Harken literature recommends checking with a rigger on forestay condition before installation. Harken also requires separate purchases for furling lines and ratcheting stanchion blocks. As mentioned, we like Selden’s independent tack swivels at the drum end. The Harken MkIV has the same feature, but the ESP does not.
The Schaefer 2100 series is another strong option. Schaefer prefers riveted foil connections, because as they say rivets cannot freeze, strip, or back out. Rivets will need to be drilled out and replaced if repairs are needed. Again, after buying the system, you can use your boat’s existing forestay—but a new one might be in order.
ProFurl and Facnor, made in France and distributed in the U.S. by Wichard America have garnered thousands of sea miles and appear both robust and simple to install. There is one feature of the Facnor that I find particularly intriguing: A telescoping bottom foil that allows easy adjustment in foil section length without cutting. The Facnor system joins foil sections with Torx-head set screws, not rivets, which will ease dismantling if an owner is so inclined. The Facnor unit has stainless steel, no-maintenance bearings packed in grease. Like the Selden, it has an independently rotating tack fitting that results in a flatter roll.
At an MSRP of $2,149, the well-regarded ProFurl stacks up well on paper. But then you have to add a furling line, stanchion blocks, stem-end extension plates if you need them, a turnbuckle cylinder and a rigger-supplied forestay with terminals, on the educated guess your old one has seen better days. Still, that is a very attractive price for a proven furler, so adding these odds and ends might be cost effective.
Proof in the pudding
We had our friends at Quantum Sails Connecticut install a new #6 luff tape on our aging 120 percent headsail, and they executed the all-important tack cutback so the sail would fit. Raising an older sail on a new furling system tends to cast aside all rationality. It’s like putting bald tires on a Ferrari. So now we’ll have to take a hard look at the kitty for a sail upgrade.
Nonetheless, just as you get a bit of a thrill from that new-car smell, or the sight of a clean hard drive, there’s nothing like an effortless headsail hoist through a hands-free pre-feeder. And while we were expecting smooth on that first furl, we didn’t expect whipped butter.
So now were getting revved up for a set of lazy jacks, with maybe a stack pack . . . and new sails.
I better get back to work to pay for all this. . .

Assembling the foils and headstay is like any other job that involves cutting and measuring. Measure twice (at least) and cut once. It helps if you have a rigging shop with a long bench and the requisite tools at hand.
- The Selden foils, like most that are aimed at larger boats, have two grooves, simplifying sail changes.
- So-called “joining tubes” (unique to Selden) inside the foils push these stainless steel connecting plates up into pre-drilled holes in the foil section. No rivets or screws needed. The extra-long connector joins the foils adjacent to the luff feeder.
- The foil joining system allows a fraction of an inch stand off between the foil sections, which prevents any grinding, especially off the wind.
- The swaged eye of the old furler is anchored through a rod in the work bench next to a 100-foot measuring tape (set in epoxy so it won’t disappear). Getting an accurate measurement of your old system is key to building up the new, especially when it comes to getting a precise cut of your new forestay.
- To assemble the Sta-Lok fitting you insert a “cone” into the strands, which are carefully opened and unlayed using needle nose pliers. Selden has an easy-to-follow video illustrating the installation. Practical Sailor has also covered this skill in previous issues, along with some tips from professional riggers on how to maximize the hold. See PS June 2015 Step by Step: Threaded Terminal Fittings .

Bearing corrosion was the bane of early furlers, so our August 2009 report took a close look at this element.
1. The Schaefer’s drum and swivel features large races for its Torlon bearings.
2. The Profurl’s hardened carbon-steel ball-bearing set is packed in grease and protected by a double-lip seal. This should be checked on older units that exhibit signs of friction.
3. The Harken MKIV turns on Torlon and Delrin Balls, which are hidden away from damaging UV rays.
4. The Facnor LX 130 relies on UV resistant, self-lubricating Torlon bearings, which are easy to inspect and flush, but are exposed to the sun.
RELATED ARTICLES MORE FROM AUTHOR
How to mount your camera on deck: record your adventures with diy innovations.

Headsails and Spinnakers: How to Explain Their Functions to a Beginner

Practical Sailor Classic: The Load on Your Rode
Wow, awesome article. I wonder if this paragraph is in need of a set of quotation marks?
According to Alexander, We include everything because we want to maintain the integrity of the system, with no parts that you didn’t know you had to buy.
Maybe the quotes should begin before the “We” and close after “buy”? This is a tad confusing because without the quotes, it seems like the author of the article is saying this, rather than a third person.
Thanks. Good information. I once rebuilt an old Hood furler on the dock in Grenada. I found out that the main bearing was a wheel bearing from a GM car. It worked! It was about 15 yrs old when I rebuilt it and used it full time for another 5 yrs with no problem. Also had a boat with a Profurl ( my preference), that in nearly 20 yrs, I needed to replace the top swivel. So great luck there. Many thousands of sea miles on it. Especially where the only washing with fresh water is done by when it rains!
LEAVE A REPLY Cancel reply
Log in to leave a comment
Latest Videos

How To Test a Boat Engine

Hunter Legend 35.5 – Behind the Curtain

Whipping Line On Your Sailboat

Hallberg Rassy 42 – Behind the Curtain
- Privacy Policy
- Do Not Sell My Personal Information
- Online Account Activation
- Privacy Manager

Sponsored By
ADVERTISEMENT
Outfitting your boat is more than just using the right electronics
In this episode of northland outdoors, host chad koel rigs up a new boat. but high-end electronics aren't just the only thing you should pay attention to..

If you've spent time rigging up a boat with the latest electronics, it takes time. And you need to consider using the right equipment.
In this episode of Northland Outdoors, host Chad Koel outfits a new boat with the help of professional angler Bill Shimota, the owner of Stabil Mount, of Northfield, Minnesota.
"A boat is always wiggling around and its in the elements, it's a big thing too," Shimota said. "You gotta do 'em right. So if you don't, it won't last."

IMAGES
VIDEO
COMMENTS
The running rigging on a sailboat consists of all the lines used to hoist, lower, and control the sails and sailing equipment. These lines usually have different colors and patterns to easily identify their function and location on the vessel. Looking at the spaghetti of lines with different colors and patterns might get your head spinning.
The rig or rigging on a sailboat is a common term for two parts: The standing rigging consists of wires supporting the mast on a sailboat and reinforcing the spars from the force of the sails when sailing. The running rigging consists of the halyards, sheets, and lines we use to hoist, lower, operate, and control the sails on a sailboat.
The domain of rigging is an essential matter for the safety and good performance of your sailboat. Nowadays, the type of rigging is still evolving. Generally, rigging is depending on the type of sail used or the number of masts. As a basic rule, the replacement of the standing rig should be done every 10 years, except for multihulls or regattas, and rod or composite fiber rigging. A good set ...
5. Secure the mast using the appropriate rigging and fasteners. Attach the standing rigging, such as shrouds and stays, to the mast and the boat's hull. Fact: The mast of a sailboat is designed to withstand wind resistance and the tension of the rigging for stability and safe sailing. 2.
In part 3 of our series on sailboat parts, we dive into two types of rigging: standing rigging and running rigging. I use a 3D model and some diagrams to giv...
Gaff ketch - two-masted (mizzen), two mainsails, staysails, fore-and-aft rigged. Full-rigged ship or tall ship - three or more masts, mainsail on each mast, staysails, square-rigged. The first word is the shape and rigging of the mainsail. So this is the way the sail is attached to the mast.
A sailboat's standing rigging is generally built from wire rope, rod, or occasionally a super-strong synthetic fibered rope such as Dyneema ®, carbon fiber, kevlar or PBO. 1×19 316 grade stainless steel Wire Rope (1 group of 19 wires, very stiff with low stretch) is standard on most sailboats. Wire rope is sized/priced by its diameter which ...
Rigging Guides. Not sure how to rig your boat or looking to brush up on a certain part of your rigging? Check out these Rigging Guides with photos and tips for rigging a variety of small sailboats. Available as PDF downloads for ease of use.
Aug 14, 2015. It's one of the most important features on a sailboat, but many owners put standing rigging at the back of their minds when it comes time to do their pre-season safety checks. A prudent sailor should inspect his or her standing rig at least once each season and should know when the time comes to replace most or all of it.
A jib is used to improve handling and to increase sail area on a sailboat. This helps to increase speed. The jib gives control over the bow (front) of the ship, making it easier to maneuver the ship. The mainsail gives control over the stern of the ship. The jib is the headsail (frontsail) on a front-and-aft rig.
The running rigging is the rigging on a sailboat that's used to operate the sails. For example, the halyard, which is used to lower and heave the mainsail. The standing rigging is the rigging that is used to support the mast and sail plan. Standing Rigging. Here are the different parts that belong to the standing rigging:
Running rigging is the rigging of a sailing vessel that is used for raising, lowering, shaping and controlling the sails on a sailing vessel—as opposed to the standing rigging, which supports the mast and bowsprit. Running rigging varies between vessels that are rigged fore and aft and those that are square-rigged.
Short answer: rig sails Rig sails refer to the various types of sails used in sailing rigs. They include mainsails, jibs, spinnakers, genoas, and more. Rig sails play a crucial role in harnessing wind power to propel boats and are designed for different wind conditions and sailing purposes. How to Rig Sails: A Step-by-Step Guide.
Short answer running rigging on a sailboat: Running rigging refers to the ropes and lines used for controlling the sails and other movable parts on a sailboat. It includes halyards, sheets, braces, and control lines. Properly rigged running rigging is essential for efficient sail handling and maneuvering of the boat. Understanding Running Rigging on a
The rig should be tuned with the boat in the water on a day with little to no wind. You'll also want to be away from wakes and other boats that can rock your boat. To start, the turnbuckles for the stays and shrouds should be hand-tight only. This is sufficient to hold up the rig but places no strain on anything — yet.
Standing rigging comprises the fixed lines, wires, or rods, which support each mast or bowsprit on a sailing vessel and reinforce those spars against wind loads transferred from the sails. This term is used in contrast to running rigging , which represents the moveable elements of rigging which adjust the position and shape of the sails.
Standing rigging tension is a peculiarly under-addressed subject. Easy to see how it would worry a new boat owner or someone going to sea. Most experts step aboard, yank or twang the shrouds and stays and mutter, Pretty slack, Too Tight, or, Thats about right.
Rigging Traditional Sailing Ships. While rigging is a verb when referring to modern cargo and container ships, it becomes a noun when referencing traditional sailing ships. A vessel's rigging consists of the ropes, cables, and chains that support and control the masts and sails. Preparing these parts for a long voyage involves various tasks ...
Rigging comprises the system of ropes, cables and chains, which support and control a sailing ship or sail boat 's masts and sails. Standing rigging is the fixed rigging that supports masts including shrouds and stays. Running rigging is rigging which adjusts the position of the vessel's sails and spars including halyards, braces, sheets and vangs.
Sailboat Types There are many different types of boats for sailing, differentiated by three distinctive characteristics: Hull Type (monohull, catamaran or trimaran); Keel Type (fin keel, wing keel, bilge keel, daggerboard, or centerboard); Mast Configuration and Sails (sloop, fractional rig sloop, ketch, schooner, yawl, cutter, cat); Let's explore those different types in a little more detail.
A gaff rig employs a spar on the top of the sail and typically other sails can be set in conjunction with that mainsail with the gaff. Often, on the smaller, non tall ship, gaff rigs, there will be a small triangular sail that fits between the main and the mast like a puzzle piece - this is the topsail. The gaff rig was the standard manner of ...
Getting the boat close to the manlift is the key, so call around to find a similar solution near you. Norwalk Cove also gave us the run of their rigging shop, complete with 60-foot workbench pre-fitted with measuring tape and cutting tools at the ready.
If you've spent time rigging up a boat with the latest electronics, it takes time. And you need to consider using the right equipment. In this episode of Northland Outdoors, host Chad Koel outfits ...